Saturday, February 9, 2013

Not Your Average Chipmunk...

I don't often take video, but in the summer, when my little friend Charlie was coming to visit for peanut treats, I decided to document it by using the video camera on my iPhone.  You may be getting sick of hearing this, but Lightroom is amazing!  Today in Round Trip, I learned that you can very easily capture jpeg images from video you've shot.  That's how I got this wonderful series of me feeding and patting my little chipmunk friend.  

You might also enjoy an older post in which I've included a short video of my giving one of the chipmunks a bit of a back rub.  This particular chipmunk would come up on my lap to be patted even if I didn't have any peanuts for it.

It's quite amazing, but we've taught our Golden Retriever, Casey, to leave the chipmunks alone.  All I have to say if one comes up on the deck is, "Leave it Casey.  That's mom's friend." and Casey will just watch it and not bother it at all.  They have become so used to one another that the chipmunks will sometimes go up and sniff her paws while she's sleeping.  If she notices she just lifts her head and looks at them.

And it would seem that she can tell the difference between chipmunks and red squirrels (which can be very annoying and destructive) because she'll chase them away if they come on the deck.  She's one smart dog!

Friday, February 8, 2013

Polka Dot Letters and Words...

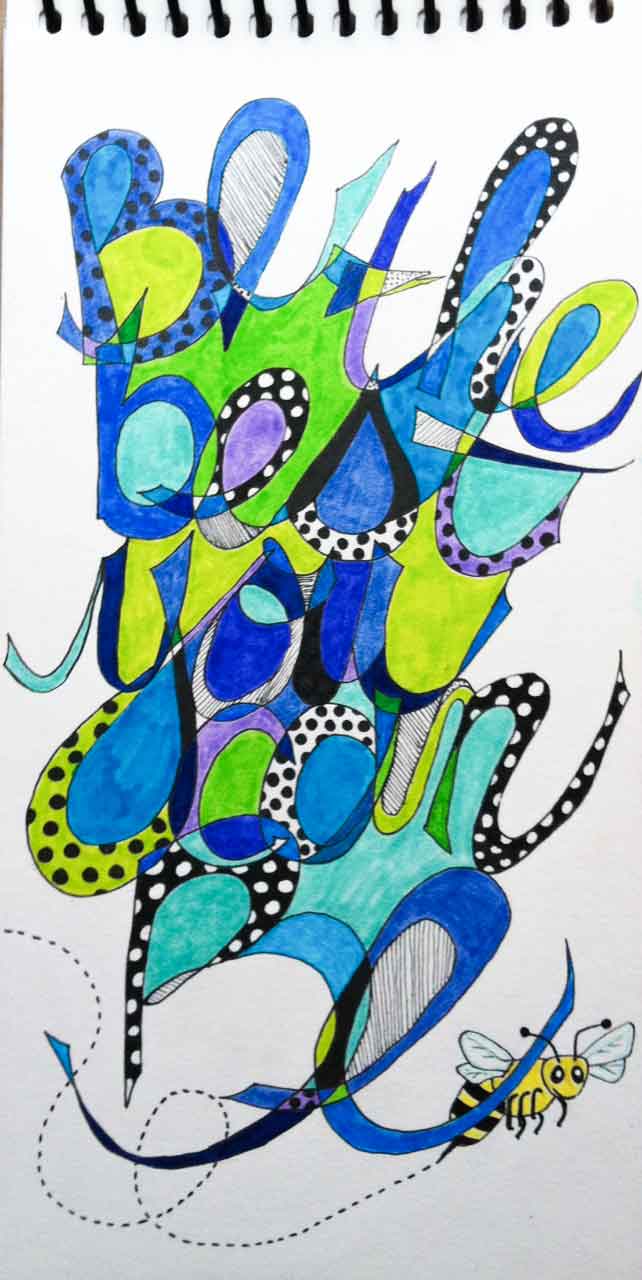
Here are a few of the fun pages I've been doing while taking Joanne Sharpe's latest online class, Letter Love 201.  It's a great way to get into an art trance and just doodle!

The word collage was done on an old dictionary page.  The coloured border/background is done with pan pastels.

The lettered page below, on the left, was just not popping for me, so I added some polka dots to all of the letters in my first and last name (I had to add an extra 't' because initially there was only one) and then I gave it a bit more of a colour pop too.

If you need something to pass the time, figure out where the extra letter was squeezed in on the second image.  It shouldn't be too hard since you already know it's a polka dotted 't'.


And finally this last piece for today...I think I'm getting a bit carried away with all the polka dots and the 'bee' is just way to cutesy for my usual style, but oh well...

As I look at the bee here, I don't think those little wings are going to support a bee that size. :o)

The jumbled letter piece was definitely my favourite of these three activities.  I can see some potential for variations on that idea.  I love the dimensionality of the layers of letters.


Thursday, February 7, 2013

Abstract Collage...

Bonnie's challenge this week in Photo Art Friday was to play with a couple of her textures and create an abstract image.  I decided to use some more of my 'pinhead kitty' shots from last weekend's shoot.  I could see using this as some funky wrapping paper. :o)

I played around with a few other filters in Elements and came up with these additional versions.  The first one reminds me of a chalk board.


Wednesday, February 6, 2013

It's a Matter of Point of View...

One of my goals this year is to learn more about photography and specifically about using my camera to it's full potential.  My top priority was to get out of 'auto' on my DSLR camera (and stay out!), which so far is going well.  I've also switched to shooting in 'raw' and I'm learning that it gives me a lot more wiggle room in Lightroom.

Today's photo collage is a study of point of view.  The subject is an fun little assemblage piece that I created a few years back at my friend Sandra's Open Studio.

The collage itself was created, literally in minutes, using the Print module in Lightroom 4.  If you've been considering it, you've got to go ahead and get Lightroom and then take Kim Klassen's Round Trip class.  You won't regret it!

Artful Snail Mail Delivery...

In these days of
e-everything, about all we get in the mailbox are bills or packages of things we've purchased online.  But, occasionally there is a special little treasure that arrives.

Last week I posted about a postcard I was making for a postcard swap over on the Artists in Blogland site.

Well, yesterday I got the most beautiful card in the mail from Morag Archer.  I just love the fabulous texture that she has achieved in the hair.
Morag is an incredibly talented artist, and you can see more of her work on her blog.

Thank you Morag!  I'm so glad to have a piece of your art.

Tuesday, February 5, 2013

A Pop of Colour...

Yesterday, while driving to my daughter-in-law's place, I passed this beautiful church and it immediately reminded me of Kim's challenge for this week's Texture Tuesday, 'a pop of colour'. Fortunately I had brought my camera along with me because I knew I'd be driving along country roads and I planned to get some barn shots on my way home, but when I saw this wonderful bright red door on the church I knew it was perfect for for the challenge.  I created the collage in Lightroom, and then added a subtle layer of Kim's texture, 'stamped' using a soft light blend mode to give it a cool, soft look. I used a layer mask and brushed the texture off of the white frame and sashing of the collage, as well as the red door so that the wonderful colour could 'pop'.

This photo is being linked to Our World Tuesday, Texture Tuesday and Sweet Shot Tuesday.

Monday, February 4, 2013

Forced Break...

I've been working on a monochromatic piece for our next GOE challenge and I'm at the machine quilting stage.  I went down to the kitchen to get a coffee, which I had planned to sip on while quilting, but when I returned to the studio I saw that Arbour, our cat, had other ideas. Obviously I couldn't quilt with her there, and I hated to disturb the spoiled brat... so I enjoyed a bit of a coffee break, checked my email, and just relaxed for a while before getting back to my quilting.  I did have to move her though because if left alone she would have likely slept there all day.

Arbour seems to have 'new bed' radar.  Any time there is anything new, whether it's in my studio or else where in the house (i.e., a freshly washed towel that hasn't been put away yet, or a new shirt my husband bought and left on the newel post to remind him to take it upstairs, etc.), if she perceives it to be comfortable  it becomes her new favourite sleeping place until it is moved or something newer shows up to replace it!

My husband Bill has been recently pointing out just how close the words pets and pest are...  (see my final comment in this previous post LOL)

Sunday, February 3, 2013

Artful Lettering and My January Art Journal Calendar

As some of you have long figured out, I've become a bit of a Joanne Sharpe junkie.  I enjoy her online classes and the inspiration they give me to make sure I'm doing some art every day.  

In addition to all of the machine work and hand stitching and beading I'm doing on my fibre art pieces, I've really come to love doing quick little pieces (as compared to weeks for some of the fibre pieces) of art in my journals.  And so, I am signed up for Letter Love 2...

Here are a couple of shots of the first day's play...sort of a title page for the class 'work' to come.  I had a funny sized journal (6" x 12"...not sure why I bought this size but...) so I decided to use it for this class.

And the page below is from the second lesson.  I love the transformation from the black and white version to the colour.  I used my Tombow markers and my water brush to add the colour. It would appear I like bright Towbows!  (Nothing monochromatic about this Leah! LOL).

This has me well caught up on my "TV listening" of all the shows I had PVR'ed for the last week.  Now I've got to get back to my sewing machine for a bit...
I've also included a shot of my January spread of my Art Journal Calendar.  Some of you questioned how much I'd be able to fit into those little circles.  Well, it turns out that with my tiny printing I was able to cover the highlights of my day without any difficulty. Keep in mind that the journal is a 9" x 12" book, so each 2 page spread is bigger than it might appear.
Until next time, stay inspired and make sure you make some time to play with your creative self!

Saturday, February 2, 2013

DOF Study: Pinhead Kitty

I'm working to get more comfortable with shooting using Aperture Priority on my camera and eventually moving into shooting in manual all the time.  My goal is to get out of (and stay out of) the auto setting for good!

In this shoot, I grabbed my crazy pin cushion* to play around with DOF (depth of field).  I love the great results I can get with my 50mm 1.8 lens.  So much fun...

*Several years ago my friends Heather, Doeteke and I were making these silly Halloween cats. I made my head, following the pattern, and when I held it up to the rest of the cat it was way too small.  Heather said it looked like a pin head, and that gave me the idea to make a pin cushion out of the little head.  I went ahead and redesigned a larger head for the Halloween cat (in hindsight it could have even been bigger...).  Anyway, when I got home, I used the little head to make the pin cushion and attached it to a tiny mason jar so that I could store extra pins inside the jar.  At first it was a bit creepy sticking pins in the cat's head, but I'm over it! :o)

Friday, February 1, 2013

Artists in Blogland Postcard Swap

I'm participating in a postcard swap with a group of wonderfully talented folks that are part of the Artists in Blogland community.  I have participated in postcard swaps before, and I had three postcards left from a swap back in 2011 that I wasn't very happy with.  You can see what they looked like here.  Being as I can't seem to throw too much out, I decided I'd make some 'green' postcards for this swap by reworking these old leftovers.

The first step was to rip and cut to remove the original fabric from the card.  (I had used some Texture Magic for the water part, so I couldn't just paint over it.)

Then I painted the outside 'frame' green and painted the remaining Fast 2 Fuse layer with blue acrylic paint.

Once that was dry I used a stencil and did the white spirals.  After a little more drying time I added the red using a scrap of corrugated cardboard.

A bit of yellow splatter was added as the next layer...

I wish I had taken a shot of my desk while all this was being done, because between these steps, while paint dried, I continued working through my on-line course where I'm learning how to use Lightroom 4.  At one point the cat was up here too... Let's just say that I'm amazed my laptop doesn't have paint footprints on the keyboard!
 Anyway, back to the postcards.  After again waiting for paint to dry (sounds exciting doesn't it!), I added a few bits of my homemade washi tape.

Then I stamped some Queen Anne's lace and a quote on to tissue paper and added that using matte medium.

The final step (for the front of the card) was to use some Golden Fibre Paste, which I tinted using black paint and a bird stencil I made last week to add the bird.  The fibre paste gives it a great bit of texture and allowed me to stick a bead into it (for the eye) so that it would be secure when the paste dried.

I'm please with the transformation and I like how the raised fabric and stitching on the edge creates a nice frame for the piece.

Because I make custom backs for my postcards, it was also necessary to paint over the original backing which had text about the original postcard and was dated 2011.  I added some stencil work and a bird and then used a Pitt pen to add my name and blog details for the recipients.  It's a bit busy, but what the h_ _ _! (...heck fits...what were you thinking?)