
I'm participating in a postcard swap with a group of wonderfully talented folks that are part of the
Artists in Blogland community. I have participated in postcard swaps before, and I had three postcards left from a swap back in 2011 that I wasn't very happy with. You can see what they looked like
here. Being as I can't seem to throw too much out, I decided I'd make some 'green' postcards for this swap by reworking these old leftovers.
The first step was to rip and cut to remove the original fabric from the card. (I had used some Texture Magic for the water part, so I couldn't just paint over it.)
Then I painted the outside 'frame' green and painted the remaining Fast 2 Fuse layer with blue acrylic paint.

Once that was dry I used a stencil and did the white spirals. After a little more drying time I added the red using a scrap of corrugated cardboard.
A bit of yellow splatter was added as the next layer...

I wish I had taken a shot of my desk while all this was being done, because between these steps, while paint dried, I continued working through my on-line course where I'm learning how to use Lightroom 4. At one point the cat was up here too... Let's just say that I'm amazed my laptop doesn't have paint footprints on the keyboard!
Anyway, back to the postcards. After again waiting for paint to dry (sounds exciting doesn't it!), I added a few bits of my homemade washi tape.
Then I stamped some Queen Anne's lace and a quote on to tissue paper and added that using matte medium.

The final step (for the front of the card) was to use some Golden Fibre Paste, which I tinted using black paint and a bird stencil I made last week to add the bird. The fibre paste gives it a great bit of texture and allowed me to stick a bead into it (for the eye) so that it would be secure when the paste dried.
I'm please with the transformation and I like how the raised fabric and stitching on the edge creates a nice frame for the piece.

Because I make custom backs for my postcards, it was also necessary to paint over the original backing which had text about the original postcard and was dated 2011. I added some stencil work and a bird and then used a Pitt pen to add my name and blog details for the recipients. It's a bit busy, but what the h_ _ _! (...heck fits...what were you thinking?)

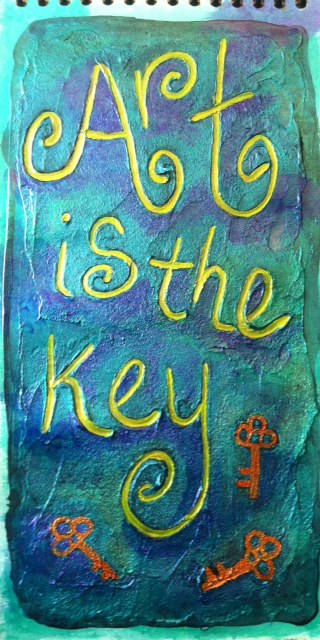 Sparked by another couple of lessons in Letter Love 201, I've been playing with texture in lettering. Joanne had suggested an idea using heavy body paint, but instead mixed some black gesso with Golden Fiber Paste and wrote in it while it was still wet. When it dried, I painted it using Silks Glazes. I love the way the Silks work on black! The close up gives a better view of the texture and depth of the lettering. I used a rubber stamp of a key to stamp into the wet paste and gesso, but it isn't as deep as the lettering.
 This piece is the favourite of a number of pieces I created using matte medium and Dylusions spray inks. I'll end up using them as embellishments on journal pages at some point.


