 After the large undertaking I took on for BJP 2012 (you can see the finished piece here, or in person at the Cultural Centre in Georgetown where it is currently hanging in an art display to celebrate the grand re-opening), I decided to scale things back slightly. I chose to use puzzle pieces approximately three inches square as my shape. I drew up a basic plan for the final overall picture, and each month I will complete the next piece of the puzzle, literally. This means that the journalling aspect has sort of gone by the way side, but since I'm keeping an art journalling calendar too, it will record the on-going events of my life as it unfolds over the course of the year. However, having said that, I have snuck in a bit of journalling because I wrote something down on the piece of stabilizer, using a Micron, before I started beading. I plan to record what I consider to be the most important event that transpired during the month (or at least the first 3 weeks of the month) as a secret journal entry that I will know is there, but others who look at the piece would never guess! So don't tell anyone, okay... I'd hate to think someone might take the beads off to see what was written underneath!
Wednesday, January 30, 2013
Bead Journal Project: January
After the large undertaking I took on for BJP 2012 (you can see the finished piece here, or in person at the Cultural Centre in Georgetown where it is currently hanging in an art display to celebrate the grand re-opening), I decided to scale things back slightly. I chose to use puzzle pieces approximately three inches square as my shape. I drew up a basic plan for the final overall picture, and each month I will complete the next piece of the puzzle, literally. This means that the journalling aspect has sort of gone by the way side, but since I'm keeping an art journalling calendar too, it will record the on-going events of my life as it unfolds over the course of the year. However, having said that, I have snuck in a bit of journalling because I wrote something down on the piece of stabilizer, using a Micron, before I started beading. I plan to record what I consider to be the most important event that transpired during the month (or at least the first 3 weeks of the month) as a secret journal entry that I will know is there, but others who look at the piece would never guess! So don't tell anyone, okay... I'd hate to think someone might take the beads off to see what was written underneath! Tuesday, January 29, 2013
An Odd Still Life...

I've been spending a lot of time in Lightroom these days, learning the ins and outs of the program thanks to Kim Klassen's Round Trip online course. The more time I spend in Lightroom, the more I'm loving it. My image files are finally getting organized in a logical way and I can find them within seconds instead of having to search through endless places on my hard drive, sometimes never finding the shot I was looking for...they were in a real mess! Once I finish adding keywords to all my archived photos (something I'll be working on a bit at a time over the next couple of weeks...or months) I will be able to find any shot with a few quick key strokes!
Today I've been experimenting with the 'develop' part of the program in which you can do some pretty amazing processing of your images and save presets of multi-step adjustments to be used over again. I've only been at it for a short time, but I am already loving the capabilities of this software! I can't wait until I actually know what I'm doing! It also works seamlessly with Photoshop Elements, so I can add textures, text, etc. and then pop back into Lightroom again to catalogue the finished image. So fabulous!
Today's image is a silly still life of an apple, an orange and a frog (I needed a third and the frog was within reach). I really never intended to do anything with the shots I took...I was just goofing around with taking raw images and doing some processing in Lightroom, but I kind of like the end result.
This photo is being linked to Our World Tuesday, Texture Tuesday, Sweet Shot Tuesday, Photo Art Friday and Orange You Glad It's Friday.
Monday, January 28, 2013
So...Now what?

I've been trying a few of the techniques, or variations of them, from Creative Jumpstart series. In this case, I started with a page that had a bit of paint on it from a day when I didn't want to waste the paint left on my brush. The page was actually like this for almost a year.
In addition to learning some new ideas, I've also pulled out a few materials that I have but haven't used for a long time. I started with a couple of Pearl Pens, in blue and copper. Their fine tips are great for drawing with the paint right out of the 'pen' (probably why they're called Pearl Pens). I drew a bunch of circles and some spirals ('cause that's just what I do...). I love the wonderful raised texture they give you when they dry.

I thought I'd add some stamping, but because of the raised edges, it can't easily be done. Enter that great tissue paper technique! Stamp on the cheap tissue and then adhere it to the page using gel medium. Very cool!
I also had some scraps of tissue paper on which I had hand written some text using a Micron pen, lying in my tissue paper bin so I added them too.
But, as you can see it needs more...
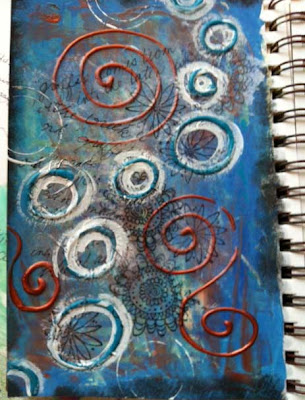 So I got out some white acrylic paint and a fine paint brush and I added some white around those raised blue circles. Then, just because it was lying on my desk I picked up an empty tape spool and stamped it in the paint and added a few more circle with it. I like the double concentric circles I get with this particular spool.
But, I think it still needs more...


But, as you can see it needs more...
 So I got out some white acrylic paint and a fine paint brush and I added some white around those raised blue circles. Then, just because it was lying on my desk I picked up an empty tape spool and stamped it in the paint and added a few more circle with it. I like the double concentric circles I get with this particular spool.
 But, I think it still needs more...

I got out the black paint and added some 'shadows'. And then I stared at the page for a while and finally asked myself,
"So... Now what? And then it came to me...

Sometimes you just have to go with the obvious. It's not a work of art, but it certainly was a great way to try out some new ideas.
Saturday, January 26, 2013
A Photo Shoot and Timeline...

This week in the first Beyond Beyond post, Kim challenged us to do a photo shoot in which we set up a still life and then moved around to take shots from various angles. The other day, I found our cat Arbour sleeping on a pile of quilts that were left on top of the antique sewing machine at the top of the stairs. So...
It wasn't long before she was watching me and following the camera. She didn't look too please that I had disturbed her nap, but I kept shooting.
When it came time to figure out how to present a select few of the shots, I remembered a timeline lesson that Kim had taught us in Beyond Layers, which I have been meaning to try but so far hadn't done. I had to figure out a few things since I put my own spin on it by using photos along with thought bubbles in place of Kim's text boxes. It was fun interpreting Arbour's thoughts from some of the looks she was giving me during the shoot.
Friday, January 25, 2013
Organizing the Archives

This morning, I came across this picture of Spencer, our little basket baby. Spencer was a 'free' kitten (and then came the vet bills for shots, etc. LOL), picked up at the Bait and Tackle shop in Magnetawan (near our cottage). He just loved this tiny basket (not sure how big it was, but certainly a lot smaller that a standard 6 qt basket).
Spencer became known as our 'puppy cat' because he followed our dog around everywhere and behaved much more like a dog than like our other cat. He'd even run to answer the door! Sadly, he got sick and passed away when he was only six yrs. old. Thank goodness for photos and these happy trips down memory lane!
Tuesday, January 22, 2013
Idleness...

I took this shot a couple of years ago, but since I've been organizing my images in Lightroom 4 (got that for my birthday too!) I came across it and just had to use it along with this quote. I found the quote while working on a fibre art piece that uses my rust dyed fabrics.
 |
| original image |
These photos are being linked to Our World Tuesday, Texture Tuesday, Sweet Shot Tuesday, and Photo Art Friday.
Monday, January 21, 2013
And Then It Popped...

Yesterday I showed you another watercolour paint doodle I was working on and today I got out my Microns and Pitt pens and added some black doodling over the paint.
I just love how it makes it pop. I've also added some additional dimension using my Inktense pencils to add some shading and highlights here and there.
The final step was to add the words and since the image ended up reminding me of a garden path, that lead to the words I chose. In hindsight, I wish I had written the text in larger, bolder letters, but what's done is done.
If you look at the close ups, you'll also see that I added some text, using a Micron 01 between the leave and petals on the right hand page too.

It was fun drawing the little pebble circles within the larger circles. I love doing that when I free motion stitch so I decided to add it in my doodle too.
The photos don't really show it, but I love the contrast between the regular watercolours and the Twinkling H2Os. It just give a bit of glimmer and pop to some areas.
Thanks for your visit. I don't say it enough, but I really appreciate you taking the time to stop by! Have a fabulous week!

Sunday, January 20, 2013
More Watercolour Doodling

For those of you familiar with Joanne Sharpe's 'Color Love' class, this is lesson 11, so the next step will be getting out my Pitt pens and Inktense so that I can doodle over the doodles with fine black lines and add another level of depth with the Inktense. I love the idea of adding the layers...
But, it's 4 degrees C here today (that's 39F for my US friends), which is crazy for mid-January, so I'm off for a long, lazy walk with my 'little old lady', Casey (my 12 1/2 yr. old Golden). I'll post another shot of this when I get the next step finished.
Saturday, January 19, 2013
Work in Progress

I started by machine needle felting hand dyed scraps of batting with various layers of rovings, hand dyed cheese cloth, yarns and other bits and pieces of fibres. I've added a lot of hand stitching as well as free motion machine work on top. I'm now adding some beading and a whimsical little surprise embellishment. I've been working on this piece, off and on, for two and a half years. I've never considered it a UFO though. It's always been on my mind and sometimes just had to rest for a while as I considered possible next steps.
Wednesday, January 16, 2013
What Do You Do...
 What do you do while listening to TV? Since I started hand stitching and beading, I've stopped watching much TV, but I listen to it a fair bit. If I have beading or stitching to do I take it to the family room so I can be entertained while I work. I sometimes wonder if I should be taking advantage of the programs that have described video for the visually impaired so that I wouldn't miss anything. I must say, I do quite well to follow the movies and shows I 'watch' though. When my husband is watching with me he'll sometimes ask if I saw this or that (I think it drives him a little crazy that I don't watch more attentively :o) but what can I do...) Since we have a PVR device, if I did miss it he'll back it up so I can see it. However, if I'm 'watching' alone, I have no idea what I might have missed so it's all good.
Lately, while I've been 'watching' TV I've been doing kazillions of running stitches. My spell checker is questioning the word kazillion, but you get the idea.
Almost two years ago, I posted about this wonderful piece of silk that a generous friend gave to me ;O). Thanks Heather!
I started by outlining shapes of colour and then filling them with running stitch, but it kept getting set aside for other hand stitching and beading that needed to get done.

Tuesday, January 15, 2013
Watercolour Paint Doodles
 As you may know from reading some of my previous posts, I am taking Joanne Sharpe's Color Love 101 online class. In the last couple of days I've been exploring the whole idea of doodling with a paint brush and watercolours. I discovered very quickly that I am way out of my comfort zone on this activity!
 I started with a cool colour palette since I love working with blues and greens. I added a bit of yellow to warm it up some and give it a bit more of a pop, but it's certainly not great. However, that was just my first attempt...
 My second try was with a warmer palette, bringing in reds, pinks, and oranges, but still using the green for some contrast. I think that my lines are too 'up tight'. Somehow I need to relax so I can get a more easy flow to my lines. Of course, if I truly learned to relax I wouldn't be me, now would I ;o)
You'll notice I included my favourite spiral lines...

 As a complete aside, I had this background done on a page from many months ago, and I recently saw this wonderful quote by Mark Twain so I used my correction pen and wrote it out so I wouldn't forget it.
Monday, January 14, 2013
You Can Do Anything...

Kim's challenge in Beyond Layers today is to use her sample photo of tulips on a black background and process it any way we want. We'll then link up and compare what we've all done.
 |
| Kim's original image |

Final Touches on the June Art Journalling Calendar
 A couple of days ago I showed you the spread for June, in an almost finished state, and explained a little about my process.
Since then, a few finishing touches were added, including writing in the ordinal number words for each of the dates and using Tombow markers to colour the top band on the journalling boxes. I also put in a row of tiny black dots to separate the coloured bar from the area that I will eventually journal in. I then added three silhouettes of birds and wrote in Happy Birthday Lucas, for my son, on the 23rd.

Sunday, January 13, 2013
Making Stencils
Since I've been doing more art journalling lately, and watching the videos that are part of Creative Jumpstart 20113, I've become more interested in using stencils in some of my work. In addition to buying some fun stencils, I decided to use some of the template plastic I had in my studio (and seldom use...) to make a few basic stencils of my own.
 I used a cutting mat, an exacto knife, a fine Sharpie marker and some scrap paper. I found that with the lined template plastic and the marks on the cutting mat it was really hard to see what I was doing so by using a scrap of plain paper under the plastic I could see better. You could also draw your design on the paper first if you wanted, but I drew right on the plastic with the Sharpie.
 For the stencil shown here, I used a mug to trace a circle and then just used the lines on the plastic and cut away every second little strip to create a stripped circle stencil.
This one is very simple and will just give me some straight lines and the final one is my version of what I think of as 'cottage signs'...those wonderful signs that you see on the dirt roads in cottage country directing you to all of the various cottages. I guess it would be good for distance markers too.

I know I'll still buy stencils I see and fall in love with, but it's also nice to be able to make some simple ones, especially onces with straight lines that are easy to cut, so that I have some which are uniquely my own.
Saturday, January 12, 2013
June Art Journal Calendar Spread

It's been a while since I did any art journalling, so last night I got out the paints, some stencils and other 'tools' and had a little fun. This first image shows what I have done so far, with the little Post-It note squares (I cut them down to about 1.7") that I used as masks. The word June and the numbers are Tim Holtz masks.

*I just couldn't let it go...enquiring minds...so I did some research and finally found out that these things are inserts for ammo cases. I'm so glad I found a better use for it!

I still plan to do some black pen work to the page, although I'm not entirely sure what I'll do... I certainly have to add numbers to the journalling squares and I might outline the letters and numbers...I'll post again when it's finished.

Thursday, January 10, 2013
Enjoy a Moment...

Kim's challenge today in Beyond Layers was for us to take a photo that included a coffee cup, books and some other object. Does anyone out there recognize what the blue disks are that are strung on an old shoe lace?
The books are old Ontario Public School books from the early 1900s. The brown one makes me chuckle because it's all about hygiene!
 The photo has a couple of Kim's textures layered over it. They're called chaos and calamity, which is ironic since the photo gives me a very peaceful sense of calm...
I've included the 'before' pic so you can see what I started with.
BTW, the blue disks are Canada Rations disks for meat from the WWII era.
Rust Dyeing

About a year ago, I read about rust dyeing and thought if would be fun to try. I started carrying plastic bags in my bike's pannier, so I could collect the interesting bits of rusted metal that I'd see in my travels. As a side note, there is a relatively large (about 14"-16" diameter) round 'thing' that seems to fall off of large trucks on a frequent basis!
I dyed one piece of fabric with some of my rusty bits and loved the result, but as with so many things, it got set aside and nothing ever came of it.
 Then, last week I got an idea for an art quilt, partly in response to a call for entry that I read about in the SAQA newsletter, and I got out my collection of rusty metal and dyed some more fabric.
 I just love the fun of opening up the piece after a couple of days and seeing what surprises it holds. You have to check both sides because the results look different from each side and you therefore have a couple of choices as to which parts you will use in your art piece.
 If you're interested in trying this, you just need some rusty bits of metal that you've scrounged up from somewhere, fabric, water and some white vinegar. The acid in the vinegar speeds up the rusting.
 Use relatively small pieces of fabric (fat quarter sized or there abouts) because if the fabric is too big you won't get the interesting designs on large parts of it.
I wrap the piece of metal in the fabric, put it into a plastic bin and then pour a 50/50 mix of water and vinegar over it to wet the fabric. Let that sit for at least 24 hours. You can check it to see how it's looking and then decide if you want to leave it longer.
Take out the fabric and rinse it well. I continue rinsing until the water runs clear, and then I wash it in the washing machine to make sure I've got all of the residue out.
Keep the rusty pieces of metal because you can use them again. I just put them on top of another piece of fabric (which will get rust marks on it too! bonus!) and store them in a plastic bin until I need them again.
I wasn't sure about the long term effect on the fabric, but in last weeks episode of DMTV, Linda Kemshall was also talking about rust dyeing and she mentioned having a cushion that she made ten years ago using rust dyed fabric and it was no worse for wear.
Tuesday, January 8, 2013
Butterfly Transitions
 The other day I gave you a sneak peek of this piece, in which I showed you some of the quilting from the back, as well as providing a link to the original photograph.
Since then, I've spent a few hours working hard to get the background machine quilted. When that was finished I made a whole lot of French knots to add some additional texture to the dupioni silk that is the background of this piece.
And, here it is, finished and mounted over a stretched canvas. I'm very happy with how it turned out, and wish that the photo did it justice.
Below are a couple of detail shots. This finishes a fifth UFO. I am so glad Tracey gave us the challenge that she did because I've really been tidying up a lot of outstanding pieces. I still have four other UFOs to finish plus the three new pieces that I have in the works, all of which I started in the last month.
It's funny to think that when I first started to quilt in 1999 I did one quilt, from beginning to end, before I started another project. Now, I can't imagine staying that focused on one thing! Add in my art journalling and photography and I just have to laugh...


Sunday, January 6, 2013
From Photograph to Art Quilt...a sneak peek...

I loved the colours in the altered photo so much that I wanted to use it in an art quilt. I transfered the photo to fabric, went through my stash of fabrics and selected a number of pieces that I thought would work with it, sketched out a couple of ideas on paper, and then got busy with other things...
Finally, in October I got back to it and actually started working with the fabric and the image. I wasn't happy with what I was coming up with, so again it was put aside so I could let my ideas 'simmer'. Then came Tracey's GOE challenge for us to finish a UFO...which I turned into a personal challenge to try to finish all of my UFOs (or at least as many as I possibly could). I've been working at the quilting of this piece for a few hours today, so I thought I'd give you a little sneak peak. It still needs a lot more machine work and then some hand stitching, but I'm hoping to have it done by Wednesday evening, when our little group meets.
Saturday, January 5, 2013
Artful Random Act of Kindness Tags

The other day I, after watching one of the Creative Jump Start videos, I pulled out some tags, spray inks and stencils and played around a bit.

Then I wondered what I would do with these little pieces of art and after thinking about it for a bit I decided to use them to make little RAK tags. I continued to decorate them by adding some acrylic paint and when I liked how they looked I printed up some labels to stick to the back and added tassels.

Over the next few days, my plan is to give them out as I do some RAKs for people around town, and hopefully they will continue to make the rounds.
Wouldn't it be amazing if one found it's way back to me eventually?
Thursday, January 3, 2013
The Beautiful Towel
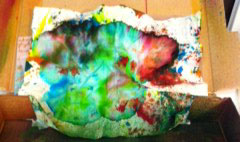 This week for Photo Art Friday, Bonnie has challenged us to create a piece of photo art showcasing our guiding word for 2013.
I've already shared my word in a previous post in which I was creating a journal page, and before that, in a photo post in which I explain my reasons behind it. But this afternoon, as I was starting to do some backgrounds on a few tags using spray inks and stencils, my wipe up paper towel became so beautifully colourful that it inspired me to photograph it and play around with it in Photoshop. After doing some minor adjustments I added my word, put a bevelled edge on the outside and here it is:

This paper towel may find itself in some other project too. I see some stitching in it's future...
Subscribe to:
Posts (Atom)