Monday, December 30, 2013

Beginning a New Piece With Silks...

I've been wanting to get my embellisher out for a while, and I finally found some time. I'm starting a new piece in which I'm using dupioni silk and I have plans for lots of fun hand stitch.  I just love that richness of the silk, and these colours are really speaking to me right now!

 I'm using my embellisher (I have a 12 needle Babylock).  One of the things I love about the 12 needle is that even if I break a needle, I can keep working without having to replace it for a while because I still have lots of needles working for me.  Yes, this has happened a few times. LOL


I'm also thinking about couching down some twisted strands of silk to add more dimension and interest.  So far, those pieces are just lying on top, being auditioned, but I'm liking how they look.  I'm excited about having a new 'hand project' on the go so I have something to do while listening to TV!

Thanks for dropping by today!

Friday, December 27, 2013

'Celebrate Who You Are' is finished!

A couple of weeks ago I was playing with a product called DeColourant, as well as exploring a technique for adding text to a quilt which I picked up from Laura Kemshall.  You can read about that here.  I went on to add machine stitch to that little quiltlet, which you can see here.

Today I'm ready to share the finished art quilt with you. I created a separate slightly larger quilt, on which I mounted the 'quiltlet'.  I then added a few little elements to each side, which I fused in place and then used hand stitch to embellish them further.  A bit of hand stitch was also added to the top left and bottom right corners and then button stitch around the edges to create a binding.

I'm really happy with how it turned out, and I must say I love the way the initial piece of hand dyed fabric informed my choices for the background colours.  I don't think I would have thought of using that rusty tan colour with purple, but I really love how it all works together.


Thanks so much for visiting today.  It's always such an honour to have you visit, and I love reading your comments!  

Wednesday, December 25, 2013

Merry Christmas...


Those flashing Christmas lights are especially meaningful today.  As a result of the big ice storm, we were without power for over 70 hours, so we're thrilled to have it back in time for Christmas!  It came back on yesterday evening, so we did have to postpone our family Christmas Eve (we always host my whole family for Christmas on Christmas Eve...a German tradition...which will now take place this weekend instead), but Christmas Day festivities with our immediate family are back on for today!

I hope you and yours are having a great, warm day too!

Monday, December 23, 2013

Holidays Greetings and a Promised Reveal...


Merry Christmas and Happy Holidays to all! Whether you celebrate Christmas, or other festivals of light, either now or at other times of the year, I hope you are enjoying time with family and friends this week and also taking time to be good to yourselves!


As promised, I am sharing the finished the little art quilt, titled "Heartfelt Celebrations", which I started last week. If you're interested, you can see the process I used to make the heart itself in this post here.  I will be sending this little 10" x 7" art quilt to the SAQA 2014 ANNIVERSARY TRUNK SHOW.


To create the background I used the same treated muslin as described in the earlier post.  I then used Neocolor II to create patches of various blues and greens.  I continued layering, using some oil sticks.  I recently discovered Kama Pigment Sticks and I really like how they go on the fabric, as well as some of the fabulous colours they have.

Black text was added using a Traci Bautista Graffiti Glam stamp with StazOn ink.  The remnants of the light blue background, from when I originally made the heart, were torn into thin strips and then machine doodled into place using the same tiny circles, and leaving the frayed edges loose. The final step was to add a bit of black acrylic paint in areas around the edges, as well as under the narrow strips and parts of the heart to create the shadow. And of course, it needed a few dots...alway need a few dots ;o)

I had a lot of fun layering the various elements to create this piece!  This may lead to a bit of a series...


Friday, December 20, 2013

Christmas Lights...

Last weekend, we ended up with a lot of snow, and although I'm not a really big fan of the white stuff, it does make for some really pretty photography, especially when the trees and bushes are decorated for Christmas.

This is the same cedar tree, shot with and without the flash.  I love how the flash captured the falling snow, but the shot without the flash gives more depth and colour to the lights.


In these shots, I love how the colour glows through the deep snow...later, the bit of heat from the bulbs caused the snow to melt away leaving interesting holes.


Thursday, December 19, 2013

I'm Featured on StencilGirl Talk Today...

Today, over on StencilGirl Talk, I sharing the beginnings of a new art quilt I have in the works. Here's a little sneak peek...I hope you'll pop on over and see what I'm up to.

Thanks for checking in today!
.

Wednesday, December 18, 2013

Machine Doodling 'Celebrate Who You Are'...

Last Friday I posted about how I created the beginnings of this piece which I've called 'Celebrate Who You Are'. Today I want to show you the next steps in this on-going 'work in progress'.

Using an off white thread, I stitched the lines from Sue Pelletier's Loose Woman #1 stencil over the image on the fabric.  I intentionally used a very loose stitch line, going over each line two or three times, to create a very 'imperfect' doodled line in keeping with the text on the piece.
 I outlined the text boxes and loosely traced over the text.


Here are some close up images of various parts:


And the finished focal piece in it's entirety.  I plan to mount this element onto another quilted piece, and then add some hand stitch and maybe some beading.  Hopefully I'll be able to show you the finished piece in the near future!

Monday, December 16, 2013

Playtime...


Yup, I just had to play with captions this week.  Needless to say, Casey and Dime are really enjoying one another!  And when the play is done they catch a few zzz's together too!


Friday, December 13, 2013

A StencilGirl Blog Hop Featuring Sue Pelletier's Designs...

I'm back today, playing along in another StencilGirl blog hop, this time featuring the designs of Sue Pelletier.  I love Sue's whimsical designs and today I'm using her Loose Woman #1 stencil.  I decided to experiment with a technique that's been on my 'to do' list for some time...using deColourant, a product created to remove pigment from fabric.  


I started with a wonderfully colourful piece of my hand dyed fabric.  After laying the stencil over the fabric I sprayed the deColourant over the entire image. Following the directions on the spray bottle, I waited until it had dried completely (I'm not good at this waiting part, but it specifically says to let it air dry so I had no choice!).

Once the deColourant was completely dry, I used a steam iron and ironed the fabric, watching the magic as the colour left, leaving behind Sue's fabulous Loose Woman image!

I then used an idea I got from Laura Kemshall.  I printed the text I wanted to add to the piece, added a piece of freezer paper over top and then used a craft knife to cut the text out, leaving behind the stencil of the words.

The freezer paper stencils were ironed onto the fabric and I then used a white Shiva paintstik and my finger to apply the paint.


As you can see, I put paint in the letters and also around the outer edge of the mini word stencils so that I could highlight the shape of the word 'blocks'.


When the freezer paper was carefully removed, the text and those block shapes were left! The next step in this work in progress will be to add some machine stitch.  I hope you'll come back next Wednesday when I'll be posting about the machine doodling/stitching that I plan to add.  Until then, enjoy the rest of the blog hop (more details below) and have a fabulous weekend!


Great news...StencilGirl has a giveaway! 
All comments left on the hop are eligible for the giveaway so 
the more blogs you comment on, the more chances you will have to win. 
Have fun and GOOD LUCK!

The giveaway will close on Monday, December 16th at 11:59PM Central Time. 


Blog Hop Order:

Linda Kittmer-you are here!
Kirsten Reed-YOUR NEXT STOP


Wednesday, December 11, 2013

Self Portrait Cubed...a StencilGirl / Sizzix Blog Hop

Have you heard of the new ATBs?  That stands for Artist Trading Blocks and I've been invited to play along in another fun blog hop, this time using StencilGirls stencils and the latest Sizzix die cuts (dies will be available soon).  You can also see more about ATBs on the Artist on the Block website here and Facebook page here.

Unlike tags and ATC’s, Artist Trading Blocks allow you to create in 3-D!  

Let's get started: Using the blank die cuts, I masked of sections so I could spray Dylusions ink onto one 'face' of the cube at a time.  I ended up starting with a make-shift stencil which is actually the bottom of a little strawberry basket from the supermarket (saved from the summer!)


As you can see, I used six different bright colours of Dylusions sprays.
The added bonus is some great over spray that I'll find some other use for, as well as the beginnings of a journal page in which I blotted off the excess stray left on the back of the stencil!
The next step was to use a variety of StencilGirl stencils (I used Eddy Rose 6, Swatton Grid, Mimosa 6, Gears, Greek Key and Bubbles) and over spraying with a different colour.

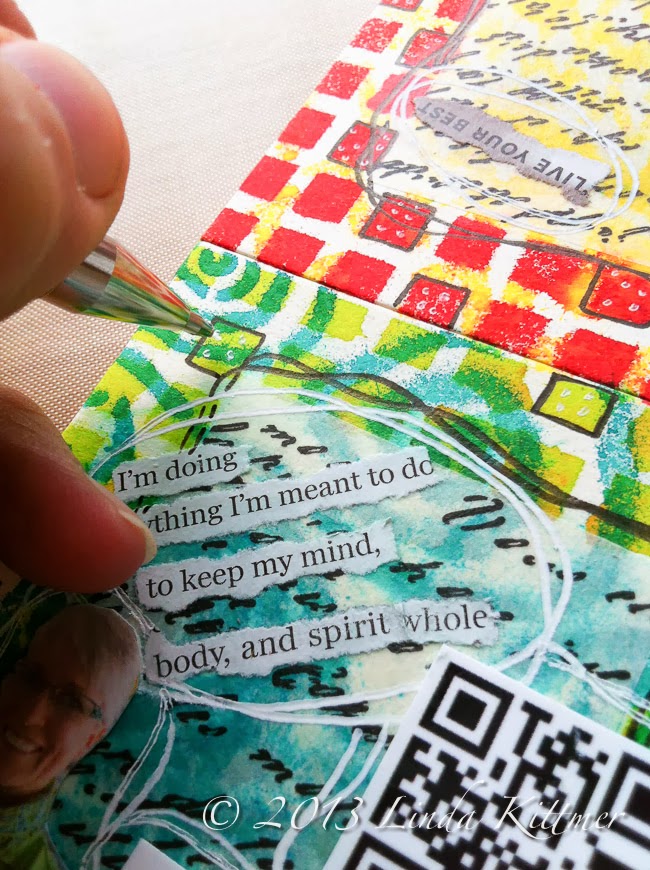
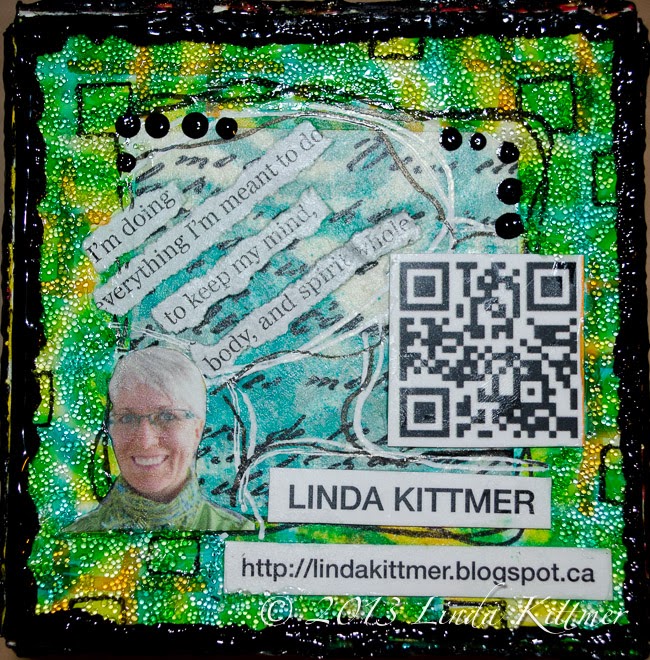
A while back I found some wonderful tissue paper that has script on it.  I cut pieces out to fit into the centre square on each 'face' and used mat medium to adhere it. I like how it lets the stencilled pattern show through!

Since my idea was to create a self portrait, I went through an old magazine to find text that would allow me to create messages that are meaningful to me.

Then I added some doodles using a black Micron, a white Signo, and various colours of paint pen.

I love texture, both visual and tactile, and one of my favourite ways to achieve it is with Glass Bead Gel.  It goes on somewhat white, but dries clear, leaving wonderful clear glass beads that allow the colours underneath to shine through.  It's best applied with a palette knife.


For obvious reasons, the top of "Self Portrait Cubed" includes my name, picture, Q code and blog address, which I cut out of one of my business cards.  The final addition was a line of Pearl Paint around the edge of each of the sides.


Here are close up images of each of the six sides:


StencilGirl and Sizzix will both be giving away prizes! All comments left on the hop are eligible for the giveaways so the more blogs you comment on, the more chances you will have to win. Have fun and GOOD LUCK!

The giveaway will close on Friday, December 13th at 11:59PM Central Time. 


Blog Hop Order:
Linda Kittmer-YOU ARE HERE!
Leslie Tucker Jenison-YOUR NEXT STOP