Showing posts with label digitally altered photo. Show all posts

Monday, December 15, 2014

Graffiti Piece Finished!

In my last post (here) I showed the photograph inspiration for this piece, commemorating my first Future Dog Guide puppy, Dime. Thanks to some very tired puppies, I found more studio time and managed to get this piece in my Graffiti series done!


I free motion stitched the bricks using a cream thread before adding the letters to make up Dime's name.


As with the first in the series, I carried some of the brick and paint elements over the side so they would add interest to the sides of the canvas.  You can see that in the next two images.


And finally...the puppy wall...I can't wait to foster more puppies and keep adding to this commemorative wall!


Monday, December 8, 2014

Dime Graffiti Has Been Started...

Another busy weekend has just passed, but I did manage to fit in a bit of time in the studio to start my Dime piece in my graffiti series. I did the first piece (see post here) with Yoshi, my current Future Dog Guide puppy, as the subject and I liked it so much that I've decided to make a keepsake piece for each of the puppies I foster.  That of course meant I had to go back and do one for Dime, my first foster puppy.

This is one of my favourite pictures of Dime, so I had to incorporate it in the piece.  I imported it into Photoshop and started having fun! 


Once digitally altered, printed and transferred onto fabric, I pulled out some of the new acrylic paints from the DecoArt Media samples that were recently sent to me, and I started adding elements with various found objects, stencils, and a small paint brush to add to the digitally altered image I had created.

Hopefully I'll find time in the next few days to get to the sewing machine to add some stitch.

And for those interested...puppy update...

(L - R) Shamus, Gracie and Yoshi, all Future Dog Guides

This weekend Yoshi and I babysat Gracie for another foster family.  While she was staying with us, we participated in two more Santa Claus parades, one Saturday afternoon, and the other on Sunday evening.  

Fortunately the parade in the afternoon and a long evening walk tired the girls out enough to give me some studio time Saturday night.

Yoshi (7 mths) in back, with Gracie (5 mths)


It sure is fun having a puppy friend for a sleep over! Yoshi and Gracie had some wonderful 'bitey face' sessions and really enjoyed running around the yard together.


Wednesday, November 20, 2013

Shadows Revealed...

I'm happy to say that "Shadows" is finally finished!

Here are a couple of close ups that show the hand and machine stitching in a little more detail:

I have another photograph that I am thinking about doing in a similar way...this could be the beginning of a small series.  Time will tell.

Friday, March 22, 2013

Rusty WIP

Here's a look at the basic layout of the rust piece I'm working on.  I love the rust dyed fabric, but it is really hard on machine needles!  I've got some plans for the larger black areas, although this photo doesn't show the rust in them.  The close up below gives you a better indication of the wonderful colour and texture that is showing on the black.  It almost looks like old leather.  Really cool!

Thursday, March 21, 2013

Photo Art Meets Journalling

Bonnie's challenge this week for Photo Art Friday is 'self portrait' so I decided to combine some digital photo work with some hands on art journalling to create this spread. I started with a very low res. image that included me in a group shot that someone had posted on Facebook.  I printed it at the size I wanted to work in, and used it to trace the key shapes (head, eyes, nose, mouth, glasses).  I then used various media including Inktense pencils, Neocolor II watersoluable wax pastels, pan pastels, acrylic paint, black Pitt pen, and white Signo pen to recreate my face as well as the background and journalling on the facing page of the spread.

I took a photograph of the finished journal spread back into Photoshop Elements where I did a minor level adjustment and then place it onto Bonnie's 'inspiration' texture.

Tuesday, March 19, 2013

Starting to Plan...

Back in January, I did some rust dyeing and talked a little about the 'how to' of it all.  Well it's time to get all those fabrics out and start planning the art quilt for which they were made.   

I'm planning to use text on this quilt, as well as a photograph which I took and digitally altered to include a quote.  

There are so many ideas floating around in my head.  Now I just need to harness some of them and get started with the actual piecing...


Monday, March 18, 2013

Water and Ice...


I took this photo a few weeks ago while exploring along the Bruce trail.  It was a mild winter day, and the textures in the ice and the water were stunning.  I did a couple of very minor adjustments to the levels and contrast and then I added a subtle gradient mask to get a bit more of the sparkle back in the water without loosing the definition in the ice.

I added a layer of Kim Klassens "cool grunge' texture using a hard light blend mode at 15% and then finished off by creating a soft frame using an inverse selection and adding a colour adjustment at a low opacity with a soft light blend mode.

The final steps to the edit were to add the quote and my signature.  The quote uses 'Journal' font.

As much as I like the beauty of the ice and snow, I look forward to images of Spring, hopefully in the very near future!

Linking up with Our World TuesdayTexture Tuesday, and Sweet Shot Tuesday

Thursday, March 14, 2013

Remembering Oatie...


I made a special fibre postcard in honour of Oatis, a four year old miniature schnauzer that recently died because of a tragic misdiagnosis.  My friend, Donna and her husband were devastated by the loss of this little fur person, and this is just a little token to let them know that I'm thinking of them.

I altered this image in Lightroom and Photoshop to create the image for the postcard.


Some might say that he was "just a dog", but I get it Donna!


Linking up with Photo Art Friday for Bonnie's 'portrait' theme.

Thursday, March 7, 2013

This Is One Crazy Chicken!

Bonnie's challenge this week for Photo Art Friday was to do an abstract image and I had a lot of fun playing with a photo of a chicken that I shot back in the summer.  Happily I can say that I also learned something new in Photoshop Elements while doing it!

Mouse over photo to see the 'before' image.

The first step was to extend the area to the left of the chicken so that I'd have enough room for the text so I copied the left part of the image and flipped it horizontally before using the clone stamp to draw in the extra parts of the chicken wire to create the three triangular 'thingies'.  I then played around with the blend mode so that I could change up the colours to make it a more fun, graphic image.  Unfortunately, I did so many things to the image, in a trial and error sort of way, that I don't know everything that I actually ended up doing.  Suffice it to say I had a lot of fun playing.

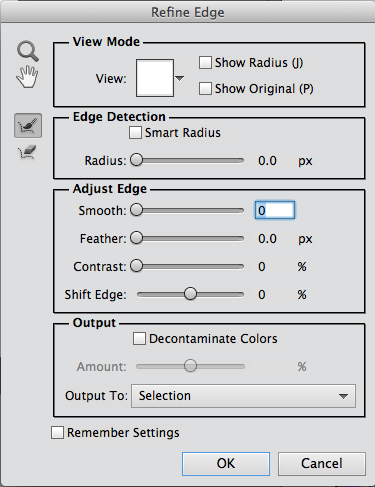
I drew in some extra 'hair' to augment the already funky head feathers that she had, and then I found a woman's face on the Internet by doing a Google search for 'blue eye'.  This is where I learned something new.  When I used the elliptical marquee tool, I discovered that you can click on a box that says 'refine edge' and the dialogue box to the right opens up.  From there I was able to feather the edge and adjust the edge detection so that it actually selected a more precise shape around the eye than what I had originally captured with the elliptical marquee tool.  In the 'output to:" section I could choose to make the eye selection a new layer and then I just had to move it into place.

Once she had that funky hair and her new and improved eye, I just had to give her a nose job too!  I found a clip art nose, which I had to flip horizontally so that it was pointing in the right direction.  The next step was to pop in Bonnie's PDPA Faded Fresco texture.  I decided to move it into the background and use it as a frame.  I rotated the chicken image slightly and then used the eraser tool to remove some of the image along the outer edges so that it wasn't such a stark square and it fit better into the 'frame' in Bonnie's texture.

I said a few weeks ago that abstracts are not my thing, but I had a lot of fun with this!  The best part was not having any preconceived notions when I started.  One thing just led to the next and the further I got into it, the sillier it became.

Thursday, February 7, 2013

Abstract Collage...

Bonnie's challenge this week in Photo Art Friday was to play with a couple of her textures and create an abstract image.  I decided to use some more of my 'pinhead kitty' shots from last weekend's shoot.  I could see using this as some funky wrapping paper. :o)

I played around with a few other filters in Elements and came up with these additional versions.  The first one reminds me of a chalk board.


Tuesday, January 22, 2013

Idleness...

It's been a while since I've posted any photo art, and since I got PSE11 (upgraded from 9) last week for my birthday, I thought it was time I played with some of the new features.  I spent way too much time working on the text in this image.  I'm sure there is an easier, faster way to write on straight lines while using the 'draw your own path' tool, but then again I guess I could have just written it straight and rotated it too...so much to learn :o)

I took this shot a couple of years ago, but since I've been organizing my images in Lightroom 4 (got that for my birthday too!) I came across it and just had to use it along with this quote.  I found the quote while working on a fibre art piece that uses my rust dyed fabrics.

original image
I cropped the image slightly, did a minor levels adjustment to the image, then added a couple of layers of textures.  I used Kim Klassen's new texture, kk_minus43 (you can see it, read about it's name, and get on Kim's free texture list here) and Bonnie Zieman's PDPA Beauty is... texture (you can see it and download it here).  I'd tell you more about what I did, but I don't remember and unfortunately didn't take a screen shot of my processing this time.  Sorry!


These photos are being linked to Our World TuesdayTexture TuesdaySweet Shot Tuesday, and Photo Art Friday.

Monday, January 14, 2013

You Can Do Anything...

There's nothing we can't accomplish with the right support!

Kim's challenge in Beyond Layers today is to use her sample photo of tulips on a black background and process it any way we want.  We'll then link up and compare what we've all done.

Kim's original image
I did some cropping to bring the tulips closer, did a minor levels adjustment and added a very subtle texture (Kim's 1301) with a soft light blend mode at 30% opacity.  I positioned the text (the quote is my own) to follow the shape created by the flowers by putting each line of text on it's own layer and then used a soft green from the leaves as the text colour.  By giving the text a bevel, it lets the 'light' shine on the text to echo the light hitting the flowers.  Finally, I added a gaussian blur to the image, and used a layer mask to remove the blur from the single tulip to keep it in sharp focus while having the 'family and friends' blurred in the background.

Update (30 minutes later)... I've just played with the image a little more, added another layer of of the 1301 texture, this time at a normal blend mode, 100% opacity, and then using a soft round brush on the layer mask, I removed most of the texture to just leave a soft frame around the image.  I think I like this one better than the first.

Sunday, January 6, 2013

From Photograph to Art Quilt...a sneak peek...

Back in April of last year, I took a photograph of a monarch butterfly and I digitally altered it in Photoshop.  You can see both the original photo and the altered one by clicking here.

I loved the colours in the altered photo so much that I wanted to use it in an art quilt.  I transfered the photo to fabric, went through my stash of fabrics and selected a number of pieces that I thought would work with it, sketched out a couple of ideas on paper, and then got busy with other things...

Finally, in October I got back to it and actually started working with the fabric and the image.  I wasn't happy with what I was coming up with, so again it was put aside so I could let my ideas 'simmer'.  Then came Tracey's GOE challenge for us to finish a UFO...which I turned into a personal challenge to try to finish all of my UFOs (or at least as many as I possibly could).  I've been working at the quilting of this piece for a few hours today, so I thought I'd give you a little sneak peak.  It still needs a lot more machine work and then some hand stitching, but I'm hoping to have it done by Wednesday evening, when our little group meets.

Saturday, December 29, 2012

I'm Choosing JOY!

Inspired by many influences, I've decided to choose an inspirational guiding word for 2013 to help frame my thoughts as I move into the new year.  As I said to a friend in an email this morning, it's so easy to slip into the bad habit of focussing on what is wrong but then we forget to enjoy and celebrate all that is right in our lives!  I have so much to be grateful for and so much JOY in my life.

I'm working on the title page spread for 2013 in my Art Journal Calendar, using these same words (I'll post that when it's done) but Kim's challenge in Beyond Layers today lent itself so well to this same topic that I wanted to use them on her sample photo as well.

For those of you interested, I used two of Kim's textures, kk_chalkmagic and kk_clarity, and the fonts I used are 1942 Report, Stamp Act Jumbled and aka Frivolity, respectively.

Thursday, November 29, 2012

Picking Favourites...

This week, for Photo Art Friday, Bonnie's challenge was for us to choose our favourite photo art piece from the year.  The idea was that if you were going to create a photo book of your images for the year (a great idea by the way!) Bonnie wanted us to consider which image we would put on the front cover.  This is a lot tougher than you might think!

As it turns out, I did make such a 'coffee table' book of all my favourite photography back in the spring.  At that time, I chose to use this image on the cover:


However, since then I have taken a lot of new photos and created a lot of new photo art.  I love last week's image of the gorilla's hand:


The other one that I might use is this one of the monarch chrysalis just before the butterfly emerges.  In the summer I put a couple of monarch caterpillars in a terrarium and photographed the metamorphosis from caterpillar to butterfly (you can see it here).  I used one of those images to create this:


So, it's a toss up between these two right now, but since I won't be creating another photo book for a while, there will be so many more to choose from when the time comes...

These photos are being linked to This or That Thursdays and Photo Art Friday.

Tuesday, November 20, 2012

Gorilla Love


Bonnie's photo art challenge this week is to create an art image using her texture 'Signed & Sealed'.  Yesterday my friend and I were at the Toronto Zoo and I got a great shot of a gorilla's hand.  My image today was simply a matter of adding four layers of Bonnie's texture, 3 using a soft light blend mode (100% opacity for all three) and the forth was added using a pin light blend mode at 73% opacity.  Simple but fun!

Thanks for the great texture Bonnie!

This photo is being linked to This or That Thursdays, and Photo Art Friday.

Monday, October 15, 2012

Look Up...Way Up...


Kim's challenge this week for Texture Tuesday was to have us looking up.  This is the perfect time of year for this as the colours in the autumn trees are spectacular!  I added three of Kim's textures to this image: Just Stitched, Trust, and Warm Sun.  I love that bit of zigzag 'stitching' at the sides. I brushed away some of the texture from the centre of the image so that the colours of the leaves were a little more intense in the centre.  


This next image, of my dog Casey snoozing on the dock, was taken a couple of weeks ago, the day before we closed up the cottage.  Bonnie's challenge for Photo Art Friday was to use her Leafy Landscape texture to create our 'photoartography' (that's my new word for today...Have you read the book Frindle?...just saying...).  I started by adding a gradient map to take the original image to black and white.  After adding the texture, I added a 'sponge' filter and bumped up the hue/saturation levels. 


Notice my signature?  That's another neat trick Kim taught us in Beyond Layers!  And, I just found out that Kim is starting the third session in January!  I highly recommend it if you want to learn more about how to use Photoshop Elements or CS!

These photos are being linked to Our World TuesdayTexture TuesdaySweet Shot TuesdayPhoto Show Off This or That ThursdaysPhoto Art FridayShoot, Edit, SubmitFabulous Friday, and Photo Friday Link Party.

Monday, September 17, 2012

The Beauty of Aging...

I had a lot of fun creating this digital journal page.  I tried something different with one of Kim Klassen's textures.  Instead of just using it over the photo images to enhance them (which I did by using 2 layers on each image, the first at soft light 100% and the second at screen 25%), I also decided to use it as my background 'page' for the collage.  The texture, called Autumn Burst, was the perfect choice because of the journal page holes along the left edge.  It also had the perfect colour for the warm Autumn look I was going for.

The three images were all taken in my garden last fall. I love the look of the black 'balls' left after the Black Eyed Susan's loose their petals and find them especially attractive poking out of the snow during the winter.

My favourite shot is of the wonderful skeletonized (new word?) Chinese Lantern.  It's incredible to see that perfectly round orange berry encased inside the delicate cage left after the orange skin comes off of the lantern.

I also really like the shape shape of the seed pods left after the Columbine flowers have died away.  Again, they add some interesting interest when poking out of the snow in the winter.  In the background of this last shot you can see the beautiful deep pink of our Sedum.  The Columbine's self seed very effectively and seem to pop up in the most unusual places, like right in the middle of other plants.  This can result in some confusion for folks who are not familiar with gardening since you get Columbine flowers blooming out of some odd foliage.  LOL

This photo is being linked to Photo Show OffTexture TuesdaySweet Shot TuesdayOur World TuesdayThis or That ThursdaysPhoto Art FridayShoot, Edit, SubmitFabulous FridayFlower Art Friday and Photo Friday Link Party.

Tuesday, June 19, 2012

Photos Of My Week

 This beautiful image of the sunset behind a barn in Northern Indiana, complete with the wonderful vapour trails of jets, is the image that I keep coming back to as I work through the stresses of the last few days.  It was taken while my husband and I were camping on a mini vacation last week.

These next two images were taken within a couple of hours of our return home.  Fortunately we saw our son before we saw what remains of my Escape.  Thank goodness he will be fine and there was no one in the passenger seat when he was hit.  The thoughts of what might have been still cause my knees to shake!
These photos are being linked to Photo Show OffTexture TuesdaySweet Shot TuesdayOur World TuesdayThis or That ThursdaysPhoto Art FridayShoot, Edit, SubmitFabulous Friday, Flower Art Friday and Photo Friday Link Party.