Showing posts with label stamps. Show all posts

Wednesday, October 2, 2013

A Sneak Peek at a Work in Progress...

Here's what I'm currently working on...


So far I've painted the background and added some handwritten text and a few stamps.  I'm off to the sewing machine to add some more texture with stitch before I start working on the foreground.  I'll keep you posted as it progresses.  As always, I'm glad you stopped by for a visit!

Wednesday, July 10, 2013

Soy Wax Batik...More Indigo Dyeing Prep

I can't believe how much fun I'm having doing all the preparations for our retreat at my cottage.  We're going to be experimenting with indigo dyeing for the first time and I've been preparing fabric to create lots of fun and interesting results (I hope)!


I found this fabulous mini electric frying pan in a thrift shop ($3.00!) and it's perfect for melting my soy wax.  I'm using a little tin inside the pan so that I can use less wax but still get enough depth to dip my tjanting tool into the wax and fill the little bowl on it.

I started out doodling circles on a piece of cotton using the tjanting.  As you can see, it sometimes drips larger drops of wax, but I love the randomness of that and I love dots so it's all good!
I liked the doodled circles and polka dots so much that I decided to grab an white tank top from my dresser and I put a row of the circles around the neckline and then added dots randomly all over the front and back of the shirt.
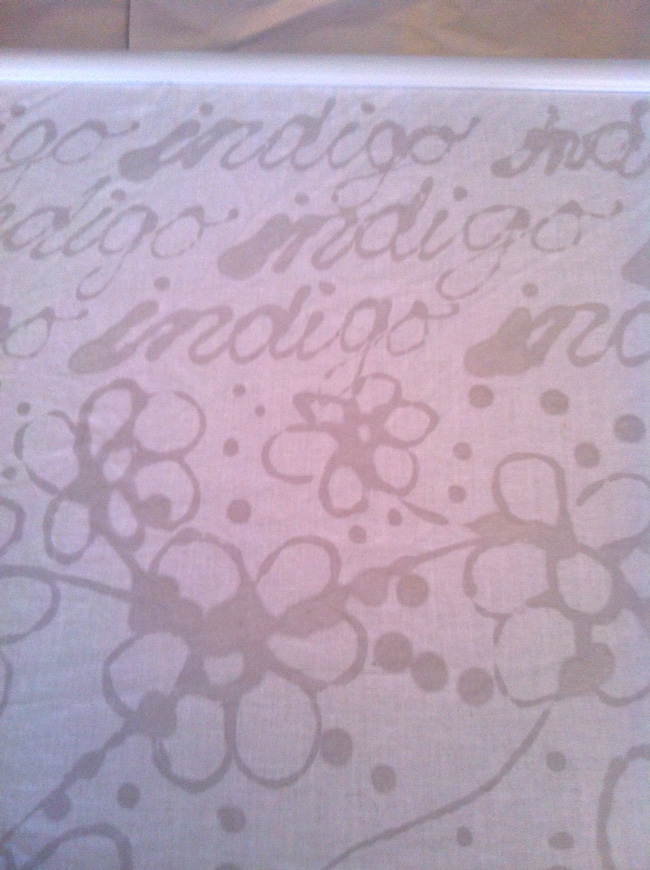
One the next piece I started by using the tjanting to write the word indigo repeatedly and then after a few rows of that I doodled some simple flower shapes.  I connected them with some thin lines and added more dots...dots are good!
This next piece was first taped using masking tape, and then I created various line patterns within the rectangles and squares that I had masked off.  I did another similar one in which I doodled various circle patterns inside the spaces, but I forgot to take a shot of that.
The final piece done with the soy wax resist is this piece of hand dyed green that I decided I wanted to over dye.  I created a design of doodled circles and dots. Again, I forgot to take a photo of it once I finished with the wax, but this shot 'in progress' give you an idea of where I'm going with it.  I can't wait to see what these look like after they're dyed with the indigo!
 In my last post, I had folded and clapped some fabric, so today I decided to see what would happen if I pressed the fold lines to make them more distinct.  This piece was them clamped with some plastic belt buckles that I found at a discount store.
Another idea I wanted to try was using rubber stamps and 'Stazon Ink'.  I love text in my work, so the first stamp I used was this wonderful called 'Creativity Flows', by Traci Bautista, from her Grafitti Glam line.
Then I went into my stamp stash and pulled out another few that I especially like.  Sadly I don't know what they're called or where they came from...collected over the years from a variety of sources.  I imagine using some of these as small elements within larger pieces and others as great backgrounds.


 The final experiment for now is a small piece that is a layer of tissue paper over top of a bit of fabric.  I stitched the two layers together using a straight stitch on the machine.  I hope that the tissue paper doesn't just disintegrate when it gets wet.

Hopefully my next post will be of a whole lot of beautiful indigo pieces!  Until then, have a fabulous day!

Monday, March 4, 2013

Writing With Ink


This was a fun page.  I started by playing around with inks, as per Joanne's lesson 21, and one thing led to another. I had these 'Posh Rainbow Inks' by Ranger in my stash and they've got a very fine tip so you can write with them by just very gently squeezing the bottle as you go.


After using the butterscotch to write the words, I echoed them using cranberry.  I drew the flowers in the same way.  I ended up cutting them out because they just needed an interesting layered background to allow them to pop.

I started by using a lace doily and spraying with green Dylusions ink. I then layered on some blue and purple acrylic paint, using an old gift card and my fingers.  I stamped over that layer with Traci Bautista's 'creativity flows' grafitti stamp.  It was a fabulous surprise to see that some of the green Dylusions spray somehow bled through so that the stamped letters had a green caste in some places.  That's one of my favourite things about those sprays...you never know what added bonus you'll get that you could never hope to achieve on purpose!

I followed that stamping with some found object stamping to create some circles here and there and then I glued the original words and flowers I had made in place.  The final step was to do a bit of journalling and doodling using my white Signo.

Sunday, March 3, 2013

I Love This Little Bird...

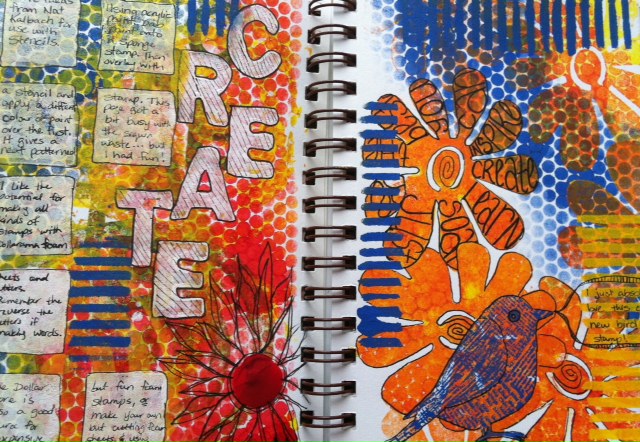
Another spread created after watching one of Nat Kalbach's jumpstarts.  I really like this idea of layering texture onto sponge stamps.  I think I got a little carried away (okay, a lot...) with the sequin waste, but as a record of the technique, it works.  I love the new bird stamp I got the other day.  I love anything with text on it so when I saw him I just had to have him.  And, again at 50% off, I don't even feel guilty!

Saturday, March 2, 2013

Creative JumpStart Revisited

During January, I was watching the Creative Jumpstart 2013 videos, and I did try out a couple of techniques, but because of various other things I was doing, most didn't get too much attention.  So, I've decided to go back through the archived 'Jumpstarts' (click on CJS 2013 if you want to access them) and create a journal with the techniques and some notes for future reference.  


 I'm really enjoying the Glass Bead Gel and with a 50% off coupon at Michaels, the price was great. I love both the texture, and how it makes the Dylusions spray inks just pop!

Thanks to Nat Kalbach and all the other Jumpstart artists, these videos are full of lots of creative ideas for using things that you may already have in your stash in some new ways.
 

Saturday, January 12, 2013

June Art Journal Calendar Spread

It's been a while since I did any art journalling, so last night I got out the paints, some stencils and other 'tools' and had a little fun.  This first image shows what I have done so far, with the little Post-It note squares (I cut them down to about 1.7") that I used as masks.  The word June and the numbers are Tim Holtz masks.

We have this wonderful recycling place called Waste Wise in town.  It's a huge warehouse full of wonderful 'junk' where you can pick up all kinds of interesting things for pennies.  I found this plastic 'thingy'.  My husband and I have no idea what it is intended to be used for*, but it makes a great paint stamp.  I often keep little lids to dip in acrylic paint and stamp, so when I saw this I though it would be fun to be able to stamp entire grids of circles!  If you look closely, you'll see the little black circles on my pages.  I love that they aren't perfect circles...randomness perfected ;o)

*I just couldn't let it go...enquiring minds...so I did some research and finally found out that these things are inserts for ammo cases.  I'm so glad I found a better use for it! 

The stencil I used is one by the Crafters Workshop.  I stamped over it using a make-up sponge (thanks to Creative Jumpstart for that idea...love it) and acrylic paint.  My final colour addition came from some spray inks that I layered over top before removing the masks.

I still plan to do some black pen work to the page, although I'm not entirely sure what I'll do... I certainly have to add numbers to the journalling squares and I might outline the letters and numbers...I'll post again when it's finished.

Monday, December 24, 2012

May Art Calendar Journal

My May art calendar journal spread is ready for the journalling.  I started by using various spray inks to give the page a gently mottled look.  I then added a variety of old silk flowers and a few paper flowers to create masks for each of the days of the month and I sprayed over them with green.  I removed the flowers...getting my fingers all inky :o)...and let that layer dry.  When that was totally dry, I came in with my Micron pen and did the lettering and a bit of soft sketching around the flower shapes.  After stamping the leaf shapes and the birds, butterflies and dragonflies, I used my Micron again to draw in stems and swirls to connect the leaves.  Finally, I did a bit of colouring with my Peerless watercolour pigments...and you have May flowers to follow the April showers.

Friday, April 27, 2012

What I Was Up to Today...

Sadly some sort of a computer glitch has caused all of the images in this post to disappear, and I am unable to correct the problem.  Sorry!
Back in February, I posted a tutorial about making your own washi tape.  Well, I was running low so it was time to make some more, but having had some time to think about it, I have made a few changes to the process.
I started by cutting my tissue paper into smaller, more manageable pieces.  I made them about 6 inches long and the width of 4 strips of my double sided tape, plus a tiny bit more for wiggle room.  I then put the four strips of tape, side by side, on the tissue paper.
Last time, I stamped the tissue before taping it (with not protection on my ironing/work surface) and you can see I have a permanent record of that day's efforts! LOL
Today I put the tape on the tissue paper first, which I found made the process faster and easier (and less messy).
I also lined my work area with newspaper, just in case, but with the tape on the back, the ink doesn't come through.


Here they are before and after I cut them apart.  Aren't all those wonderful colours just the best!

The other 'studio' time today was spent doing some tidying and organizing.  A few years ago I found this wonderful old post office unit at a big outdoor antique market.  I thought it was perfect for housing fat quarters, and smaller pieces of my hand-dyed fabric.  There are 90 little cubbies in the unit, so I've found there's room for some little bins of various art supplies too.  The glass doors keep the dust out but still let me see what I have inside.
 Today I got busy reorganizing and labelling those bins.  Here's a close up of some of those wonderful little bins of 'stuff'.
And my nicely filled bin of washi tape!

Sunday, March 11, 2012

Preparing a New Journal to Go

 I've been preparing a new journal to take along with me on a bit of an 'escape'.  I started with 9" x 12" sheets of watercolour paper.  I folded them in half (one at a time to get the best crisp fold), nested them into one another and then sewed them together by stitching down the centre fold on my sewing machine (I used the longest stitch possible and a good strong thread).

The next step was to pull out some stencils and my watercolour paints and just start to play.

I love the tone on tone effect of these numbers overlapping one another in various shades of aquas and blues.


This page got a bit dark at one point so I used a dampened paper towel and brought it back to what you see here.  I also like that it resulted in softer lines and shapes.
 I started this page by stamping the stamp using a deep brick coloured stamp pad.  I inked the stamp once and then stamped it five times, letting it gradually fade out as it went up the page.  I then reversed it on the facing page so that the dark image is at the top fading down to light.
 This page was all about creating lines and streaks in those beautiful pink tones.  I can see using some of those lines for some beautiful lettering.
 I see some Van Gogh 'Starry Night' coming out of this page.  I went a little further with this page, already adding some more stamping to get more texture.
 Simple pale blue with a bit of brown stamping.  I love that stamp!
I'm craving a Tequila Sunrise...hmmm, I haven't had one of those since my misspent youth! LOL
 I was playing with colour mixing here, but the green really didn't come through as much as I might have expected.
Not sure what happened here, but this page might end of being a close-up of some weird face or something.  I feel some funky eyes looking at me...
More stamping and a fun bit of striped gaffer tape on the spine of the journal.  

The next step is to add more elements, texture, stamping, etc. to the pages before I actually start to journal.  Of course, it's been made to fit perfectly into my 'Journal on the Go' cover so I can take it with me while I'm travelling, pens, markers, homemade washi tape and all!

Sunday, February 26, 2012

DIY: Home-Made Washi Tape

Before I get to the home-made washi tape, I wanted to share the improvements I've made to my new 'Journal on the Go' (see original post here for more details about how and why I made it).  Since taking Joanne Sharpe's great Letter Love 101 online class, I just couldn't stand looking at those plain pockets.  They just begged for some lettering on them!  I also added a belt loop to hold my new home-made washi tape!  Keep reading I'll tell you all about how to make it.
Mouse over photo to see the 'before' image.

This is dedicated to my new cyber friend, Heather, who lives in South Africa and can't get her hands on washi tape (no local shops carry it and none of the online vendors will ship to South Africa).  I've heard about this idea in a few places, and today it was time to try it.  It was easy, fast and really inexpensive.  I started with some double sided tape that I got at the Dollar Store and some tissue paper that I had saved because it was still 'like new' Yes, I can be a bit of a pack rat but it's environmentally friendly!
I pulled out my ink pads and stamps and just started stamping on the tissue paper.  I love black on white to contrast all the other colours I use in my journalling, but you could use coloured ink pads if you prefer.  I personally like StazOn but use whatever you prefer.
These five stamps are especially great for this.  They're the clear ones that you stick on the acrylic block and I simply lined all five up side by side to make the printing really fast.
The next step is to turn the tissue paper over and put the two-sided tape on the back, smoothing it out as you go (sorry, I forgot to take a photo at this stage).  I don't worry about a few wrinkles because I actually like the added texture and interest.

You're now ready to cut the tape out.  Just cut along the edge of the tape.  This is a great activity to do while 'listening to TV' (I hardly ever actually watch TV anymore. LOL).
If tissue paper is good, why not old dictionary pages?  I get old books at a wonderful recycling depot called Wastewise which recycles all sorts of things for incredible prices.  I can get old hard cover books (also great for altered books - learn more here) for 50 cents!
One thing led to another and I pulled out this 'love' paper which is actually the inside of an envelope that I took apart (Thanks Diane. The birthday card you sent me last month is still bringing me Joy!).  I know you can get some beautiful printed tissue papers so you could make some washi tape with those too.  I'd love to hear your ideas for what else we could use to make our own unique, inexpensive washi tape. 
Here's my new stash of washi paper.  You'll notice some coloured pieces.  Those are some bits of old book pages that were used when I was making background papers.  Nothing goes to waste!
Here's the washi 'stash' all neatly organized.  I rolled them, secured them with little binder clips (another Dollar Store find) and put them on a large binder ring.  This is why I had to add the belt loop to my Journal on the Go!  The shorter pieces were just tucked into one of the pockets.


It's been a very busy couple of days.  In addition to the above mentioned pursuits, I also made some more beautiful background papers.  If you want to know more about the process, check my previous post here.