Showing posts with label machine quilting. Show all posts

Wednesday, May 27, 2015

All It Needs Is A Name...

It's been almost another month, but this piece is finally finished. I showed you the work in progress here and I've finally finished the last bit of hand stitching. I'd love your suggestions for a name...I'm completely at a loss for what to call it.

It's made entirely from my hand dyed and indigo dyed fabrics and threads (except for the machine thread). I love the contrast of the tight machine quilting and the seed stitches on the background piece.

If you've got an idea for a name, please leave your suggestion in the comments. Thanks!
Here are a few detail shots:


Monday, April 21, 2014

Machine Quilting Has Finally Begun...

I've had a lot of distractions lately, but I've finally got down to some machine quilting on this WIP.  Thanks to Anita at Cotton Mill Threadworks*, I was able to get the perfect variegated thread that had the warm grey tones I was looking for to compliment my hand painted fabric.
(*It's the best place to get thread!  If Anita doesn't have it, you probably don't need it.)

Here are a few photos of the machine quilting in progress:


Wednesday, November 20, 2013

Shadows Revealed...

I'm happy to say that "Shadows" is finally finished!

Here are a couple of close ups that show the hand and machine stitching in a little more detail:

I have another photograph that I am thinking about doing in a similar way...this could be the beginning of a small series.  Time will tell.

Friday, September 13, 2013

And Along Came A Spider...

Well, it's finally done!  Each time I did some hand stitching on this piece, more ideas for additional hand stitching just kept popping into my head.  Ultimately, I've done way more hand work on this piece than I had initially expected to, but I just love how it turned out.  A bit of machine quilting/doodling and a few finishing touches (hanging tabs, embroidered binding and the fabric covered hanging rod), it's finally time to hang it and move on to other things.

I should tell you how it got it's name...I kept thinking it would be Indigo 'something', but nothing came to mind that made me happy.  Then one day, while looking at this section my husband said it looked like a spider web. I had done a lot of hand stitch in the darker areas, leaving the light lines created by the string or elastic bands that had bound the fabric during the indigo dyeing process.  They did indeed look a bit web like.  And then I saw the spider just sitting there (see him in the red circle?).  I did some machine stitching to further bring out the web and then hand stitched over the spider to make it pop.  So you see, one day the spider did literally just come along!                                                                                                                       
BTW, Michelle, the fabric was adhered to the hanging rod using the transparent Paverpol.  There, I've finally used some of it!

Wednesday, July 3, 2013

Abstract #4

This is the last in my Abstract Series for a while.  I plan to come back to this series, but with so many ideas that I want to work on, it's time to move my focus to other things for a while.


Here are all four of the pieces in this abstract series, framed and ready to go:


Saturday, June 29, 2013

Abstract #3

Number three in the on-going Abstract Series.  I'm really enjoying these little quilts, and once my finger and wrist have had a little more healing time,  I think I'll be adding some  hand stitching to future pieces in this series.


Thursday, June 27, 2013

Abstract #2

Here's the second piece in my abstract series.  I'm really enjoying quilting these pieces!


Saturday, June 22, 2013

Abstract #1

Before quiltng
Last weekend I posted about starting this new abstract series.  After finishing all of the fusing of the hand dyed fabrics, I decided that I would work on the quilting one piece at a time.  It means changing thread a ridiculous number of times, but I like that I can see one piece through to completion in a day.

The two photos show what the piece looked like before and after the quilting was added.


Friday, May 24, 2013

Rust

The rust piece is finally finished!  I learned while finishing it that apparently I would prefer to thread my machine left handed, but the cast wouldn't let me get close enough.  As I tried it just went 'clunk' against the machine, so I was forced to use my right hand.  LOL  Thankfully the actual machine sewing process isn't hampered too much by the cast! In spite of the challenges I encountered working with the rust dyed fabric (you can read about it here, and more about how the piece began here), I think I'll work with it again because I'm really pleased with the finished piece.

Here are a few close up images of the piece:


Linking up with Off The Wall Friday.

Friday, May 3, 2013

Xs and Os

On Sunday I posted about a new series I've started, using a consistent 12" x 12" format.     I've finished the first one and my mats arrived in the mail yesterday so it is all matted and ready.  Fortunately this image is true to the actual colour (unlike the previous post).  I've called it Xs and Os because of the circles that I had printed on the denim using my Gelli plate, and the Xs that I stitched into the rust dyed fabric.  I echoed the Os using little round discs (actually the ends of those pre-wound cardboard bobbins...'cause I can't seem to throw anything out. LOL)


I've posted it here without the mat so that you can see a larger image, allowing you to see more detail.


Thursday, March 28, 2013

One of Those Days...

Do you ever have one of those days where you just can't seem to machine quilt...the fabric seems weighed down or something and you're struggling to move it around through the machine with your regular ease?  Well, that's the sort of morning I'm having!

Let's take a closer look at why...


Yes, it would appear as though Arbour has again found the newest 'cat bed' that has obviously been put in the studio for her personal pleasure and comfort!
But, being the horrible person I am, I will have to move my little assistant because my wishes to work on this piece trump her need for yet another comfortable place to sleep!

Thursday, February 14, 2013

Fingers Crossed...

My cat, Arbour, finally let me finish the quilting on this challenge piece and I finished sewing on the binding last night.  Now for the scary part...

This piece is an experiment, based on something I read online about a year ago.  At the time I thought it sounded interesting but didn't think I wanted to try it.  Unfortunately I now want to play with the idea but I don't recall the site, and haven't been unable to find it again.

Best I can remember, it involves sewing pieces of plastic grass trimmer cord into the quilt, which has a wool backing.  The next step is to do some immersion dyeing and then to wash the piece and dry it in the dryer so that the wool shrinks.  The plastic cord, of course,  will not shrink, thus creating interesting ripples...

I'm worried about going to the next step, but the quilt as it is now is not is very inspiring, so apart from hours of piecing and quilting (a great challenge, fighting the plastic cording...not to mention the three machine needles I broke), what have I got to loose?

As I said in the title of this post, fingers crossed...

I hope to be able to post about the next few stages soon.

Happy Valentine's Day!

Tuesday, January 8, 2013

Butterfly Transitions

The other day I gave you a sneak peek of this piece, in which I showed you some of the quilting from the back, as well as providing a link to the original photograph.

Since then, I've spent a few hours working hard to get the background machine quilted.  When that was finished I made a whole lot of French knots to add some additional texture to the dupioni silk that is the background of this piece.

And, here it is, finished and mounted over a stretched canvas.  I'm very happy with how it turned out, and wish that the photo did it justice.

Below are a couple of detail shots.  This finishes a fifth UFO.  I am so glad Tracey gave us the challenge that she did because I've really been tidying up a lot of outstanding pieces.  I still have four other UFOs to finish plus the three new pieces that I have in the works, all of which I started in the last month.

It's funny to think that when I first started to quilt in 1999 I did one quilt, from beginning to end, before I started another project.  Now, I can't imagine staying that focused on one thing!  Add in my art journalling and photography and I just have to laugh...


Sunday, January 6, 2013

From Photograph to Art Quilt...a sneak peek...

Back in April of last year, I took a photograph of a monarch butterfly and I digitally altered it in Photoshop.  You can see both the original photo and the altered one by clicking here.

I loved the colours in the altered photo so much that I wanted to use it in an art quilt.  I transfered the photo to fabric, went through my stash of fabrics and selected a number of pieces that I thought would work with it, sketched out a couple of ideas on paper, and then got busy with other things...

Finally, in October I got back to it and actually started working with the fabric and the image.  I wasn't happy with what I was coming up with, so again it was put aside so I could let my ideas 'simmer'.  Then came Tracey's GOE challenge for us to finish a UFO...which I turned into a personal challenge to try to finish all of my UFOs (or at least as many as I possibly could).  I've been working at the quilting of this piece for a few hours today, so I thought I'd give you a little sneak peak.  It still needs a lot more machine work and then some hand stitching, but I'm hoping to have it done by Wednesday evening, when our little group meets.

Wednesday, November 21, 2012

Stupendous Stitching...


After having seen a beautiful piece of art done by my friend Diana, I took Carol Ann Waugh's online class, Stupendous Stitching.

I started out as the lessons suggested, first making my stitch bible and then I got into the couching and decorative stitching (you can see some of this in this previous post). This is where I just couldn't stay the course...

As is so often the case, I started to stray from the lessons and play around with my own ideas.  I cut away a bit here, machine appliquéd some pieces on there...etc.

I then cut away the two side strips and because I just can't seem to waste anything, they became another small piece that you can see here.

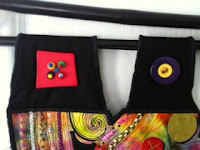
What I had left was then layered over a larger black piece of fabric, hand stitched and quilted to within an inch of it's life, and then I added some beading and buttons on the lower part as well as big, fun buttons on top to create the hanging loops.

Here are a few detail shots:


And here is the finished piece:

Friday, May 18, 2012

Growth Over Time

Today I decided to post a traditional quilt that I am especially proud of, called Growth Over Time, as part of the Blogger's Quilt Festival. This quilt is an original design.  The centre "9 patch" of diamonds in the quilt was hand pieced and then I designed each of the borders around it, one at a time, to best suit the quilt as it grew.  The first border around that 9 patch of diamonds echoed the diamond shape to create the larger diamond that makes the focal point in the centre. 

I had a lot of fun putting it up on the design wall at each stage of it's growth, to study it and decide what should come next.  As you can see in the photo to the right, there are sections of prairie points in each of the corners which taper off from larger to smaller as they move away from the corners.  The little 5 point diamond 'flowers' are hand appliqued.


The finished quilt is 89" X 98" and drapes beautifully over our queen sized bed.  


Wednesday, April 11, 2012

Spring Blossoms Finally Finished


Several weeks ago, while making background papers for some journaling, I posted about the beginnings of these little art quilts. 

I cut very simple shapes to represent the flowers and leaves and used a background of neutral scraps.


Black thread sketching at the machine further defined the flowers, leaves and stems.  This is the stage at which these pieces sat for many weeks as I worked on other projects.  I obviously took these pictures under very different lighting conditions.  The newest photos, showing the finished pieces (below) show the accurate colours.  

I finally got around to quilting the neutral areas and I decided I would mount the pieces onto another simple quilted background.  I started auditioning some backgrounds for these pieces using some of my hand-dyed fabrics and I settled on four different colours. 
Although the photos don't show it well, there are two fairly different blues, as well as the green and the purple.