Monday, March 31, 2014

Another StencilGirl Blog Hop Featuring Newly Released Designs by Andrea Matus deMeng...

I'm excited to be participating in this blog hop in which we're featuring these newly released stencils from the talented Andrea Matus deMeng. I first saw these stunning designs a couple of weeks ago, and it's been really hard to keep them a secret until today's unveiling!

I'm lucky enough to be able to use this beautiful design, called Precocious Peony today. 

I'm experimenting with a technique, based on a piece of art I saw a couple of years ago.  Sadly, I can't remember where I saw it and I don't really know how it was made, but I know the final piece had Silks Acrylic Glaze painted onto black gesso.  Based on what I remembered, and some things I found in my husbands workshop, I decided to experiment and see what I could come up with.  Happily the end result turned out alright so I'm able to share it with you!

If you want to try this, you'll need:

-drywall compound
-a piece of wood (or other sturdy material) cut to the finished size you desire. 
-a putty knife
-sandpaper
-something pointy with which to 'draw' (I'm using a seam ripper, but a ballpoint pen, an awl or a stiff piece of wire will work.)
-black gesso
-Silks Acrylic Glaze
-paint brushes (a sponge brush for the gesso and smaller paintbrushes for the Silks)
-a water jar for cleaning brushes
-Golden Self Levelling Clear Gel
-patience...because this has to be done over a couple of days!

Step 1:

Sand the surface of your wood to roughen it up a bit so the drywall compound with stick well.

Step 2:

Read this whole step before starting...Mix up a small amount of drywall compound to a nice spreadable consistency, but not too runny. (I only mix enough for each thin layer each time). Using the putty knife, spread a thin layer of the drywall compound onto the piece of wood, keeping it as smooth and even as you can so that the entire surface is covered. Let dry completely-my drywall compound says it is dry in 45 minutes but some take longer so read the package (this is where the patience comes in...not my strong suit!). 

While that's drying, scrape any excess compound into the garbage and wash the container and putty knife with water. 

Repeat this step several times until you have about a 1/4" - 3/8" layer of compound. It is better to add thin layers many times to avoid cracking. (See what I mean about needing patience!). 


Step 3: 

Using sandpaper, sand* the final dry surface of the drywall compound until it is completely flat and smooth. Sand the sides of the block too, to get any little bits of drywall compound that may have got on them. (You can see from the image on the left that my 'before' was not terribly smooth but it still sanded up beautifully).

*Drywall dust is messy, so do this outside if possible.


Step 4:

Position your stencil onto the surface, and using your pointy 'drawing' tool etch the design into the surface of the drywall compound. Consider flipping your stencil over to give you another variation of the design. You can add any additional drawing/doodling you wish by etching into the surface.  


Step 5:

Paint the entire surface and the sides with black gesso, ensuring you get into the grooves you created while 'drawing' but without filling those grooves up with excess gesso.  A sponge brush works great for this because you can dip the pointy edge into the groove to soak up the excess gesso. Let dry completely (there's that need for patience again...)


Step 6:

Using the small paintbrushes and the Silks, paint your design however you like. Notice I took the design over the edge with the paint.


Step 7:

Wait...more patience...According to the jar, Silks required 48hrs to fully cure so go find something else to do for the next couple of days!

Step 8:

Add a layer of the Golden Self Levelling Gel to the top and sides of the painting.  I set mine up on another jar of Golden product to elevate it up off the table while I added the layer of gel and let it dry.


Step 9:

Sit back and admire your handiwork!  


Great news...StencilGirl has a giveaway! 

Two winners: one will receive a set of the new 6"x 6" stencils 
and one will receive a set of the new 9" x 12"

All comments left on the hop are eligible for the giveaway so 
the more blogs you comment on, the more chances you will have to win. 
Have fun and GOOD LUCK!

The giveaway will close on Sunday, April 6th at 11:59PM Central Time. 

Please Note: Although this is considered a one day hop, 
you have the ENTIRE week to comment to win the prize.

Note about replies during blog hops: Blogger seems to cut me off at a certain number of replies (no sure how many) and then stops letting me post comments from you. Since I want anyone to have a chance to win the giveaway prizes,  I have decided to only reply if someone asks a direct question.  
Please know that all of your comments are much appreciated.  I do read them all, and I thank you for all of your kind and thoughtful words!

Blog Hop Order

Linda Kittmer- You are here
Carolyn Dube-Your next stop...
Friday, March 28, 2014

I'm Featured on StencilGirl Talk Today...

I'm featured over on StencilGirl Talk today.  I'm creating a journal page using Carolyn Dube's Use Your Words stencil.  Here's a bit of a peak at what I'm doing...come on over to see more!

Wednesday, March 26, 2014

Variation On A Theme...

On Monday, during the StencilGirl / Lost Coast Designs blog hop I created a somewhat silly spread in my journal.  (BTW, it's not too late to get in on the fun or the prizes in that blog hop!)

Today I've decided to pull out a few other materials, namely this wonderful little coloured 'paper pocket' and a tag so that I could create a cute little variation yesterday's theme.  It's all really quick funny, since I've never been concerned about birthdays or my age, but I know some people are and so the idea was born.

I had this newsprint on which I had cleaned the dictionary stamp I used in the blog hop post while I was doing the background Gelli print.  I tore a couple of pieces from it to glue to the pocket and the tag.  Then using Inktense pencils, a stencil, the little black insert from doggie poo bags, and some acrylic paint I added some additional colour and texture.


Notice the drippage...drippage makes me happy!


Since all the additions resulted in the backgrounds not being totally flat, I stamped the two bird stamps on to deli paper, tore the images out, and adhered them using matte medium.


Add some magazine cut outs for the text, some fun tassels to the tag using yarns or whatever you have on hand and you've got a cute little birthday 'card' for that special friend who's celebrating the --th anniversary of their 29th birthday!

The message says, "A little bird told me it was your birthday...-but don't worry...I put an end the THAT!"

Here are the two pieces separate:


And what they look like with the tag tucked into the pocket ready to be presented to your friend!

Monday, March 24, 2014

Blog Hop with StencilGirl and Lost Coast Designs...

I'm so glad you've come along for another fun blog hop. Can you believe we've got 15 stops on this hop!  Wow!!!

Today I'm using some StencilGirl stencils along with Lost Coast Designs rubber stamps.

It's been a while since I played with my Gelli Plate, so I decided to get it out for some fun!

I used the Joy (dictionary page) rubber stamp on the Gelli plate to get a bit of text (and texture) onto my background.


Using Pam Carriker's Journal Texture #1 stencil and Journal Texture #2 stencil I added some additional texture while also lightening up the page. 

Being in that circle mood, I decided to pull out Patricia Baldwin Seggebruch's Bubbles Stencil to add another layer.


Looking at this, you might not know that I do in fact have a lot of paintbrushes...but, sometimes there's nothing like a little finger painting! I just squirt a drop of the selected colour onto my finger and make marks!  I got so carried away with this that I'm afraid I forgot to take any more pictures during the process, but you'll see them in the final shots.


Using Lost Coast's Shrubbery stamp (this comes in two different sizes), I added some background grasses to the lower part of the pages using StazOn Timber Brown.  I then loosely doodled over the design using both permanent black and white pens to add more layers and depth the that areas too.
I added the Feather Bird stamp  using black StazOn and quickly applied black embossing powder while the ink was still wet.  I like how the embossing powder gives this fun, wonky bird more depth and a nice shine!
 Bird Bones stamp was added on the other page of the spread, and I used a fine black pen to extend the branch to the edge of the page, and also to 'finish' it at the end that extends into the page.
A message was added using a black Copic brush tip marker.  I added shadow to the text using a grey Copic and gave the letters some highlighting with my white Signo.  The white pen was also used to randomly trace around some of the circles that had been made with the stencils in the earlier part of the process.

A red Copic was used to make dotted lines to 'cross out' the skeletal bird....*


And there you have it...

[*no actual birds were harmed in the making of this art journal spread!]


One lucky winner will get two 9"x12" StencilGirl stencils 
and a $25 gift certificate from Lost Coast Designs!

All comments left on the hop are eligible for the giveaway so 
the more blogs you comment on, the more chances you will have to win. 
Have fun and GOOD LUCK!

Please Note: Although this is considered a one day hop, 
you have the ENTIRE week to comment to win the prize.

The giveaway will close on Sunday, March 30th at 11:59PM Central Time. 

Friday, March 21, 2014

The Text Is In Place...

The text is now in place and I'm ready to do a bit of thread doodling and then some hand stitch before I finish with the final machine quilting on this piece.
I ran into a bit of trouble when I was removing the paper backing from the painted fusible. I'm not sure if it was because I didn't water the paint down enough or if it was old fusible or some other issue.  I'll have to do some more experimenting with this technique to figure it out.  But for now, I'm ready to go with the next stage of the process.


Wednesday, March 19, 2014

Adding Text...

I've decided on a title, 'The Secrets Within', and I'm ready to add some text to the 'eyes' piece I've been working on for the last while. The first step was to paint some 'Wonder Under' fusible webbing.  I learned this technique from Linda Kemshall on DMTV. 


One of the nice things about this technique, which is really only suitable for larger text, is that you don't have to worry about reversing your words/letters which makes it easy to trace your text, cut it out and then apply it to the fabric.  


I cut the letters out while listening to TV but now I'm thinking I should have had a more organized system (other than a bin in which I dropped all the letters) so that I would have had an easier time of sorting the words and putting the text on the actual quilt top. Oh well, maybe next time...

Hopefully I'll be ready to show you the next stage on Friday.  Until then...

Monday, March 17, 2014

I Needed More Eyes...


In Friday's post I had begun to put together the faces I've been thread sketching for the last few months.  However, as I was working on the piece this weekend, it became evident that I needed a couple more faces.  So, out came a stack of books and magazines so I could find some inspiration.

After doing a few rough sketches on paper I was ready to trace my drawings onto dissolvable stabilizer and then sit down at the sewing machine and thread sketch.  


Happy St. Patrick's Day!

Friday, March 14, 2014

The Fun of Working Intuitively...

Over the last couple of months, among other things, I've been sketching and thread doodling close up images of faces, focusing on the eyes.  It's now time to start putting together the vision I have in mind for this piece.  


The thing I love about working in the intuitive manner that I do, is that it becomes a bit like a giant puzzle.  I have a rough image in mind, but no real plan of attack.  I've cut each of the thread sketched faces out so that when sewn up they will have a 1/4" clearance between the seams and the thread sketching.  As such, none of the pieces has square corners.  This of course is in keeping with my mental image of the piece.

The fun comes in laying the pieces out in a rough layout and then attaching various strips of the hand painted grey fabric so that I can make it work and all fit together.  As you can see, I've also added some narrow black bits here and there just to give greater contrast and keep the eye moving.  Did I mention how much I love this processes?!

I'll keep playing with this over the next few days and hopefully I'll come up with an arrangement I'm happy with.  Back to it...bye for now.

Wednesday, March 12, 2014

Edible Art...

On Saturday I went to the second of my cupcake decorating classes.  This class was all about working with fondant.  Here are the cupcakes I finished.  Working with fondant is a lot slower and fussier than piping buttercream icing.  I'm starting to understand why bakeries can charge so much for their fancy wedding cakes, etc.!

We looked at a lot of amazing ideas in books and magazines and then worked on learning some basic techniques from which we'd basically be able to tackle any number of ideas or themes. We used various cutters, texture mats, moulds, stencils, etc. By the end of the afternoon, I was getting tired and hungry when Maria, the instructor was showing me how to use the extruder.  I happened to use yellow fondant, and the resulting strands looked like spaghetti to me so in addition to some 'pretty' cupcakes, I ended up making a plate of spaghetti and meatballs for one of my cupcakes.


Although it's a lot of fun (much like playing with plasticene!) and can result in some very pretty and creative cupcakes, my husband and I decided that we both prefer the taste and texture of the buttercream iced cupcakes (If you've never had it, fondant is sort of a chewy, tasteless but sweet candy).

I think for my purposes, piping buttercream gives me enough opportunity for creative and attractive cupcakes (you can see some of my earlier cupcakes here and here).  I did experiment with putting some of the fondant flowers on top of the piped cupcakes and I though that looked pretty, but again I'm not sure it's worth the time involved to create them.


Monday, March 10, 2014

A Few More Threads and a Puppy Update...

For those of you that have been following me for a while, you'll know that I am a foster 'mom' to a future dog guide puppy through the Lions Foundation of Canada Dog Guides. Well, Dime turned 6 months old a couple of weeks ago, so I thought I'd share this with you so you can see how he's growing.  He's such a smart little fellow and is so very well behaved! I'm so proud of the little guy*!
(*I weighed Dime on Saturday and 'little guy' is 25kg/55lbs)


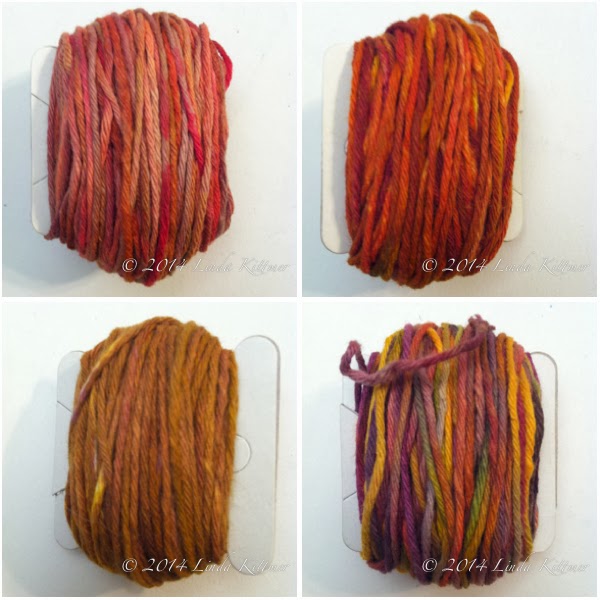
I've also got a few more hand dyed threads that we're still drying when I did  Monday's post so I thought I'd show you those too.  These are a slightly thicker thread, but I love the colours I've achieved, especially that last one.


Have a fabulous weekend!

Friday, March 7, 2014

Oh, Look...a distraction...

I haven't been working on much lately in my studio...I think between the winter blahs, the Olympics, and other distractions I just haven't been very motivated.  I am still working on this hand stitching piece that I've given you a couple of peeks at previously (here and here) but it will be a while before I finish that.  I'll need to listen to a lot more TV to get that piece done!

As if I didn't have enough distractions, last week I finally gave in to myself and bought an iPad.  I've been resisting for a long time, but I finally decided to use a little of my retirement gratuity to treat myself!  Talk about distractions!  I'm reading more, playing around with new apps (Have you seen Paper by 53?) and just learning all the wonderful things I can do with this great new toy.

I did think I should make a little protective sleeve for it for when I'm out and about with it, so I pulled some commercial fabric from my stash (I've just about completely stopped using it for my fibre art) and set to work making a very simple 'case'.  The idea is that I can just easily pull it out when I want it, so there are no closures.


Okay, I changed my mind...I've added a simply button and elastic loop closure just so I don't have it fall out because I'm caring it upside down.

If you have any favourite apps, I'd love to hear about them!

See you Friday...

Wednesday, March 5, 2014

A Little of This and That...

I finally got around to painting some more fabric so that I can start working on the art quilt that will include all the thread doodled eyes I've been doing.  You can see the eyes here, here and here if you missed them.
I've also been doing some more art journalling, preparing the March calendar spread.  I'm using Inktense pencils and it's interesting to see the before and after as I work.  If you're not familiar with Inktense, initially they look and feel like pencil crayons, but once you take a water brush to them the incredibly vibrant pigment is activated and they come to life!


It's also interesting to see how they react differently to different paper.  This Canson journal has different textured paper front and back, so when doing an open spread like this you're dealing with two different papers.  The right hand side is a beautiful mixed-media/watercolour type but the left side is a smoother bristol board like paper and it just doesn't give you the same variations in the colours. However, you can't sweat the small stuff so for my purpose this will be just fine!


Monday, March 3, 2014

The Beauty of Hand Dyed Threads!

As you know if you've been following my blog, I've been having fun exploring snow dyeing lately.  Along with some fabric, I've been dyeing crazy amounts of cotton threads to use in my hand stitching.  I am totally in love with variegated hand dyed threads!  I make skeins of the threads for the purpose of dyeing it, but I find it easier to store and work with if I take the time to wrap it on the little cards usually used for embroidery floss.  This way, I can store them in my plastic, colour coded DMC floss boxes along with the floss and other hand stitching threads.

Without babbling on any more, let me just show you my newly dyed stash:


I've got an idea brewing in my head for a piece I want to start that will involve crazy amounts of hand stitch with my new stash of fabrics and threads, both from this last little batch and from the results of last summer's dyeing fun.

On a side note, my friend Kit Lang does some incredible art, often using painted paper towel.  Well Kit, here are all the paper towels that got dyed in the clean up or thread dyeing process.  You've inspired me to try to do something with it...I don't know what yet, but something!