

Monday, September 30, 2013
Symmetry in Nature...
Friday, September 27, 2013
A Blog Hop Featuring Pam Carriker's Stencil...
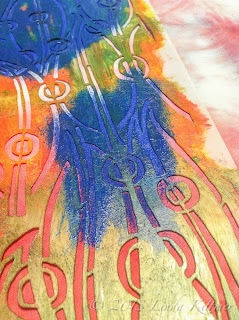
 For today's StencilGirl Blog Hop, I'm working with Pam Carriker's "Complementary" stencil. My first thought was to do a journal page, but as I started thinking about what I wanted to do with the stencil, whimsical practicality took me in a different direction! The journal was set aside and instead I pulled out a 10" x 12" canvas.
 I used matte medium, a palette knife, and a few old dictionary pages to create a background layer. I then pulled out the stencil and some Golden Fibre Paste and I covered the stencil with a good thick layer.
 When I lifted the stencil, I was left with a lovely raised image of the design. Make sure you wash your stencil right away so the fibre paste doesn't have time to dry on it!
 The next step, after the fibre paste has dried, is to get out the paints. I applied a few different colours in random areas, and then did a bit of stamping with the cardboard insert from this box of Christmas tree bulbs.
 It didn't work as well as I had hoped but I did get some of the diamond shapes I was imagining.


I added several layers of paint, stippling it on to allow colours underneath to still show through a little until I was happy with the colour.
I then added some more stamping, and some numbers and the piece was starting to really take shape.


And then I added the clock works (I got mine from Lee Valley)...a clock for my studio!

I hope you've enjoyed this stop on the hop. Remember, if you visit all of the blogs, and leave comments at each, you increase your chance to win in the giveaway! Good luck!
StencilGirl Talk
StencilGirl Talk
Linda Kittmer-You are here.
Leslie Tucker Jenison-Your next stop on the hop!
Wednesday, September 25, 2013
Brilliant Idea for Stencil Storage!


In this shot you can see the J Hooks (S-11655) along with the labels I've made so I can organize the stencils alphabetically by designer. [note: the above line gets you to the Canadian warehouse for U-Line. If you want the US link, it's available in Carolyn's post on StencilGirl Talk]
Only $20 for four feet of closet shelving complete with the hardware needed to hang it, an easy installation (make sure you're screwing into studs if you plan to have any weight on the shelf!), plus the J hooks and its ready to use!
Thanks so much Carolyn and Maria! I never would have thought of this fabulous idea without your inspiration! It's the perfect solution since I don't have room for those amazing racks that you use!
Monday, September 23, 2013
Reflection...

I'm playing catch-up on my wonderful Beyond Beyond year long 'class' with Kim Klassen. On day 26 we were challenged to a bit of a scavenger hunt. Since I'm so far behind (that lesson was from mid July), I've decided just to use this one image of the beautiful early morning reflection which is the view from our cottage. Not a bad sight to wake up to!
Although I loved it right out of the camera, I did add a very light layer of Kim's texture, 'Appreciate' at a blend mode of soft light at 25%, which just gives it a bit of a boost.
Friday, September 20, 2013
GOE is giving back...
I'm so exciting to share this fabulous collection of journals and bags made by the members of Group of Eight Fibre Artists. For the second year, we have made a collection of journals, and this year some large tote bags, for donation to our local women's shelter. It is our way of being able to give something back to the community. There are seven tote bags and twenty-seven journals (with three four more journals to come!).

 Update...the last of the beautiful journals have been delivered to me. I'm now ready to take them to the shelter for donation!
 Update...the last of the beautiful journals have been delivered to me. I'm now ready to take them to the shelter for donation!
Thank you to my wonderfully artistic friends...you've done another fabulous job this year!
Wednesday, September 18, 2013
When I Need An Art Fix...
ATCs are perfect for that quick art fix when you need to get into something but you don't want to spend too much time in the studio or you just don't have your head around how you want to start the next big art piece. I've been really enjoying using collage and paint in my ATCs lately. This one is for a swap I'm participating in.


Monday, September 16, 2013
Have You Ever Seen One Of These Up Close?


Friday, September 13, 2013
And Along Came A Spider...
 Well, it's finally done! Each time I did some hand stitching on this piece, more ideas for additional hand stitching just kept popping into my head. Ultimately, I've done way more hand work on this piece than I had initially expected to, but I just love how it turned out. A bit of machine quilting/doodling and a few finishing touches (hanging tabs, embroidered binding and the fabric covered hanging rod), it's finally time to hang it and move on to other things.
 I should tell you how it got it's name...I kept thinking it would be Indigo 'something', but nothing came to mind that made me happy. Then one day, while looking at this section my husband said it looked like a spider web. I had done a lot of hand stitch in the darker areas, leaving the light lines created by the string or elastic bands that had bound the fabric during the indigo dyeing process. They did indeed look a bit web like. And then I saw the spider just sitting there (see him in the red circle?). I did some machine stitching to further bring out the web and then hand stitched over the spider to make it pop. So you see, one day the spider did literally just come along!
BTW, Michelle, the fabric was adhered to the hanging rod using the transparent Paverpol. There, I've finally used some of it!
Wednesday, September 11, 2013
Another Journal...
As I may have mentioned in the past, my fibre art group makes journals that we donate to our local women's shelter as a way of giving something back to the community. Each of us commits to making three journals, so that we can donate a total of 30. I've made several journals in the last couple of months, but they keep finding homes! And so I've had to make another one so that I have three ready to go for our deadline this month.

I used some of my hand dyed fabric, but I wanted to add a bit more of a graphic element so I did some surface design by using Jane Lefazio's Eucalyptus stencil and some acrylic paint.
 I love the added texture. Obviously I was in a circle mood so I cut lots of circles and rings from the fabric.


 After fusing the circles and rings to the background I did some zig zag top stitching and called it done.
And here's 'Chain Link Journal'. May it bring hours of drawing, writing, or journalling pleasure to it's new recipient!


I used some of my hand dyed fabric, but I wanted to add a bit more of a graphic element so I did some surface design by using Jane Lefazio's Eucalyptus stencil and some acrylic paint.


I'm almost sorry that I used this fun piece of a wipe up rag as the lining. the more I look at it the more I wish I'd used parts of it in a piece of art rather than as a hidden lining! Oh well, there will be more wipe up rags...
 After fusing the circles and rings to the background I did some zig zag top stitching and called it done.
 Monday, September 9, 2013
This and That...
The other day I was going through some of the photos I've taken recently and I thought I'd share these.
 |
| A female Ruby Throated Hummingbird |
 |
| Blue Spotted Salamander...I found this little guy when I was picking up a rock while doing a bit of gardening. |
 |
Our view at the end of another beautiful summer day! And finally, last week I posted a series of shots of the Downy woodpecker, and someone has taken the ones of the adult feeding the youth, and put them into a .gif file and somehow added it to my Google+ photo album (something which I was thinking I should do but hadn't got around to). Thank you to whoever it was! (Please leave a comment to identify yourself if you're reading this.) And finally, last week I posted a series of shots of the Downy woodpecker, and someone has taken the ones of the adult feeding the youth, and put them into a .gif file and somehow added it to my Google+ photo album (something which I was thinking I should do but hadn't got around to). Thank you to whoever it was! (Please leave a comment to identify yourself if you're reading this.) |
Friday, September 6, 2013
Surface Design and A Tutorial...

 I've been meaning to make myself a toiletry bag for about a year now, but I just couldn't fine the motivation. Well, I guess this newly designed fabric was the ticket. I've decided to share my steps in a detailed tutorial since I was unable to find any toiletry bags this size quite like it when I did a search online. I would like to thank Jane for her tutorial for a similar but smaller zippered pouch.
 Fully Lined Toiletry Bag Tutorial (or make a cosmetics bag using the smaller measurements)
Materials:
For the larger/toiletry bag (finishes about 12" long, 6" wide, and 3 1/2" tall)
18" zipper
2 pieces of fabric measuring 16" X 10" (for the outside of your zippered pouch)
2 pieces of fabric measuring 16" X 10" (for the lining)
4 pieces of heavy weight fusible interfacing measuring 16" x 10" (Important! This is what gives your bag some structure!)
2 pieces of fabric measuring 4" X 3" to make your tabs (these can match your outer fabric or you could use a coordinating fabric)
For the smaller/cosmetics bag (finishes about 7" long, 4 1/2" wide, and 3 1/4" tall)
12" zipper
2 pieces of fabric measuring 10" X 8" (for the outside of your zippered pouch)
2 pieces of fabric measuring 10" X 8" (for the lining)
4 pieces of heavy weight fusible interfacing measuring 10" X 8" (Important! This is what gives your bag some structure!)
2 pieces of fabric measuring 4" X 3" to make your tabs (these can match your outer fabric or you could use a coordinating fabric)

I chose to cover my lining fabric with iron-on vinyl to make it easy to wipe with a damp cloth should anything spill inside. If you decide to do this, you have to cover the lining fabric with the vinyl before you do anything else.
This product is available at fabric stores like Fabricland and on-line.
Just follow the instructions on the package for how to apply it...it's very easy!
 1. Making the pull tabs. Take one of your 4" X 3" tab pieces. Fold and press about 5/8th of an inch along one long edge.
  Turn it the other way, this time folding and pressing about 1/4" along the other long side.
Fold the 1/4" edge down onto the wider 5/8" edge until the edges are close to even and press (see photo with red circle).


Top stitch close to both edges and then fold the tab in half and press. Set aside.

 2. Adding the interfacing. Fuse the heavy weight interfacing to the wrong side of all 4 of the bag pieces (outer fabric and lining).
 You've now got all of the parts you'll need to put the bag together!
3. Putting in the zipper. It is important that you make some marks 1/2" in from the sides on the back of your lining and outer fabric pieces. You can't sew past these marks or you'll get yourself in trouble later! My zipper was longer than needed (using what I had on hand) so I marked where the edge of the fabric would fall as well as that 1/2" mark on the zipper too.
 It's time to put in the zipper. Lay the first piece of lining right side up (blue dots). Put the zipper on top, along the 16" edge, and also right side up. Lay the outer fabric right side down (green pattern). As much as I hate pinning, you will want to pin this carefully. I put the first pin in that 1/2" space that you don't want to sew, and then continued along, putting the last pin in that 'no sew' area on the other end.

Remember not to sew the 1/2" areas at the beginning and end of this seam. You should use your zipper foot (didn't have mine with me at the cottage!) to sew this. Fortunately with the low profile zipper and the extra thickness of the fabric because of the interfacing, I had no trouble with my regular foot.

Repeat these steps with the remaining pieces of outer and lining fabrics to attach the other side of the bag.
 Top stitch along both sides. As you can see, I like to use two rows of top stitch. For the first, I set the machine to the 1/4" setting, then I stitch to the centre setting and again keep my pressure foot right along the edge of the fabric.
 4. Sewing the bottom seams for lining and outer bag. Right now, you have the zipper at the centre with a layer of lining wrong side together with a layer of lining on each side. You need to rearrange the sides so that the lining is together on one side and the outer fabric is together on the other side. Lay the piece down so that the zipper is at the centre and the lining sides are on the left, right sides together, and the outer fabrics are together on the right, right sides together.
Starting with the outer fabric, pin if you like, and stitch just along the 16" edge. This time you will stitch right to the edges (you don't need to leave that 1/2" you did before).
 Unlike this photo, stitch the outer fabric seam using a 1/4" seam.
Sew this seam using a 1/2" seam so that the lining ends up a bit smaller than the outer layer of the bag. This way it nestles nicely inside. Backstitch at the stop marks so that the opening doesn't rip as you are turning the bag right side out later.
5. Adding the tabs and sewing the end seams. Fold the bag so that the bottom seams are centred on the zipper, with the outer fabric on top. Make sure the lining's bottom seam is lined up with the zipper too, and press it flat.

 Here's another shot of what this folded pressed piece should look like at this point.
Lay the tab so that it is centred along the bottom seam of the outer fabric, with the part you want at the top facing up and the raw edges lined up with the raw edges of the outer fabric. Tack the tab in place with a quick line of stitching just over this tab, as shown below.


 Now, starting with the end OPPOSITE the one with the zipper pull (while zipper is closed), pin the outer fabric edges, right sides together, and carefully stitch along this seam, being careful to hold the lining fabric out of the way (This is why that 1/2" 'do not stitch' area was so important earlier!).
  It should look like this photo when stitched. If your zipper was too long, you can go ahead and trim it a bit shorter now.
We're now going to stitch the other side of the outer fabric closed. OPEN THE ZIPPER!
Open the zipper almost all the way. If you don't, you won't be able to turn your bag right side out when you're done!

Pin and stitch along this seam, as you did for the other end, above, being careful to pull the lining out of the way.
 Repeat the same steps with the lining, this time holding the outer layer away as you sew the ends of the lining shut. Do this for both ends of the lining.
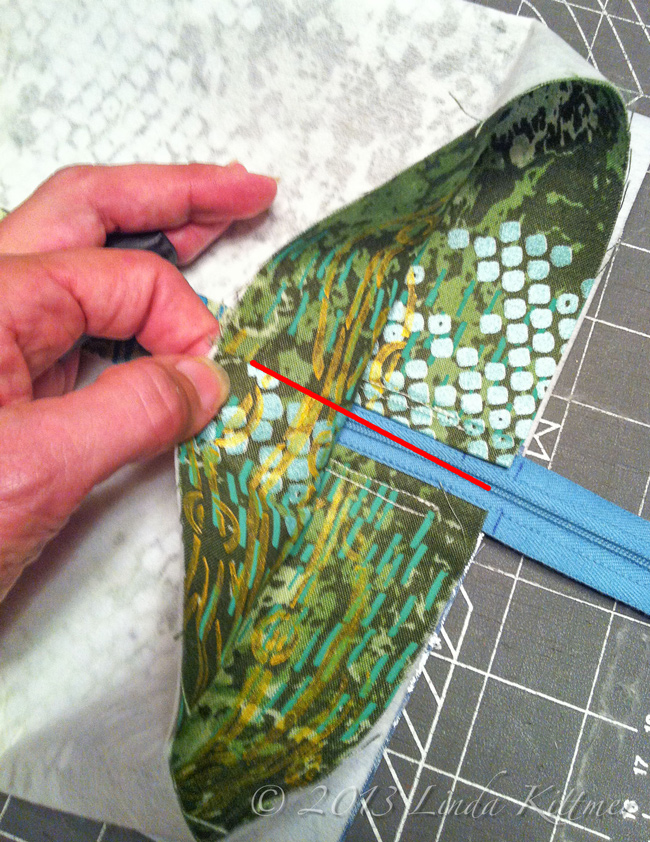
 6. Shaping, folding and sewing the corners. You are going to repeat this for all eight corners (4 bag corners and 4 lining corners). Pick up a corner, and press it flat so that the seam runs straight down the centre of the triangular fold as shown by the red line in the photo.
 Lay this folded triangle flat on the table and measure 1 1/2" from the tip, along that centre line. Draw a line along the edge of the ruler to mark your sewing line.
 Sew along the line you just drew and then trim off the extra fabric.
Repeat these steps for the other seven corners.
 Here you can see I've shaped the outer part of the bag after finishing the first four corners. I still have to do the corners on the lining.
After all 8 corners are finished, you are ready to turn the bag right side out.
Reach into the opening that you left in the bottom seam of the lining fabric and turn the bag right side out.
Shape the bag by completely pushing out all of the corners.
All going well, your finished bag should look something like this:

Subscribe to:
Posts (Atom)