I've been meaning to make myself a toiletry bag for about a year now, but I just couldn't fine the motivation. Well, I guess this newly designed fabric was the ticket. I've decided to share my steps in a detailed tutorial since I was unable to find any toiletry bags this size quite like it when I did a search online. I would like to thank Jane for her tutorial for a similar but smaller zippered pouch.
 Fully Lined Toiletry Bag Tutorial (or make a cosmetics bag using the smaller measurements)
Materials:
For the larger/toiletry bag (finishes about 12" long, 6" wide, and 3 1/2" tall)
18" zipper
2 pieces of fabric measuring 16" X 10" (for the outside of your zippered pouch)
2 pieces of fabric measuring 16" X 10" (for the lining)
4 pieces of heavy weight fusible interfacing measuring 16" x 10" (Important! This is what gives your bag some structure!)
2 pieces of fabric measuring 4" X 3" to make your tabs (these can match your outer fabric or you could use a coordinating fabric)
For the smaller/cosmetics bag (finishes about 7" long, 4 1/2" wide, and 3 1/4" tall)
12" zipper
2 pieces of fabric measuring 10" X 8" (for the outside of your zippered pouch)
2 pieces of fabric measuring 10" X 8" (for the lining)
4 pieces of heavy weight fusible interfacing measuring 10" X 8" (Important! This is what gives your bag some structure!)
2 pieces of fabric measuring 4" X 3" to make your tabs (these can match your outer fabric or you could use a coordinating fabric)

I chose to cover my lining fabric with iron-on vinyl to make it easy to wipe with a damp cloth should anything spill inside. If you decide to do this, you have to cover the lining fabric with the vinyl before you do anything else.
This product is available at fabric stores like Fabricland and on-line.
Just follow the instructions on the package for how to apply it...it's very easy!
 1. Making the pull tabs. Take one of your 4" X 3" tab pieces. Fold and press about 5/8th of an inch along one long edge.
  Turn it the other way, this time folding and pressing about 1/4" along the other long side.
Fold the 1/4" edge down onto the wider 5/8" edge until the edges are close to even and press (see photo with red circle).


Top stitch close to both edges and then fold the tab in half and press. Set aside.

 2. Adding the interfacing. Fuse the heavy weight interfacing to the wrong side of all 4 of the bag pieces (outer fabric and lining).
 You've now got all of the parts you'll need to put the bag together!
3. Putting in the zipper. It is important that you make some marks 1/2" in from the sides on the back of your lining and outer fabric pieces. You can't sew past these marks or you'll get yourself in trouble later! My zipper was longer than needed (using what I had on hand) so I marked where the edge of the fabric would fall as well as that 1/2" mark on the zipper too.
 It's time to put in the zipper. Lay the first piece of lining right side up (blue dots). Put the zipper on top, along the 16" edge, and also right side up. Lay the outer fabric right side down (green pattern). As much as I hate pinning, you will want to pin this carefully. I put the first pin in that 1/2" space that you don't want to sew, and then continued along, putting the last pin in that 'no sew' area on the other end.

Remember not to sew the 1/2" areas at the beginning and end of this seam. You should use your zipper foot (didn't have mine with me at the cottage!) to sew this. Fortunately with the low profile zipper and the extra thickness of the fabric because of the interfacing, I had no trouble with my regular foot.

Repeat these steps with the remaining pieces of outer and lining fabrics to attach the other side of the bag.
 Top stitch along both sides. As you can see, I like to use two rows of top stitch. For the first, I set the machine to the 1/4" setting, then I stitch to the centre setting and again keep my pressure foot right along the edge of the fabric.
 4. Sewing the bottom seams for lining and outer bag. Right now, you have the zipper at the centre with a layer of lining wrong side together with a layer of lining on each side. You need to rearrange the sides so that the lining is together on one side and the outer fabric is together on the other side. Lay the piece down so that the zipper is at the centre and the lining sides are on the left, right sides together, and the outer fabrics are together on the right, right sides together.
Starting with the outer fabric, pin if you like, and stitch just along the 16" edge. This time you will stitch right to the edges (you don't need to leave that 1/2" you did before).
 Unlike this photo, stitch the outer fabric seam using a 1/4" seam.
Sew this seam using a 1/2" seam so that the lining ends up a bit smaller than the outer layer of the bag. This way it nestles nicely inside. Backstitch at the stop marks so that the opening doesn't rip as you are turning the bag right side out later.
5. Adding the tabs and sewing the end seams. Fold the bag so that the bottom seams are centred on the zipper, with the outer fabric on top. Make sure the lining's bottom seam is lined up with the zipper too, and press it flat.

 Here's another shot of what this folded pressed piece should look like at this point.
Lay the tab so that it is centred along the bottom seam of the outer fabric, with the part you want at the top facing up and the raw edges lined up with the raw edges of the outer fabric. Tack the tab in place with a quick line of stitching just over this tab, as shown below.


 Now, starting with the end OPPOSITE the one with the zipper pull (while zipper is closed), pin the outer fabric edges, right sides together, and carefully stitch along this seam, being careful to hold the lining fabric out of the way (This is why that 1/2" 'do not stitch' area was so important earlier!).
  It should look like this photo when stitched. If your zipper was too long, you can go ahead and trim it a bit shorter now.
We're now going to stitch the other side of the outer fabric closed. OPEN THE ZIPPER!
Open the zipper almost all the way. If you don't, you won't be able to turn your bag right side out when you're done!

Pin and stitch along this seam, as you did for the other end, above, being careful to pull the lining out of the way.
 Repeat the same steps with the lining, this time holding the outer layer away as you sew the ends of the lining shut. Do this for both ends of the lining.
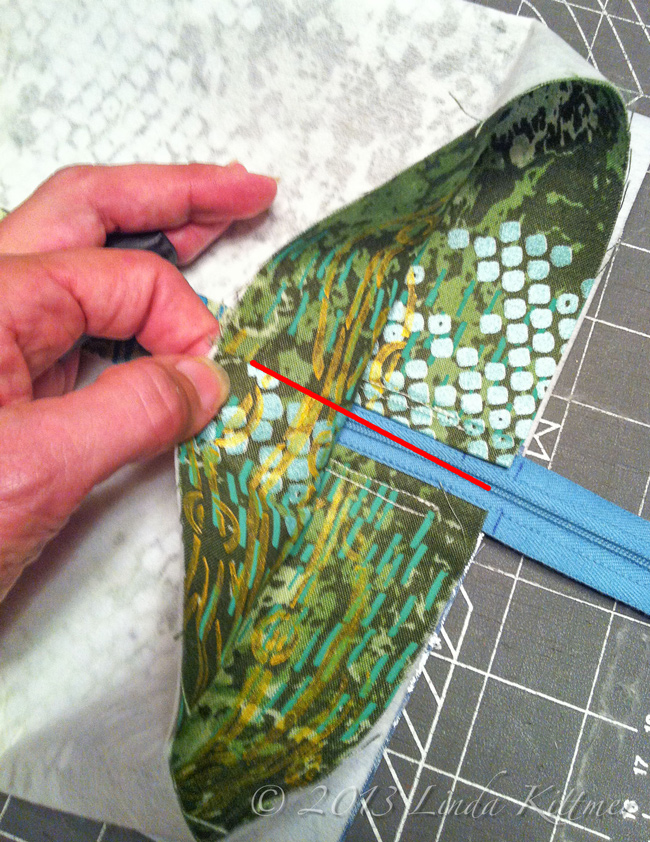
 6. Shaping, folding and sewing the corners. You are going to repeat this for all eight corners (4 bag corners and 4 lining corners). Pick up a corner, and press it flat so that the seam runs straight down the centre of the triangular fold as shown by the red line in the photo.
 Lay this folded triangle flat on the table and measure 1 1/2" from the tip, along that centre line. Draw a line along the edge of the ruler to mark your sewing line.
 Sew along the line you just drew and then trim off the extra fabric.
Repeat these steps for the other seven corners.
 Here you can see I've shaped the outer part of the bag after finishing the first four corners. I still have to do the corners on the lining.
After all 8 corners are finished, you are ready to turn the bag right side out.
Reach into the opening that you left in the bottom seam of the lining fabric and turn the bag right side out.
Shape the bag by completely pushing out all of the corners.
All going well, your finished bag should look something like this: