Showing posts with label stencil. Show all posts

Thursday, January 22, 2015

DLP Week 3: My Favourite So Far!


The Documented Life Project challenge for this week is to use the colour wheel and a particular quote of Georgia O'Keeffe.

I decided to use some acrylic ink since I only had the three primary colours and I wanted to restrict myself to those and let them mix to create other colours. I liberally painted them onto the spread with a brush.


Then I covered the page with plastic kitchen wrap and allowed it to dry for a while.

Ironically, while I was waiting for it to dry I decided to watch the the most recent episode of DMTV with Laura and Linda Kemshall. Linda was working on a journal page and I couldn't believe it, but she was using this kitchen wrap technique! Great minds!!! Having said that, she was doing some really incredible work with leaves from her garden...something I'll certainly play with at some point!
Anyway, back to my piece. Once the plastic wrap is removed you're left with a really wonderful random texture of wrinkle lines!

I added additional layers using various sizes of bubble wrap and white gesso. I seem to go back to this a lot...it's so easy and gives you those wonderful circles...definitely one of my 'go to' techniques for adding layers and texture.
I pulled out some of my Gelli print papers and made the flowers. The stems were drawn in using my white Signo pen and a permanent black pen.

Using a Terri Stegmiller stencil I added the grid lines for the quote. To soften the lines, I doodled little circles using the white pen, rather than drawing solid lines.
The text was added with a black pen, following the shapes of the grid lines and then highlighted with the white pen.

And here's the finished page:


Monday, June 30, 2014

Heart Swell...or puff...

I've decided to do a series of small pieces using my hand dyed fabric and various techniques, all incorporating hand stitch.

This piece is starting with a heart stencil designed by Margaret Applin.
Using a palette knife, I applied a nice thick coating of Pebeo Expandable Paint through the stencil.  Be sure to keep the stencil firmly held onto the fabric so that you don't get any paint under it.  I used a temporary spray adhesive to achieve this.

Let dry according to paint directions and then 'puff' using a heat gun.

I'll show you more once I get to the hand stitching. Have a great day!

Wednesday, May 7, 2014

Fun Found Items...

The other day I was going through some things and I found a bag of goodies that my friend Jan gave me at a Christmas get together.  Inside was this package of Scratch to Draw paper.


I reached for my high tech tweezers, usually reserved for fine manipulation of tiny things...but they were the first pointy item I got my hands on and I knew they'd be great for scratching into the paper (they stick mentioned on the package seems to have gone missing!).


I used Carolyn Dube's buildings stencil because it has a nice variety of interesting blocks. I was thrilled with the bright colour and the effect of the tweezers scratching into the black looked great (in my humble opinion LOL).


 I made a variety of different sized 'building blocks' :o) and then stacked them in a finely balanced arrangement.  I played with various background ideas, but in the end I decided that I liked the contrast of the blocks on the white page so I left it as is.


I added some text, a bit of shading and a simple doodled border and called it done!


Monday, April 28, 2014

StencilGirl Blog Hop Featuring Seth Apter's New Releases

Welcome to another fun StencilGirl blog hop stop!  Today I'm using Seth Apter's new stencil called Inside Out for a mixed media encaustic piece.

I started by lightly misting a sanded board (see here re: my use of recycled art boards) and then using Caran D'Ache Neocolor II wax crayons to create the first layer.  Since these are water-soluble crayons, I sprayed the piece with a fixative before adding the first layer of encaustic medium.
Some layers of tissue paper, one on which I had written a quote, were added next.

In my fibre art group, Group of Eight Fibre Artists, we participate in two challenges each year. The current challenge is "Secrets", so although I have another piece I'm doing for the challenge, I thought I'd also use that theme for this piece.

The quote reads, "...there are two types of secrets...the kind you want to keep in, and the kind you don't dare to let out."


Seth's stencil, in addition to having many fabulous design elements, includes the words 'inside', 'out', and 'secret'.  Perfect for the quote right!?

I used oil pastel to add some of the elements from the stencil onto the surface, and then used a heat gun to slightly melt and fuse the pastel with the encaustic medium.

I drew some simple dots with the oil pastel and doodled circles around them with either a permanent black pen or my Signo white pen, again fusing the ink into the wax.


Great news...StencilGirl has a giveaway! 

Two lucky winners will each get a set of Seth Apter's newly released stencils!

All comments left on the hop are eligible for the giveaway so 
the more blogs you comment on, the more chances you will have to win. 
Have fun and GOOD LUCK!

The giveaway will close on Sunday, May 4th at 11:59PM Central Time. 

Please Note: Although this is considered a one day hop, 
you have the ENTIRE week to comment to win the prize.

Note about replies during blog hops: Blogger seems to cut me off at a certain number of replies (no sure how many) and then stops letting me post comments from you. Since I want anyone to have a chance to win the giveaway prizes,  I have decided to only reply if someone asks a direct question.  
Please know that all of your comments are much appreciated.  I do read them all, and I thank you for all of your kind and thoughtful words!

Blog Hop Order

Friday, March 28, 2014

I'm Featured on StencilGirl Talk Today...

I'm featured over on StencilGirl Talk today.  I'm creating a journal page using Carolyn Dube's Use Your Words stencil.  Here's a bit of a peak at what I'm doing...come on over to see more!

Wednesday, February 26, 2014

Doodling and Exploring a New Technique...

A little while ago I watched a YouTube video done by my friend Carolyn Dube, in which she used pan pastels and stencils to create a journal page. It looked like a lot of fun, and I needed a quick 'art play' so I gave it a try. I used my Stencilgirl peacock feather stencil, designed by Kae Pea along with colours that you'd expect to see in real peacock feathers.  I just love those colours!
I wanted a really soft, almost slightly blurred background so I used a very soft brush to gently brush over the page, pulling out from the core of the feathers. I probably should have stopped here since I love this...but I didn't...

I then grabbed the stencil and a permanent black pen and I traced the stencil a few times, filling it in with little cross hatch marks.


At this point I added my text and then put another feather up at the top, this time using only part of the feather.  Random swirls and dots filled in some of the border areas before I did a bit of journalling in the space under the two feature feathers.

I'm not sure why I had such a hard time getting good photos of this page, but the black is really dark (unlike the deep grey that you're seeing in these images).

The end result isn't as wonderful as the vision in my head was, and I sort of wish I hadn't covered up that beautiful background.  Oh well, I know how to recreate it!


Wednesday, January 29, 2014

What Do You Do When You Have No Pockets?

Although pockets tend to inform my shopping to some extent, a few of my clothes don't seem to have them. Although I can't be bothered carrying a lot around with me, I do need somewhere to keep my iPhone, a bit of cash and maybe my Visa card and my keys.

On Monday, I showed you a 6 inch square of my rust dyed fabric that I had embellished using Michelle Ward's stencil design and some hand stitching, and I promised to show you how I was going to use it.  Well, it has become a tiny little pocket/bag!

I created the bag using a simple pattern idea from Jane Davila, which I altered to suit my personal needs. The 6 inch hand stitched square was bound with the same fabric that creates the accents by the zipper and the inside lining.  This creates an open front pocket in addition to the one compartment within the bag.  I couldnt' find a strap that I was happy with, so I made my own by combining some Blue trim and a bit of copper coloured 'rope' trim.


Monday, November 11, 2013

A Blog Hop Featuring StencilGirl and Foam Board Express

 Today I'm participating in a blog hop with StencilGirl and Foam Board Express.
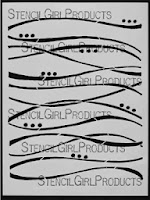
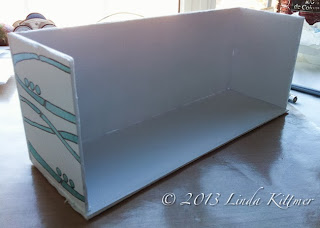
I've been meaning to come up with an organizer for all of my pens, pencils, scissors, etc. that I want to keep easily accessible on my desk so I designed one using foam core board, decorated with Terri Stegmiller's  Waves stencil.

Since I didn't have a sharp blade for my utility knife, I decided to try cutting the foam board with my paper cutter (guillotine). Although it did slightly crush the edge (not visible in the finished project), it gave me a good clean cut and made it fast and easy to get the pieces the size I wanted. 
I cut 2 pieces for the sides (11" X 4.5"), 1 piece slightly narrower but the same length (11" X 3.5") for the bottom, and then 5 pieces (4.5" X 3.25") for the sides and inner dividers.
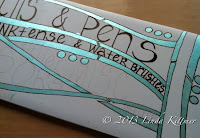


Using a metallic turquoise acrylic paint and a make-up sponge, I stencilled part of the waves stencil onto the front, back and side pieces. I used a 0.8 Micron pen to outline the stencilling and to add some text to the front.


One the decorating was done, it was time to assemble the pieces.  I used PVA glue and regular straight pins to put it together.  The glue holds it long term, while the pins hold it until the glue dries and then give it a bit more stability (think mini rebar)


I glued the bottom edge of the front piece and then attached it to the edge of the bottom piece so that the side sat flush with the edge of the base.  The pins are stuck in through the the base and into the foam of the front piece (be careful to push them in straight so they don't poke through the paper layers).  I pin about every inch along the entire edge.
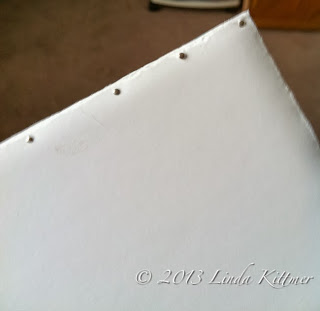


Apply glue to the bottom and front edge of one of the sides.  Place flush with the bottom and front pieces, and again pin to secure.  If any glue shows, wipe excess away before it dries, to avoid clear lumps of glue (especially on the outside).
You now need to do some measuring and draw a few pencil lines so you'll know where to put the pins for the inner dividers.  I made a mark along the edge at 5.5" to mark the centre, and then 2.75" from that centre line, to mark the quarter line.  You need to mark these lines on the inside of all three 11" pieces, and on the outside of the base and back pieces.

Draw in the pencil lines along the base, both inside and out, and the inside of the front piece.  These lines will allow you to position the dividers accurately, as well as figure out where to put in the pins.  Note, I didn't want pins all along the edges in front, so I only pinned the top and bottom and relied on the glue to hold the rest.  I did pin from the back all along the edge though since it didn't have the text decorating it.

Once all of the dividers are in and pinned from the bottom as well as anchored at the top and bottom edge of the front, it's time to add the final piece.
Put a bead of glue all along the top and side edges of the dividers and side pieces, as well as along the bottom edge of the back piece. Place it so that it sits on top of the edge of the base and tight against all of the dividers and sides.  Making sure that the sides and dividers are covering the lines you drew so that you know they're in the correct position, and then go ahead and pin to secure it all.  Once the glue dries it will be good and solid!


And here's what it looks like filled up and in place at the corner of my desk.


After organizing that area of my desk, I decided to make a little divider for one of the cubbies in this shelf.  Now instead of a 13" cube, I've got some shelves within it to organize some of the smaller bins and things.  Notice I left enough space at the side so the ATC display case can still stand at the side of that space. It was constructed in the same way, using glue and straight pins.  By adding a back, although not really necessary, you get that much more stability.

Before
After
And now, check out these great prizes...

INCREDIBLE PRIZE PACKAGE:
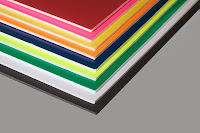
Foam Board Express is giving away:
Foam Board Express would like to offer a package of five (5) of its 20-inch by 30-inch flat display foam boards, including one black foam board, one white foam board and three additional foam board sheets in colours chosen by the winner.  Colour choices include:  green, red, yellow, dark blue, neon yellow, neon orange and neon pink. 

and 

StencilGirl is giving away:
Mary Beth's new DVD called: StencilGirl Mixed Media Sampler Journal 


All comments on all blogs eligible. Combined prize going to one winner.


You can check out Foam Board Express on their website and their FaceBook page and they've also launched a Pinterest site.


Don't forget to hop on over to the next stop on the blog hop and leave a comment!  

Linda Kittmer-You Are Here
Leslie Tucker Jenison-Your next stop on the HOP

GIVEAWAY (ends Thursday November 14th @ 11:59PM Central Time

Friday, July 26, 2013

StencilGirl Blog Hop and Giveaway

I'm so glad you've stopped by today for our StencilGirl Blog Hop and Giveaway!


Today I'm going to create my August art journal calendar page using a couple of my StencilGirl stencils, including this feature stencil called Crossed Rounds & Squares by Andrew Borloz .  I love this stencil because it's really six stencils in one!

I'm also using Rafters by Mary Beth Shaw.


I started out by using a pencil and ruler to create a grid on the page spread and then used random shapes from the Rafter's stencil to trace shapes with a permanent black pen which will be used as my journalling spaces.


You're probably noticing something very wrong right about now...sadly I didn't clue in until much later in the process.


I threw some colour on the spread using  turquoise and yellow acrylic paint.  When I do this I tend to just paint random patches of colour, overlapping and mixing the colours where they meet.
Using Andrew's stencil and a make-up sponge, I added some solid red circles here and there, followed by some of the crossed circles in a softer pink. I painted circles in varying sizes to bring out more of the turquoise and yellow. And then I added a few darker blue solid circles.


While the paint on the journal page was drying I grabbed a page of the newspaper and used a different part of Andrew's stencil to get some colour and texture over top of the newspaper text.


See what I mean...I've already used five of the six patterns available on this one stencil!

I liked the crossed square pattern on the newsprint so I added some of that to the journal page too.

Using a small paint brush I added yellow or red dots inside the crossed circles to create the centre of a flower.

I love re-purposing things, and this little spray bottle (originally a body spray) makes a great paint sprayer.  I diluted some liquid acrylic (in the darker blue I used earlier) to a milking consistency so that I could spray it through the nozzle (start with approx. equal parts paint/water and add water as needed until it sprays easily).  This was then generously sprayed onto the stenciled newspaper and left to dry.


While the newspaper dried, I picked up my black waterproof pen and started doodling on the page, creating flowers out of those crossed circles. Other lines and swirls were added to represent vines from which the flowers grew.


I added some Golden Acrylic Glazing Liquid to white paint to make it even more  transparent and started to paint in the shapes I had traced from the Rafters stencil.

Yes, this is when I finally clued in to the fact that I had way too many days in August.  Honestly, I don't know what I was thinking when I created the initial grid, but obviously I was far to focussed on playing with paint and stencils to pay attention!

Fortunately I was able to wipe off the extra white from that one shape that I shouldn't have painted!

Up until this month, I have always put the name of the month in that space in the top left of the page.  However, I decided I was going to have to make the letters bigger and put them in that huge extra space at the bottom (created by my silly mistake).

I first drew and cut out the letters from a plain piece of the newspaper to ensure they'd fit.  I then used those as my tracers when making the letters on the coloured newsprint text.

I painted matted gel medium onto the journal page, and the back of the newspaper letters to glue them to the page.


And here's the finished spread:


Have fun visiting all the other creative team members to see what they've done and for more chances to win in the giveaway!  Good Luck!