
Showing posts with label rust dyed fabric. Show all posts
Showing posts with label rust dyed fabric. Show all posts
Wednesday, April 16, 2014
Rusty Encaustic...
I've been exploring encaustic a little more. The other day, while out walking with Dime, I found a few interesting rusty bits. Since I have lots of rust dyed fabric and some rust dyed paper towels in my stash, I thought I'd use them for a small encaustic piece. I started with another of those recycled art boards (see here). My first layer was a rusted paper towel, and then I layered on some strips of rusted cotton and added the found objects and a dried cedar 'tree'.


Wednesday, January 29, 2014
What Do You Do When You Have No Pockets?

On Monday, I showed you a 6 inch square of my rust dyed fabric that I had embellished using Michelle Ward's stencil design and some hand stitching, and I promised to show you how I was going to use it. Well, it has become a tiny little pocket/bag!
I created the bag using a simple pattern idea from Jane Davila, which I altered to suit my personal needs. The 6 inch hand stitched square was bound with the same fabric that creates the accents by the zipper and the inside lining. This creates an open front pocket in addition to the one compartment within the bag. I couldnt' find a strap that I was happy with, so I made my own by combining some Blue trim and a bit of copper coloured 'rope' trim.

Monday, January 27, 2014
Blog Hop Featuring Michelle Ward's All New StencilGirl Designs
Today's blog hop is really exciting...the creative team at StencilGirl is creating with brand new stencil designs by Michelle Ward. These stencils are just being made available to you for the first time today and we've been asked to keep them a secret until today's reveal!
Ta da! Here they are...you can click on the images for links if you want to start shopping right now...(I'm thinking all 4 of them would work so well together in some surface design for art quilting!), but...


maybe you'd like to see how I used 'RIPPLES' first (that's the second one in the top row, with the wonderful concentric circles).
 I started with a piece of rust dyed fabric that I made several months ago and I traced the entire stencil onto the fabric using pencil. I often 'take stencils apart' and only use bits here and there in my design, but for what I'm planning Michelle's composition is perfect just as it is!
 I outlined the pencil lines using three strands of blue DMC floss and a simple running stitch. A finer variegated taupe/blue thread was used to outline the background areas in the same manner.
 I filled the background areas using French knots and seed stitches. I switched back to the DMC, this time using a single strand and began filling the circles in with straight stitches. A single strand of a rust coloured floss was used to add additional stitches in the areas between the 'rings'.

Here are a couple of close ups of the stitching:


I'll back on Wednesday to show you how I used this little six inch piece of stitching. Until then, enjoy the rest of the hop!
Great news...StencilGirl has a giveaway!
All comments left on the hop are eligible for the giveaway so
the more blogs you comment on, the more chances you will have to win.
Have fun and GOOD LUCK!
The giveaway will close on Friday, January 31th at 11:59PM Central Time.
Please note: I have discovered that blogger will only allow/show 200 comments, including my relpies so as much as I love to leave personal thank yous to each of you, I have stopped replying to make sure your comment shows up and therefore gets entered in the draw. Please know I appreciate all of your thoughtful words!
Blog Hop Order
Linda Kittmer-You are here!
Julie Snidle - Hop to see Julie next please...
Friday, May 24, 2013
Rust

Here are a few close up images of the piece:


 Linking up with Off The Wall Friday.
Saturday, May 18, 2013
The Denim Series Finishes...At Least For Now
 The final piece in the series, goes back to using some rust dyed fabric along with a piece of hand dyed coral 'waffle' fabric. The French knots found their way onto this piece as well. I seem to be in a bit of a French knot kick these days. The coral fabric seemed to invite simple cross stitch in those wonderful little square depressions and I decided to use a simple running stitch to provide some movement in the rust dyed area. The mono printed denim was machine quilted using a repeating squared spiral pattern. Since I wanted to leave on the two buttons from the original denim shirt, I've called this piece "Two Random Buttons".
Tuesday, May 14, 2013
The Shirt Off His Back...
For this piece, I've gone back to that denim shirt I told you about in a post a couple of weeks ago. Since that last post, I've added a lot of free-motion quilting, hand stitching and some flat, wooden 'button like' discs. I am amazed at how tough it was to do all the seed stitching into the rust dyed fabric. Even the areas that are lightly rusted are tough, but stitching through the darker areas has left me with several punctures in my hand from the back of the needle. I guess I should have pulled out a thimble, but I'm just not used to using one so I find them a bit annoying to work with. Having said that, puncturing your hands is a tad annoying too...

Friday, May 3, 2013
Xs and Os
 On Sunday I posted about a new series I've started, using a consistent 12" x 12" format. I've finished the first one and my mats arrived in the mail yesterday so it is all matted and ready. Fortunately this image is true to the actual colour (unlike the previous post). I've called it Xs and Os because of the circles that I had printed on the denim using my Gelli plate, and the Xs that I stitched into the rust dyed fabric. I echoed the Os using little round discs (actually the ends of those pre-wound cardboard bobbins...'cause I can't seem to throw anything out. LOL)
I've posted it here without the mat so that you can see a larger image, allowing you to see more detail.

Sunday, April 28, 2013
A New Series in Progress...
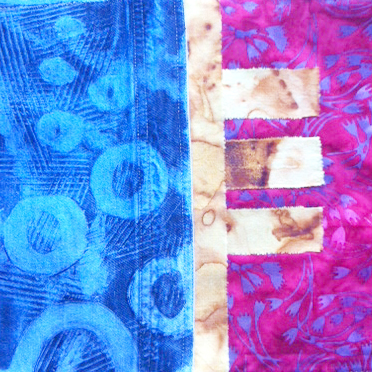 I've started a new series of work which will be matted in 12" x 12" mats, with an 8" square 'window' in the mat, ready to be framed. I've been playing with my Gelli plate to create some mono prints on pieces of an old denim shirt I inherited from my husband because the sleeve were too short for him. I'm adding various other elements, including rust dyed fabric, machine lace which I made using water soluable stabilizer, pieces of silk fusion and some batiks from my stash. Here are a couple of them ready to be quilted and hand embroidered.
 Time to go listen to some TV...
Subscribe to:
Posts (Atom)