Showing posts with label organization. Show all posts

Monday, September 22, 2014

You've Got to Love When a Plan Comes Together!

Last week I posted about the hand dyed batik fabric I made and the little quilted piece that resulted from it (see that here).

Well, after many hours of thinking about my design and mulling over ideas, I finally sat down and got to work making this fully lined and totally organized puppy raiser carry-all bag.


It's amazing what you can do with a recycled old pair of your husband's jeans, some colourful quilted fabric, muslin and a repurposed adjustable strap from a bag that's never use.


Here are various views:


The front zippered pocket allows me secure but quick access to a bit of cash and/or my iPhone.
The back outer pocket, for puppy training treats, is lined with a piece of an old denim shirt. This will allow me to turn it completely inside out to shake out crumbs that inevitably end up in the bottom of the pocket in which I carry dog treats.
I decided to add grommets with brass rings through them to attach the strap.  Since I have a small carabiner attached to my keys, this also gives me a great way to attach my keys to the bag and tuck them inside so I can get my hands on them quick and easy!  You can see all of the internal pockets for everything I need...no more digging around trying to get my hands on what I'm looking for!


It's big enough to carry extra little things I might pick up while shopping, or to carry a light jacket or umbrella, or my DSLR camera when I want it, yet not so big and bulky that I can't comfortably wear it wherever I go! I'm thrilled with how it turned out!

Monday, April 14, 2014

Repurposing a Quilt...

Many years ago, I designed and made a quilt that was used for the quilt guild's block of the month.  Although I liked the idea of the blocks, I never really liked the little quilt I had made with them.  So, this weekend I decided to repurpose it into an organizational system.

I could have just used it as a dog bed, since as soon as I put it on the floor to snap this picture so I could show you the 'before', Dime walked right over and lay down on it! Silly puppy!


Anyway, the original blocks were 12" blocks so I cut them down to 11.5".  The four blocks used for the outer panels of the bags were trimmed to get rid of any binding, but the four blocks that I used for inner pockets were trimmed so that the binding became the open edge of the pocket.


Since becoming a foster 'mom' for future dog guides, I've been carrying a lot of ziploc bags with puppy needs (paper towels, a collapsible water dish, water bottle, training treats, etc.) as well as the usual contents of a purse.  Now I can organize all of the puppy things into one bag...the pockets are great for finding things quickly, and the second one holds my other 'purse' items.

The final block (the quilt had 9 blocks) became the water bottle holder and a little change purse (which fits nicely inside the larger 'purse' bag).  All of this fits into the larger bag I carry so that now instead of riffling through a bunch of ziploc bags to try to find my wallet or whatever, I can get my hands on things really quickly!

The idea of cutting up a quilt and repurposing it took some getting over, but I'm going to enjoy this quilt so much more now that I'll see it daily and know that it'll keep me organized!

Monday, November 11, 2013

A Blog Hop Featuring StencilGirl and Foam Board Express

 Today I'm participating in a blog hop with StencilGirl and Foam Board Express.

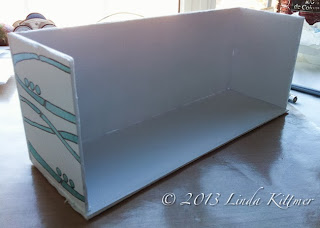
I've been meaning to come up with an organizer for all of my pens, pencils, scissors, etc. that I want to keep easily accessible on my desk so I designed one using foam core board, decorated with Terri Stegmiller's  Waves stencil.

Since I didn't have a sharp blade for my utility knife, I decided to try cutting the foam board with my paper cutter (guillotine). Although it did slightly crush the edge (not visible in the finished project), it gave me a good clean cut and made it fast and easy to get the pieces the size I wanted. 
I cut 2 pieces for the sides (11" X 4.5"), 1 piece slightly narrower but the same length (11" X 3.5") for the bottom, and then 5 pieces (4.5" X 3.25") for the sides and inner dividers.
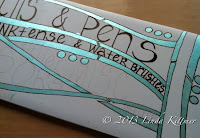


Using a metallic turquoise acrylic paint and a make-up sponge, I stencilled part of the waves stencil onto the front, back and side pieces. I used a 0.8 Micron pen to outline the stencilling and to add some text to the front.


One the decorating was done, it was time to assemble the pieces.  I used PVA glue and regular straight pins to put it together.  The glue holds it long term, while the pins hold it until the glue dries and then give it a bit more stability (think mini rebar)


I glued the bottom edge of the front piece and then attached it to the edge of the bottom piece so that the side sat flush with the edge of the base.  The pins are stuck in through the the base and into the foam of the front piece (be careful to push them in straight so they don't poke through the paper layers).  I pin about every inch along the entire edge.
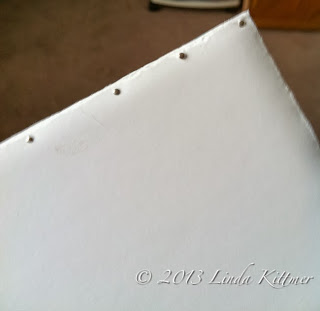


Apply glue to the bottom and front edge of one of the sides.  Place flush with the bottom and front pieces, and again pin to secure.  If any glue shows, wipe excess away before it dries, to avoid clear lumps of glue (especially on the outside).
You now need to do some measuring and draw a few pencil lines so you'll know where to put the pins for the inner dividers.  I made a mark along the edge at 5.5" to mark the centre, and then 2.75" from that centre line, to mark the quarter line.  You need to mark these lines on the inside of all three 11" pieces, and on the outside of the base and back pieces.

Draw in the pencil lines along the base, both inside and out, and the inside of the front piece.  These lines will allow you to position the dividers accurately, as well as figure out where to put in the pins.  Note, I didn't want pins all along the edges in front, so I only pinned the top and bottom and relied on the glue to hold the rest.  I did pin from the back all along the edge though since it didn't have the text decorating it.

Once all of the dividers are in and pinned from the bottom as well as anchored at the top and bottom edge of the front, it's time to add the final piece.
Put a bead of glue all along the top and side edges of the dividers and side pieces, as well as along the bottom edge of the back piece. Place it so that it sits on top of the edge of the base and tight against all of the dividers and sides.  Making sure that the sides and dividers are covering the lines you drew so that you know they're in the correct position, and then go ahead and pin to secure it all.  Once the glue dries it will be good and solid!


And here's what it looks like filled up and in place at the corner of my desk.


After organizing that area of my desk, I decided to make a little divider for one of the cubbies in this shelf.  Now instead of a 13" cube, I've got some shelves within it to organize some of the smaller bins and things.  Notice I left enough space at the side so the ATC display case can still stand at the side of that space. It was constructed in the same way, using glue and straight pins.  By adding a back, although not really necessary, you get that much more stability.

Before
After
And now, check out these great prizes...

INCREDIBLE PRIZE PACKAGE:
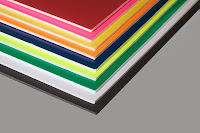
Foam Board Express is giving away:
Foam Board Express would like to offer a package of five (5) of its 20-inch by 30-inch flat display foam boards, including one black foam board, one white foam board and three additional foam board sheets in colours chosen by the winner.  Colour choices include:  green, red, yellow, dark blue, neon yellow, neon orange and neon pink. 

and 

StencilGirl is giving away:
Mary Beth's new DVD called: StencilGirl Mixed Media Sampler Journal 


All comments on all blogs eligible. Combined prize going to one winner.


You can check out Foam Board Express on their website and their FaceBook page and they've also launched a Pinterest site.


Don't forget to hop on over to the next stop on the blog hop and leave a comment!  

Linda Kittmer-You Are Here
Leslie Tucker Jenison-Your next stop on the HOP

GIVEAWAY (ends Thursday November 14th @ 11:59PM Central Time

Sunday, October 14, 2012

Studio Tour...


A couple of years ago, I moved my studio from a smaller guest room (with one small window facing our neighbour's brick wall) to the front room which has lovely big windows facing the street.  The room is 15' 8" X 11" (12' on the left side with the larger window).  Recently I picked up a great shelf/desk unit from Ikea and I've reorganized my studio, finally achieving a really good working space.  I lack a sink and source of water (which would make it ideal), but there is a bathroom just down the hall and a great utility sink in the basement for messy work.

I have been able to organize several areas, each for specific purposes.  As you enter the room, this is what you see.  Notice the white dresser and night stand to the right.  I'll tell you about those later.


Looking around clockwise, you can see my cutting table in the corner, and the closet doors which double as art display and/or design wall, as needed.  A small peg board, painted to match the walls, holds a variety of tools which I tend to use frequently.


Continuing around clockwise, you come to my fabric storage and ironing/multipurpose work table.  Both this table and the cutting table were made from 'Metro Shelving" with custom made wooden tops (thank to my wonderful husband for those!).  The ironing table is 3/4" ply wood covered with batting and then muslin to give a firm pressing surface.


In the front left corner is the new shelf and desk unit.  Ikea rocks!  It was inexpensive and it works beautifully for my needs.  This area is where I keep my computer and it is also the journaling work area.


I have easy access to all of my tools and supplies and a nice large work surface.  Add to that the large window, giving wonderful natural light in the daytime and it's perfect!  I have used a couple of short tension rods to keep all of my gaffer's tape, coloured masking tape, etc. There is even space on top of the shelf to display some of my work.

This wonderful bookcase was picked up at a quilt store that was going out of business a few years ago.  Great bargain and fit's perfectly into that little nook beside the window!  I have two little office chairs on wheels.  One goes between the desk and this side of the sewing table and the other stays at the other side of the sewing table so that I'm not having to move them around too much and I can also have a friend over for 'play dates'. LOL


On this wall, I've hung a large drapery rod close to the ceiling.  I then got some ribbon and made loops in one end.  These hang from the rod so that I can displace some of my work as well as a few special items like the stained glass dragonfly my friend Sue made, and a blown glass ball that I picked up years ago.  Items can easily be pinned to the ribbon and changed out as desired.  You can see I'm also a fan of those plastic drawer systems you can pick up all over the place (wait for them to go on sale...they do regularly!).  I like that I can see through them and I also put labels on the drawers to help me find things quickly.


Back to the ironing/multipurpose work station, you can see that the Metro shelving provides great storage for plastic bins.  Again see through but also labelled.   On the front of that unit I've hung a long bungie cord that has two hooks on the ends (allowing me to hook it to each end of the table).  Using clothes pegs, I hang small things to dry after painting (that's a piece of painted tyvek and a wipe up cloth you see hanging there).  On top of the end of the ironing surface is a small, inexpensive white bookshelf that I use to house more little bins of 'stuff' for easy reach.  I also keep a large sheet of 6mm plastic handy so if I'm going to be doing any painting I can protect the surface of this table.  


If you look to the bottom left of this photo, you can see the white plastic waste basket.  This is another great perk of the metro shelving.  I was able to drill a couple of holes in the plastic bin so that I could attach hooks to it and hang it from the shelving.  It keeps it off the floor and at a better height for reaching it as I work.  


This corner houses the 12" shelving towers (again inexpensive and available on half price sales frequently).  They're the perfect size for larger pieces of fabric.  The labeled plastic shoe boxes on top hold small scraps of fabric, sorted by colour family.  There's also a space (about 10" wide) between this shelf and the vintage mail sorter (more about that shortly) where I store larger rolls of fabric (donated to me) and bolts (muslin and black) and batting.


Here it is!  My wonderful antique find.  This is a vintage mail sorter and when I saw it out in a field at an antique sale many years ago, I knew it would be perfect for fat quarters and such.  I've since also found some perfect little plastic bins (labelled unless still empty) where I keep wonderful found objects like vintage keys, bird feathers, etc. as well as other small things that I may need (eye droppers, etc.)


Here's a view of the sewing table from the 'correct' side.  The machine is sunken to table level and there are drawers for more storage.  Behind this is the salvaged white dresser and night stand (that my brother-in-law wanted to get rid of).  It's not quality furniture, but it serves it's purpose for storing all of my stabilizers, fusibles (Misty Fuse, Steam a Seam, etc.), dupioni silk, and yarn (all in labeled drawers...yes, I love my labeller and use it almost fanatically [insert crazy laugh here...]).


The 'wrong' side of the sewing table, with the fold out extension up, allows me to keep my second machine out and working all the time too.  As you can see, those plastic storage drawers on casters fit under it perfectly allowing for easy access to various other materials (like organza bits, tulle, etc. and some additional tools that I don't use as frequently.


 This final shot shows you all of the wonderful natural light I get during the day!  Since I've discovered that I am solar powered (Yes, Lucas, you nailed that one!) all of this bright light is really good for keeping me going!


Thanks for coming on a tour with me.  Now, lets see how long I can keep it looking this tidy...


Friday, April 27, 2012

What I Was Up to Today...

Sadly some sort of a computer glitch has caused all of the images in this post to disappear, and I am unable to correct the problem.  Sorry!
Back in February, I posted a tutorial about making your own washi tape.  Well, I was running low so it was time to make some more, but having had some time to think about it, I have made a few changes to the process.
I started by cutting my tissue paper into smaller, more manageable pieces.  I made them about 6 inches long and the width of 4 strips of my double sided tape, plus a tiny bit more for wiggle room.  I then put the four strips of tape, side by side, on the tissue paper.
Last time, I stamped the tissue before taping it (with not protection on my ironing/work surface) and you can see I have a permanent record of that day's efforts! LOL
Today I put the tape on the tissue paper first, which I found made the process faster and easier (and less messy).
I also lined my work area with newspaper, just in case, but with the tape on the back, the ink doesn't come through.


Here they are before and after I cut them apart.  Aren't all those wonderful colours just the best!

The other 'studio' time today was spent doing some tidying and organizing.  A few years ago I found this wonderful old post office unit at a big outdoor antique market.  I thought it was perfect for housing fat quarters, and smaller pieces of my hand-dyed fabric.  There are 90 little cubbies in the unit, so I've found there's room for some little bins of various art supplies too.  The glass doors keep the dust out but still let me see what I have inside.
 Today I got busy reorganizing and labelling those bins.  Here's a close up of some of those wonderful little bins of 'stuff'.
And my nicely filled bin of washi tape!