Showing posts with label hand dyed thread. Show all posts

Monday, May 26, 2014

Quilt & Fibre Art Festival...and the beginnings of something new...

This week is the Quilt & Fibre Art Festival of Waterloo Region and Beyond, and I'm excited to say that the Group of Eight Fibre Artists have a show in The Mill, 1441 King Street, St. Jacobs, ON. The show runs from Tuesday, May 27th until Saturday, May 31st.  We hope that you'll be able to come and see us there!

I was in need of a new project to work on, particularly since I wanted some hand stitching I could do while sitting at the show for my 'shifts'.  

I had just purchased a few new threads (12 wt. Spaghetti by Wonderfil) and I was inspired by their fabulous colours.  I went 'shopping' in my stash, pulling out out any and all hand dyed fabrics and threads as well as some batiks and purchased yarns I had that coordinated with those new threads.  

Then I went between the cutting table and the sewing machine and I started to play, intuitively piecing in very random strips, intentionally not cutting anything too straight (no ruler was used in the cutting).

Some of what I had found in my stash were some pieces of fabric that already had Misty Fuse on the back, so I used scissors to cut rectangles and squares (again not worrying about perfectly straight lines or perfect shapes) and I fused them in place along one of the wider strips. A bit of the black and white stencilled fabric from a journal cover project I recently did was still lying on my cutting table (sometimes it's good to not tidy too quickly LOL), so I added that as I went along.  

Here are some shots of where this is going so far.  I'm looking forward to adding the hand stitch!


Monday, May 5, 2014

Waste Not...

After cooking beets for dinner, I just couldn't throw out the beautifully coloured 'beet water' so I poured it into a glass and tried dyeing with it.
I pushed in a skein of crochet cotton, using a bit of wooden dowel to make sure the liquid saturated the entire skein and left if over night.
Then I decided to crumple up a paper towel and press it in to soak up all of the remaining liquid before pulling them both out to dry.

While wet, the colours were fabulous!!!


They did lighten up a bit once dry, but I still think they'll be really great in some future art. Maybe next time I'll forget about eating the beets and boil some fabric and threads right in the pot to really get a dark, intense beet colour...

I'll still have to make one pot for eating though since beets are so delicious!


I also finished the May calendar spread...


Friday, April 4, 2014

Embellishing the Text...

I last posted about this piece here, when I had added the text using painted fusible web. Well, I've finally found my way back to it (life's been getting in the way!) and I've now finished another step in the process. I've layered the batting under the top (no backing yet), and free motion stitched around all of the text to outline it.


As you can see, I've also begun the hand stitching on the text to add a little more texture and interest.  So far I've just finished the first word, but I'll catch up on some TV listening and hopefully get all of this stitching done in the next few days.  I'm using one of my hand dyed cotton threads for the stitching. Once all of the hand stitching is done, I'll add the backing and then finish the machine quilting.  By doing it this way, any 'messiness' that may result on the back from my hand stitching will be covered!


Monday, March 10, 2014

A Few More Threads and a Puppy Update...

For those of you that have been following me for a while, you'll know that I am a foster 'mom' to a future dog guide puppy through the Lions Foundation of Canada Dog Guides. Well, Dime turned 6 months old a couple of weeks ago, so I thought I'd share this with you so you can see how he's growing.  He's such a smart little fellow and is so very well behaved! I'm so proud of the little guy*!
(*I weighed Dime on Saturday and 'little guy' is 25kg/55lbs)


I've also got a few more hand dyed threads that we're still drying when I did  Monday's post so I thought I'd show you those too.  These are a slightly thicker thread, but I love the colours I've achieved, especially that last one.


Have a fabulous weekend!

Monday, March 3, 2014

The Beauty of Hand Dyed Threads!

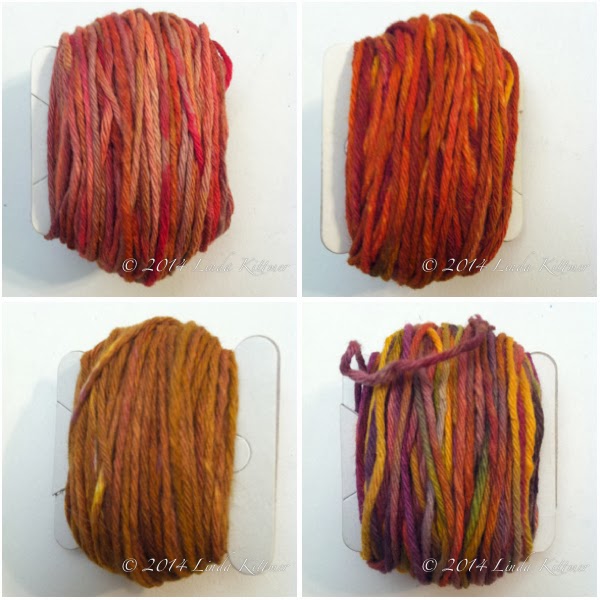
As you know if you've been following my blog, I've been having fun exploring snow dyeing lately.  Along with some fabric, I've been dyeing crazy amounts of cotton threads to use in my hand stitching.  I am totally in love with variegated hand dyed threads!  I make skeins of the threads for the purpose of dyeing it, but I find it easier to store and work with if I take the time to wrap it on the little cards usually used for embroidery floss.  This way, I can store them in my plastic, colour coded DMC floss boxes along with the floss and other hand stitching threads.

Without babbling on any more, let me just show you my newly dyed stash:


I've got an idea brewing in my head for a piece I want to start that will involve crazy amounts of hand stitch with my new stash of fabrics and threads, both from this last little batch and from the results of last summer's dyeing fun.

On a side note, my friend Kit Lang does some incredible art, often using painted paper towel.  Well Kit, here are all the paper towels that got dyed in the clean up or thread dyeing process.  You've inspired me to try to do something with it...I don't know what yet, but something!

Thursday, November 14, 2013

An Extra Post This Week...

Hi Everyone, I'm popping in with an extra post today to let you know I'm posting over on StencilGirl Talk blog today to share a quick little tutorial on how this "Stepping Stone" art quilt began.

I was inspired by a beautiful skein of thread and that led me to audition a bunch of my hand dyed fabrics and some batiks I had in my stash.  The tutorial shows how I used a bit of surface design using three incredible stencils designed by Terri Stegmiller. Please pop on over to the StencilGirl Talk blog to check it out!

This quilt is actually made up of five smaller quilts which were then aligned and stitched together with some areas overlapping.  After finishing the hand stitching that I've shared in posts here and here, I took the five pieces to the my studio for some machine stitching.


And here is the finished piece.  Unfortunately, the stitched design in the circles does not show up well in the photo.  It looks much better in person (In my humble opinion!).


Friday, September 13, 2013

And Along Came A Spider...

Well, it's finally done!  Each time I did some hand stitching on this piece, more ideas for additional hand stitching just kept popping into my head.  Ultimately, I've done way more hand work on this piece than I had initially expected to, but I just love how it turned out.  A bit of machine quilting/doodling and a few finishing touches (hanging tabs, embroidered binding and the fabric covered hanging rod), it's finally time to hang it and move on to other things.

I should tell you how it got it's name...I kept thinking it would be Indigo 'something', but nothing came to mind that made me happy.  Then one day, while looking at this section my husband said it looked like a spider web. I had done a lot of hand stitch in the darker areas, leaving the light lines created by the string or elastic bands that had bound the fabric during the indigo dyeing process.  They did indeed look a bit web like.  And then I saw the spider just sitting there (see him in the red circle?).  I did some machine stitching to further bring out the web and then hand stitched over the spider to make it pop.  So you see, one day the spider did literally just come along!                                                                                                                       
BTW, Michelle, the fabric was adhered to the hanging rod using the transparent Paverpol.  There, I've finally used some of it!

Wednesday, August 28, 2013

Guess What I've Been Doing...

If you guessed 'playing with Procion MX dyes', you'd be right.  I'm thrilled with the wonderful range of colours I've now got to work with in my art quilts for the next while! I'm especially excited by how well the cheese cloth takes the dye, resulting in fabulously brilliant colours.  I also made a bunch of skeins of cotton threads which I also included in the dyeing process, so I'll have all of these wonderful hand-dyed threads to use to embellish my work with hand stitch.

There are so many ideas running through my imagination for what to do with these and the indigo pieces I dyed earlier in the summer...I'm off to sew!

Saturday, January 19, 2013

Work in Progress

It's been a few days since I've posted so I thought I'd give you a peek at a tiny part of a piece that's a WIP.  It's a piece that I'm planning to enter into a juried show in April, so I'll hold off showing you the entire piece (once I finally finish it) until after I find out whether or not it's accepted.

I started by machine needle felting hand dyed scraps of batting with various layers of rovings, hand dyed cheese cloth, yarns and other bits and pieces of fibres.  I've added a lot of hand stitching as well as free motion machine work on top.  I'm now adding some beading and a whimsical little surprise embellishment.  I've been working on this piece, off and on, for two and a half years.  I've never considered it a UFO though.  It's always been on my mind and sometimes just had to rest for a while as I considered possible next steps.

Monday, June 4, 2012

Digitally Altered & Stitched

Two weeks ago I did a post about a photo I took and processed three ways (you can see it here).  I really liked the third version, so I printed it onto this woven fabric (you can read about that here), and then I started to add stitch and beads.  The colours are off in this first shot because of the light and time of night when I took it, but it shows the beginnings of the stitching and beading.  I let the print lead me and just kept adding to it until it felt like it didn't need anything more. 


 I used some DMC floss and some hand-dyed threads for both the embroidery stitches and the hand wrapped cords that I made.  I decided to create some more dimensionality by attaching the cording in such a way that it lifted up off of the surface.
It looks a lot different than the photo, but it was a fun little piece to work on.

Thursday, May 3, 2012

Pathways


This was such a fun piece to work on.  It started with an interesting piece of handmade paper that was created by wrapping some variagated fuzzy yarn around a frame.  The resulting piece of paper was dimensional and had an intriguing lacy texture.
After auditioning a few fabric choices I settled on some of my purple and blue hand dyed pieces to bring out the colour in the yarn used for the paper making.  I used a duel sewing machine needle to quilt some random pathways on the main background piece and then attached the paper using some more machine stitching.

From there I created some beaded lines that I had going in and out of the various holes in the paper.  Some additional lines of fabric were included and some accent buttons were added to them. 


I wanted an asymmetrical piece, so I added a few more pieces of the hand dyed fabric to create the piece that hangs down from the right side of the finished piece.  They were embellished with some accent buttons, coordinating threads and beads.  Finally, I added some hand stitching, using hand dyed variegated threads, to create some more pathways as well as added texture using the seed stitch and a few cross stitches on the smaller squares and rectangles.
 I love collecting interesting bits of wood when I'm out in the kayak in the summer, and I thought this one was perfect for hanging Pathways.

Thanks for visiting today.

Saturday, October 15, 2011

Some Recent Pieces

   It's been a while since I've been blogging regularly, mostly because I managed to escape life for a while and hide out in the quiet and solitude of the great Canadian north.  There is nothing like being surrounded by trees, water and wildlife to help one relax and focus on healing.  In addition to cycling, kayaking and dog walking, I did take along my art supplies and sewing machine so that I could enjoy 'art therapy' too.
   Here are a few of the pieces I've finished over the last few months:
Rorschachian View

What Lies Beyond?
The Galley


I also made an alphabet crib quilt to celebrate the birth of my newest great niece.  Isn't she adorable!
A is for Abigal.  

Wednesday, September 14, 2011

Salamander's Shadow

This piece began with fabric that I made using acrylic paint and stamps to create the surface design.  I then created a stencil of a stylized salamander which was done using Shiva oil sticks.  Inktense pencils where used to create the salamander's shadow.  To add some additional interest and texture I embroidered within the echoing quilt lines using a variety of hand dyed flosses and threads.