Monday, January 14, 2013

You Can Do Anything...

There's nothing we can't accomplish with the right support!

Kim's challenge in Beyond Layers today is to use her sample photo of tulips on a black background and process it any way we want.  We'll then link up and compare what we've all done.

Kim's original image
I did some cropping to bring the tulips closer, did a minor levels adjustment and added a very subtle texture (Kim's 1301) with a soft light blend mode at 30% opacity.  I positioned the text (the quote is my own) to follow the shape created by the flowers by putting each line of text on it's own layer and then used a soft green from the leaves as the text colour.  By giving the text a bevel, it lets the 'light' shine on the text to echo the light hitting the flowers.  Finally, I added a gaussian blur to the image, and used a layer mask to remove the blur from the single tulip to keep it in sharp focus while having the 'family and friends' blurred in the background.

Update (30 minutes later)... I've just played with the image a little more, added another layer of of the 1301 texture, this time at a normal blend mode, 100% opacity, and then using a soft round brush on the layer mask, I removed most of the texture to just leave a soft frame around the image.  I think I like this one better than the first.

Final Touches on the June Art Journalling Calendar

A couple of days ago I showed you the spread for June, in an almost finished state, and explained a little about my process.  
Since then, a few finishing touches were added, including writing in the ordinal number words for each of the dates and using Tombow markers to colour the top band on the journalling boxes.  I also put in a row of tiny black dots to separate the coloured bar from the area that I will eventually journal in.  I then added three silhouettes of birds and wrote in Happy Birthday Lucas, for my son, on the 23rd.


Sunday, January 13, 2013

Making Stencils

Since I've been doing more art journalling lately, and watching the videos that are part of  Creative Jumpstart 20113, I've become more interested in using stencils in some of my work.  In addition to buying some fun stencils, I decided to use some of the template plastic I had in my studio (and seldom use...) to make a few basic stencils of my own. 

I used a cutting mat, an exacto knife, a fine Sharpie marker and some scrap paper.  I found that with the lined template plastic and the marks on the cutting mat it was really hard to see what I was doing so by using a scrap of plain paper under the plastic I could see better.  You could also draw your design on the paper first if you wanted, but I drew right on the plastic with the Sharpie.
For the stencil shown here, I used a mug to trace a circle and then just used the lines on the plastic and cut away every second little strip to create a stripped circle stencil.  

This one is very simple and will just give me some straight lines and the final one is my version of what I think of as 'cottage signs'...those wonderful signs that you see on the dirt roads in cottage country directing you to all of the various cottages.  I guess it would be good for distance markers too.  

I know I'll still buy stencils I see and fall in love with, but it's also nice to be able to make some simple ones, especially onces with straight lines that are easy to cut, so that I have some which are uniquely my own.

Saturday, January 12, 2013

June Art Journal Calendar Spread

It's been a while since I did any art journalling, so last night I got out the paints, some stencils and other 'tools' and had a little fun.  This first image shows what I have done so far, with the little Post-It note squares (I cut them down to about 1.7") that I used as masks.  The word June and the numbers are Tim Holtz masks.

We have this wonderful recycling place called Waste Wise in town.  It's a huge warehouse full of wonderful 'junk' where you can pick up all kinds of interesting things for pennies.  I found this plastic 'thingy'.  My husband and I have no idea what it is intended to be used for*, but it makes a great paint stamp.  I often keep little lids to dip in acrylic paint and stamp, so when I saw this I though it would be fun to be able to stamp entire grids of circles!  If you look closely, you'll see the little black circles on my pages.  I love that they aren't perfect circles...randomness perfected ;o)

*I just couldn't let it go...enquiring minds...so I did some research and finally found out that these things are inserts for ammo cases.  I'm so glad I found a better use for it! 

The stencil I used is one by the Crafters Workshop.  I stamped over it using a make-up sponge (thanks to Creative Jumpstart for that idea...love it) and acrylic paint.  My final colour addition came from some spray inks that I layered over top before removing the masks.

I still plan to do some black pen work to the page, although I'm not entirely sure what I'll do... I certainly have to add numbers to the journalling squares and I might outline the letters and numbers...I'll post again when it's finished.

Thursday, January 10, 2013

Enjoy a Moment...

 I've treated myself to an early birthday present and upgraded to Photoshop Elements 11 (I had been using PSE9), so this evening I've been playing around with some photography.

Kim's challenge today in Beyond Layers was for us to take a photo that included a coffee cup, books and some other object.  Does anyone out there recognize what the blue disks are that are strung on an old shoe lace?

The books are old Ontario Public School books from the early 1900s.  The brown one makes me chuckle because it's all about hygiene!

The photo has a couple of Kim's textures layered over it.  They're called chaos and calamity, which is ironic since the photo gives me a very peaceful sense of calm...

I've included the 'before' pic so you can see what I started with.

BTW, the blue disks are Canada Rations disks for meat from the WWII era.

Rust Dyeing

I've always loved old rusty things...there's just something about their old, rustic look that I find charming.  And, as an avid cyclist, I see a lot of interesting rusty pieces of metal along the side of the road in my travels.

About a year ago, I read about rust dyeing and thought if would be fun to try.  I started carrying plastic bags in my bike's pannier, so I could collect the interesting bits of rusted metal that I'd see in my travels.  As a side note, there is a relatively large (about 14"-16" diameter) round 'thing' that seems to fall off of large trucks on a frequent basis!

I dyed one piece of fabric with some of my rusty bits and loved the result, but as with so many things, it got set aside and nothing ever came of it.
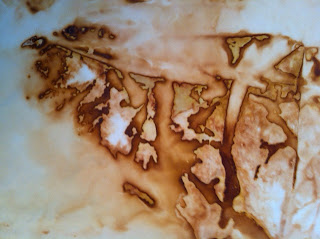
Then, last week I got an idea for an art quilt, partly in response to a call for entry that I read about in the SAQA newsletter, and I got out my collection of rusty metal and dyed some more fabric.

I just love the fun of opening up the piece after a couple of days and seeing what surprises it holds.  You have to check both sides because the results look different from each side and you therefore have a couple of choices as to which parts you will use in your art piece.
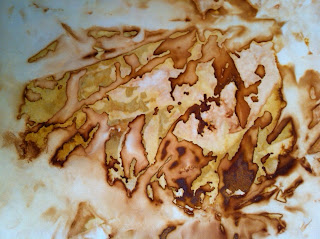
If you're interested in trying this, you just need some rusty bits of metal that you've scrounged up from somewhere, fabric, water and some white vinegar.  The acid in the vinegar speeds up the rusting.

Use relatively small pieces of fabric (fat quarter sized or there abouts) because if the fabric is too big you won't get the interesting designs on large parts of it.

I wrap the piece of metal in the fabric, put it into a plastic bin and then pour a 50/50 mix of water and vinegar over it to wet the fabric.  Let that sit for at least 24 hours.  You can check it to see how it's looking and then decide if you want to leave it longer.

Take out the fabric and rinse it well.  I continue rinsing until the water runs clear, and then I wash it in the washing machine to make sure I've got all of the residue out.

Keep the rusty pieces of metal because you can use them again.  I just put them on top of another piece of fabric (which will get rust marks on it too!  bonus!) and store them in a plastic bin until I need them again.

I wasn't sure about the long term effect on the fabric, but in last weeks episode of DMTV, Linda Kemshall was also talking about rust dyeing and she mentioned having a cushion that she made ten years ago using rust dyed fabric and it was no worse for wear.

Tuesday, January 8, 2013

Butterfly Transitions

The other day I gave you a sneak peek of this piece, in which I showed you some of the quilting from the back, as well as providing a link to the original photograph.

Since then, I've spent a few hours working hard to get the background machine quilted.  When that was finished I made a whole lot of French knots to add some additional texture to the dupioni silk that is the background of this piece.

And, here it is, finished and mounted over a stretched canvas.  I'm very happy with how it turned out, and wish that the photo did it justice.

Below are a couple of detail shots.  This finishes a fifth UFO.  I am so glad Tracey gave us the challenge that she did because I've really been tidying up a lot of outstanding pieces.  I still have four other UFOs to finish plus the three new pieces that I have in the works, all of which I started in the last month.

It's funny to think that when I first started to quilt in 1999 I did one quilt, from beginning to end, before I started another project.  Now, I can't imagine staying that focused on one thing!  Add in my art journalling and photography and I just have to laugh...


Sunday, January 6, 2013

From Photograph to Art Quilt...a sneak peek...

Back in April of last year, I took a photograph of a monarch butterfly and I digitally altered it in Photoshop.  You can see both the original photo and the altered one by clicking here.

I loved the colours in the altered photo so much that I wanted to use it in an art quilt.  I transfered the photo to fabric, went through my stash of fabrics and selected a number of pieces that I thought would work with it, sketched out a couple of ideas on paper, and then got busy with other things...

Finally, in October I got back to it and actually started working with the fabric and the image.  I wasn't happy with what I was coming up with, so again it was put aside so I could let my ideas 'simmer'.  Then came Tracey's GOE challenge for us to finish a UFO...which I turned into a personal challenge to try to finish all of my UFOs (or at least as many as I possibly could).  I've been working at the quilting of this piece for a few hours today, so I thought I'd give you a little sneak peak.  It still needs a lot more machine work and then some hand stitching, but I'm hoping to have it done by Wednesday evening, when our little group meets.

Saturday, January 5, 2013

Artful Random Act of Kindness Tags

The other day I, after watching one of the Creative Jump Start videos, I pulled out some tags, spray inks and stencils and played around a bit.  

Then I wondered what I would do with these little pieces of art and after thinking about it for a bit I decided to use them to make little RAK tags.  I continued to decorate them by adding some acrylic paint and when I liked how they looked I printed up some labels to stick to the back and added tassels.

 
Over the next few days, my plan is to give them out as I do some RAKs for people around town, and hopefully they will continue to make the rounds.


Wouldn't it be amazing if one found it's way back to me eventually?

Thursday, January 3, 2013

The Beautiful Towel

This week for Photo Art Friday,  Bonnie has challenged us to create a piece of photo art showcasing our guiding word for 2013.  
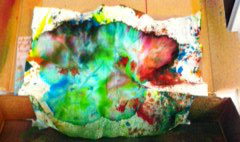
I've already shared my word in a previous post in which I was creating a journal page, and before that, in a photo post in which I explain my reasons behind it.  But this afternoon, as I was starting to do some backgrounds on a few tags using spray inks and stencils, my wipe up paper towel became so beautifully colourful that it inspired me to photograph it and play around with it in Photoshop.  After doing some minor adjustments I added my word, put a bevelled edge on the outside and here it is:


This paper towel may find itself in some other project too.  I see some stitching in it's future...