Thursday, April 4, 2013

Colours of Spring

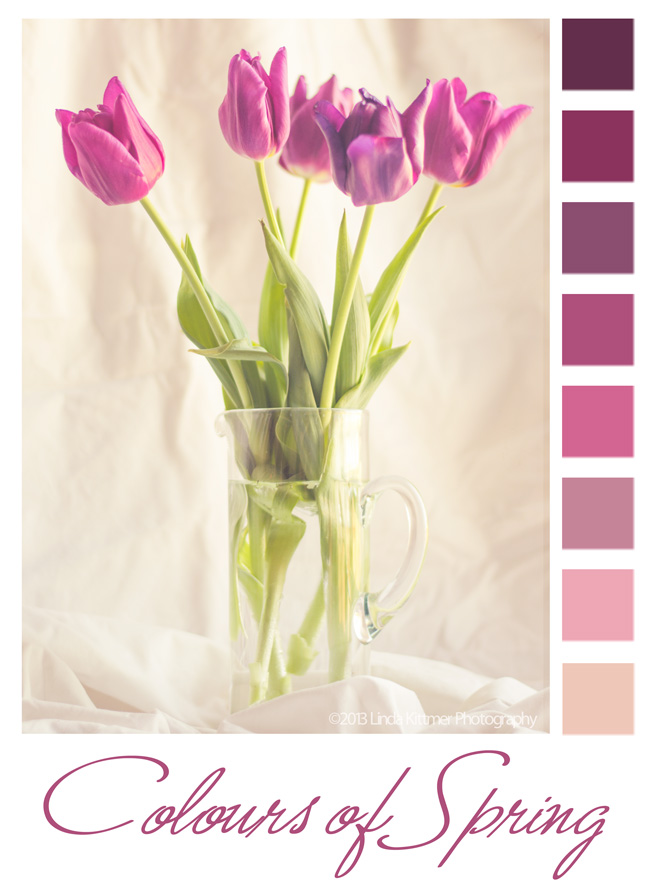
Today in Beyond Beyond or 2B as we refer to it, Kim taught us another, easier way to create colour palettes in Photoshop Elements.  I love creating these from my photos, and sometimes use them for inspiration in my fibre art or art journalling.
Raw image right out of the camera

I know I've told you this before, but I also love Lightroom 4!  It opens up so many incredible possibilities.  I've learned how to create my own presets, so that I can apply several steps of an edit to an endless number of photos.  Again thanks to Kim and 2B, I was able to create a preset today that would warm up an image and give it a bit of a hazy, dreamy effect.  The best part is that because I've created a preset for it, I can now apply that same effect the other images with literally just one click!

There are so many wonderful things that can be done when you combine the best of both of these programs.

Standing Cat Visits Toronto...


Sometimes you just have to play and sometimes all the elements just line up.

Element #1: A challenge...  Bonnie's challenge for Photo Art Friday this week is to create a collage.

Element #2: An idea...  A few weeks ago I send an email with the "mere cat" image to a number of family and friends.  My son responded by sending me with a list of about 8 or 9 links of images of the same cat in a variety of other places and scenarios, letting me know that there apparently are more where those came from.

Element #3: A photo...  On Saturday, while walking around in downtown Toronto, I took the above shot of the iconic Gooderham Building (also often referred to as the Flatiron Building) in the St. Lawrence Market neighbourhood.  As I continue to learn to use my camera out of 'auto' mode, there are sometimes some mistakes with focus, exposure, etc. (BTW, I did correct things and get a great, clear shot too).  I decided to see if I could have some fun playing with this image and the standing cat (although I see I got the wrong cat!).

Element #4: A concept...  I decided to make the cat a tourist visiting Toronto.  Thus the bag with the souvenir CN Tower inside, as well as a lovely big fresh fish from the St. Lawrence Market.  I was considering a classic Canadian touque or a Blue Jay's ball cap, but when I saw the good old 'cat in the hat' hat I just had to go with it.  I love the bright pop of red that it brings to the image.

Element #5: An inside joke...  My son is just finishing up his first year at U of T's Faculty of Law and something he told me on Saturday inspired me to find the law school logo and use it on the shopping bag that the cat is carrying.  I'm hoping this brings a bit of a smile to his face while he studies for the 6 gruelling exams he is facing in the next couple of weeks (now get back to work Lucas! =P).

Following last week's "graffiti' challenge, I just have to share this other image.  I saw this old mattress that someone had put out for garbage and it became a canvas for graffiti.  In an area where there was no other available large blank surface, this artist used what was handy!

Wednesday, April 3, 2013

Continuing to Make Slow Progress...

As I've been working on my Rust quilt, I'm finding just how much of a challenge it is to machine quilt rust dyed fabric.

I'm making slow progress, but I thought I'd show you a couple of areas that are now done.  I'm really happy with the look I'm achieving, but I can't tell you how many times I've had to rethread the machine because the rust is literally shredding my thread as I sew.


Fortunately I am now moving into some areas which are going to have hand stitching so I'll have a break from the machine work, at least for a while.


I was considering showing you more, but Arbour thinks I should make you wait until it's done...


Tuesday, April 2, 2013

Art Journal Calendar

I'm a couple of days late posting this, but I thought I'd post the March and April calendars as we move into the new month.

 I'm so glad I decided to start this art journal calendar.  I've always liked the idea of keeping a journal, but I just don't seem to have much to write.  This allows me a fun artistic outlet while capturing just a highlight or two of each day.  I'm sure it will be interesting to look back at these in the years to come!


Monday, April 1, 2013

Now and Then...Sort of...

On Saturday I went into the city to see my son, and of course my camera was in hand!  I just had to get a shot of a street car along Queen St. W.


And then I decided to play a bit and so it became an old photo...sort of...
I cropped it to take out the modern cars, but there's no denying that the streetcar itself, and the people's dress is current, so just don't look too closely.  Before adding the frame, I changed the photo to a sepia look and then added a layer of Kim's 'stamped right 1' texture at 70% soft light.  Sorry I can't give you more details on the processing, but I wasn't paying enough attention to what I was doing.


Linking up with Our World TuesdayTexture Tuesday, and Sweet Shot Tuesday

Saturday, March 30, 2013

Exciting News...

I'm excited to announce that "My Year Unravelled" has been accepted into the 6th ANNUAL OPEN JURIED SHOW at Beaux-Arts Brampton.

The show, which runs from April 9th to May 4th, will consist of work in any two or 3 dimensional media with the exception of photography (for which they have a separate show in May).  For more information about show times or other participating artist, click on the image below.

Friday, March 29, 2013

'Egg'-citing Tutorial

Yesterday afternoon I dyed some Easter eggs and I thought I'd share how I did them.  This would be a fun activity to do with your kids or grandkids, or just by yourself :o)

Let's start with what you need:

Eggs (keep the carton)
Crayola crayons
a tea towel
paper towels
food colouring
vinegar
water
6 little custard cups
6 teaspoons

My trick for timing perfect hard boiled eggs is to carefully put the eggs into a pot of cold water.  Put the pot on the stove and turn on to high heat.  Wait until the water comes to a full boil, then put the lid on the pot and turn off the heat. Set a timer for 20 minutes and let eggs sit in the hot water until the timer goes off.  When the timer goes off, carefully pour as much of the hot water out of the pot as you can without dumping the eggs.  Then run cold water over the eggs, continuing until the water in the pot is cold.  Let the eggs sit in the cold water for a while (10 minutes or so) to stop the cooking and to cool them down.  Once the eggs are cool enough to easily handle you're ready to start decorating.

Using your crayons, doodle/draw simple designs on the egg shell.  I kept the eggs on a tea towel to give them a bit of a cushion and also to keep them from rolling off of the table as I was colouring.
Here are my eggs with the colouring step complete.  Notice I did everything from simple dots and stripes to flowers, spirals and zig zags.  You might also want to write names on the eggs.  Anything goes!
The next step is to prepare your food colouring.  I used Wilton Icing Colours this time, but in the past I have also used the liquid food colouring available at the grocery store with equally successful results.  Just remember that the Wilton colour paste is highly concentrated, so a little goes a long way.


I used the six colours I had, so I prepared a little custard dish for each colour.  To protect my counter top, I put a sheet of paper towel on a plastic tray and put the dishes in the tray.  I added a tiny scoop of the food colour paste to water in which I had added a bit of vinegar (about 1 tbsp vinegar to 2 cups of water).  The vinegar helps the egg shell to absorb the colour better.


As you can see in this photo, I did not fill the dishes very full.  The 2 cups of water was enough for the six little custard dishes.  This saves having to use too much food colouring (always trying to be economical).

Once you lower the egg into the dye, you'll need to carefully rotate the egg in the dye with the spoon to ensure it dyes evenly all over.  When you're happy with the colour (it will only take a few seconds) carefully lift the egg out of the dye and let it rest for a few minutes on some paper towel to absorb the excess dye.  Be careful to use a clean area of the paper towel to avoid unwanted spots of other colours on your egg.
For most of the eggs I dyed them in only one colour, but as you can see with this one, I decided to experiment.  I first stood the egg in the orange dye, holding it up with my fingers (be prepared to get coloured fingers!...it did mostly wash off after a few washings.).  Next I stood the opposite end in the green dye.  Then I gently wiped it with a paper towel to take off any excess dye before putting the whole egg into the yellow dye for a short time, rotating it with the spoon as above.  To get the smaller bits of blue and purple on the top and bottom, I held the egg in a teaspoon of the desired dye so that just the end would be in the colour.  If you plan to do some experimenting, I would do this at the end because you do risk cross contaminating the dyes and therefore may not be able to get the pure original colours again.
I store the finished eggs in the original egg carton in the fridge  for safe keeping until I'm ready to serve them up in a pretty Easter basket.

DO NOT dump your food colouring dye yet...


Because I hate to waste beautiful colour, I grabbed 6 pieces of white fabric (fat quarter sized) from my studio and wet them.  I then wrung them out, crumpled them and put them into sealable plastic bags.  I poured one of the food colour dyes into each bag, sealed it up and then gently squished it around until the dye penetrated all of the fabric.  I set the bags into a basin and I'll let them sit for about 24 hours (I'll flip them over ever few hours when I think of it).  They will then get a rinse and I'll heat set them with my steam iron and they'll be ready to use in my fibre art!

Thursday, March 28, 2013

Street Art...


Whether a mural or graffiti, isn't it all art?

Linking with Photo Art Friday and Ready to Waltz.

One of Those Days...

Do you ever have one of those days where you just can't seem to machine quilt...the fabric seems weighed down or something and you're struggling to move it around through the machine with your regular ease?  Well, that's the sort of morning I'm having!

Let's take a closer look at why...


Yes, it would appear as though Arbour has again found the newest 'cat bed' that has obviously been put in the studio for her personal pleasure and comfort!
But, being the horrible person I am, I will have to move my little assistant because my wishes to work on this piece trump her need for yet another comfortable place to sleep!

Wednesday, March 27, 2013

Liebster Award for Cool Blogs


Joanna Grant from http://joannabananadesignoriginals.blogspot.ca/  kindly gave me a blog award that's about discovering new blogs.

Joanna, I can't thank you enough for this award.  I feel very privileged that you have included me in your five choices and it is an honor that I hope to pass on to five other very deserving artists.


ABOUT THE AWARD 

This award was designed to be a blog award in the pay it forward fashion. Once you've been nominated, you award it to five blogs that you like that have fewer than 200 followers, to encourage new visitors to visit these blogs. 

RULES FOR ACCEPTANCE 

Thank the person who gave you the award and link back to their blog. Post the award onto your blog. Give the award to five bloggers who you appreciate that have fewer than 200 followers. Leave a comment on their blog letting them know that you have given them this awesome award! 

PAY IT FORWARD

It's hard to choose only five bloggers who I find inspiring but here are my choices of art blogs that have less than 200 followers and that I know you will enjoy:  

Anne Marie Desauniniers  http://artfuldreamer.blogspot.ca/


(I may have included a blog with over 200 followers as the number of followers was not always listed but I still felt that these individuals were very deserving.)

Recipients, you may copy and paste to your blog and change the introduction and the list of blog awards.  I hope that you decide to participate and award some other very deserving artists.  Make their day!!!

Cheers!
Linda