I could definitely get used to doodling with a paintbrush. This is another spread that I started at the Decorative Doodling class. As you can see at the top half of the page, I really got into a bit of a tiny spiral trance. I was loving how the 'Twinks' layered so beautifully and the different tones of that fabulous green (Twinkling H2Os Olive Vine) that I was getting depending on the amount of paint on my brush.
When the paint was dry I added some outlining and doodles with a black Pitt pen and then added a 'sketchy text' quote by Frank Zappa. "A mind is like a parachute. It doesn't work unless it is open." True story! LOL
Showing posts with label Twinkling H2Os. Show all posts
Showing posts with label Twinkling H2Os. Show all posts
Sunday, February 24, 2013
Saturday, February 23, 2013
Pearl Pen Doodling
Here are the two Pearl Pen doodles I started at Saturday's Decorative Doodling class. This was a lot of fun, but it will take some practise to write with the Pearl paint pens. You've got to keep moving at a steady pace, without touching the page or you get globs and ridges in the paint. I added the doodles using a Pitt pen before painting with 'Twinks'. I do love the shimmer in those watercolours with the mica!
Thursday, February 21, 2013
Finishing Up Some Decorative Doodles
On Sunday I posted about the Decorative Doodling class I took with Joanne Sharpe and I showed you the doodles I had started. You'll never guess what I've been working on this week. LOL
Here are the first two I have finished. I really love the upper right part of the top page. I think the left side of that one got a bit too busy and 'heavy' compared to the right side.
Looking at the bottom image, I've decided that if I plan to add colour I need to keep the petals on the flowers simpler. It looking fine as a black and white doodle, but when I started painting them it just got crazy. Maybe it's also my colour choice. I do like the little coloured 'pebbles' (bottom rt corner and left side), and I like the contrast of the black and white stripes and checks with all the colour on the page.
Wednesday, February 20, 2013
Art Tags...a Little Something from Nothing
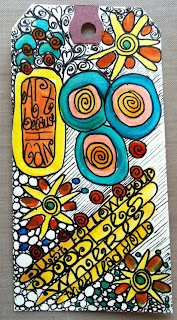
 When I'm working with either watercolour or acrylic paint these days, I like to keep a couple of blank tags on my desk. Instead of wasting the paint that's on my brush when I want to change colours, I doodle with the brush on one or both of the tags to use up as much of the paint as I can. I end up with some interesting backgrounds and then later, I can add some doodles and lettering with a black pen to finish the tag.
This first tag was made using Twinkling H2Os or Twinks as they're often called. I was working on some of the pieces I started on Saturday night.
I've also been playing around with writing with my glue gun (a lesson in the Letter Love 201 class). I had a package of sparkly glue sticks in gold, silver, red, blue and green, so I thought I'd see what the gold and silver looked like using this technique. I must say, I think I prefer the control I get from the dimensional Pearl Pens, and they seem to result in a very similar look, but the one neat thing the glue gun lets you do is create a dimensional word on your not stick mat and then pick it up and use it as an embellishment on another piece. The Pearl Pens may work for this too, but I'll have to experiment to be sure. The glue gun glue certainly dries quickly which is a real bonus!
 While painting some of these with Silks acrylic glaze, I was again cleaning my paintbrush on a couple of blank tags. You can see the painted tags on the right of this shot.
 After doing some sewing, I went back and added some doodles to the tags using Pitt pens in black and silver, and a white Signo pen. So far, I think I'm liking these tags more than the glue gun words, but I'll have to reserve judgement until I figure out how I'm going to use them in an art journal page.
And finally, here's a page I created using one of the glue gun words. I did the word on a navy blue card stock and then lay it over the white journal page before spraying it with a copper Perfect Pearls mist. I then moved the dark card stock out of the way and sprayed some bright yellow Dylusions ink onto the page. I off set the card stock so that it would give me a bit of a bright highlight along the lower edge and to the right. I added a quote in that space. Finally I used a star shaped hole punch to cut the stars in the card stock and then I glued them randomly around on the yellow paper. I found that the gold glue gun glue didn't show up as well as I hoped so I added a bit of a highlight using the white Signo pen. It actually stands out quite well but I couldn't seem to get a good shot that does it justice.
Monday, January 21, 2013
And Then It Popped...
Yesterday I showed you another watercolour paint doodle I was working on and today I got out my Microns and Pitt pens and added some black doodling over the paint.
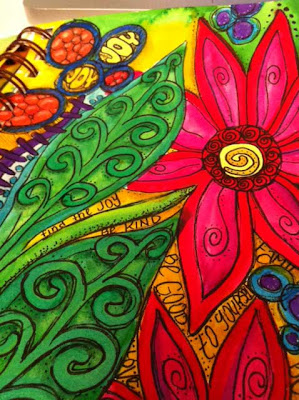
I just love how it makes it pop. I've also added some additional dimension using my Inktense pencils to add some shading and highlights here and there.
The final step was to add the words and since the image ended up reminding me of a garden path, that lead to the words I chose. In hindsight, I wish I had written the text in larger, bolder letters, but what's done is done.
If you look at the close ups, you'll also see that I added some text, using a Micron 01 between the leave and petals on the right hand page too.

It was fun drawing the little pebble circles within the larger circles. I love doing that when I free motion stitch so I decided to add it in my doodle too.
The photos don't really show it, but I love the contrast between the regular watercolours and the Twinkling H2Os. It just give a bit of glimmer and pop to some areas.
Thanks for your visit. I don't say it enough, but I really appreciate you taking the time to stop by! Have a fabulous week!
Sunday, January 20, 2013
More Watercolour Doodling
Several days ago, I posted about my first attempt at paint doodles and I said that I was way out of my element. However, I'm discovering that this is really a lot of fun. As I was working (playing) with this one, I found I lost all track of time, in a good, relaxing sort of way.
For those of you familiar with Joanne Sharpe's 'Color Love' class, this is lesson 11, so the next step will be getting out my Pitt pens and Inktense so that I can doodle over the doodles with fine black lines and add another level of depth with the Inktense. I love the idea of adding the layers...
But, it's 4 degrees C here today (that's 39F for my US friends), which is crazy for mid-January, so I'm off for a long, lazy walk with my 'little old lady', Casey (my 12 1/2 yr. old Golden). I'll post another shot of this when I get the next step finished.
Monday, February 13, 2012
Going Around in Circles
Today, again thanks to the Letter Love 101 online class, I've been playing around (pun intended, LOL) with journaling in circles. I did a few practice circles, to create a page in my practice journal so that I could add notes to remember what I've learned and jot down some ideas for use in the future.
 |
| Click on photo to see a larger image. |
I did this first one on one of the extra pages from an altered book I did a while ago. I like the extra layer that the text provides, but it was not ideal when using the Silks acrylic glaze because I was using a lot of water and the paper wanted to curl up. It dried fine, but was a bit tricky to work with. I might use a very light coat of gesso in future (as I did in the altered book) so that the text still shows through but any paint would have a primed surface. I recently won the Silks Acrylic Glaze by leaving a comment on Luminart's blog - lucky me :0). Coincidentally they posted a great video today showing Twinkling H2Os (might need to get me some of those!) and the new Silks.
 The next two circle journals were done on bristol board using Copic markers to add some colour. I experimented with black text, anding some pops of colour, as well as coloured text. I did add a layer of the Silks in a golden colour (it's called Ginger Peach - don't you love that name?)
After all the practise, it was time to use my new found skills. My husband and I had a good laugh over my choice of words since I am not into shoes at all. However, I thought it would be fun to draw and then the words just came.
Subscribe to:
Posts (Atom)


