I am having so much fun with these eyes/faces. There's nothing as fun as doodling with a sewing machine! Here are the next few faces I've finished.
I can't wait to get back into the studio to do more! An idea is beginning to brew in the back of my mind for how I might use these in a larger piece.
Friday, November 29, 2013
Wednesday, November 27, 2013
Painting Fabric and Thread Sketching Explorations...
I've been spending little bits of time in the studio, when I can fit it in, to paint some fabric. I started with recycled cotton bed sheets and left over pieces of muslin and used a selection of acrylic paints to achieve these wonderful, warm greys.
You may remember from a previous post of some of my photography, that I have a thing for eyes. I think my husband think I'm crazy sometimes because we'll be watching TV and I'll suddenly be commenting on how incredible someone's eyes are...it's especially odd when it's an episode of Income Property or some such thing. LOL
Anyway, that preoccupation with eyes has prompted me to do a study of eyes. I've decided to explore people's eyes by thread sketching them using black thread on this newly painted fabric. Here's my first one. There will hopefully be many more to come. This is a perfect, quick 'art fix' that I can easily fit in during puppy naps. Needless to say, I can't yet take Dime into the studio so I have to fit in my studio time when he's snoozing!
Monday, November 25, 2013
Sunset Silhouette...
I've been working on a lesson by Kim Klassen in Beyond Beyond, in which she taught us how to make 'magic' textures by inverting a texture and then adding some adjustment layers. I used Kim's 'kk_dollard_grunge' texture to create my magic version and then used it over this image to add a bit of texture to the silhouette.
Friday, November 22, 2013
I'm Grateful to be Participating in a Blog Hop Featuring Terri Stegmiller's StencilGirl Designs
It's time for another great StencilGirl Blog Hop, this time featuring Terri Stegmiller's designs and you guessed it, the theme is Grateful!
These days I'm grateful to have the honour of raising a future dog guide foster puppy. He's been keeping me busy these days, so I wanted to create a journal page that I could doodle on, a little at a time, when I got the chance.
I used two of Terri's stencil designs: Waves and Layered Salad.
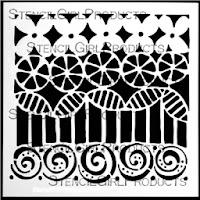

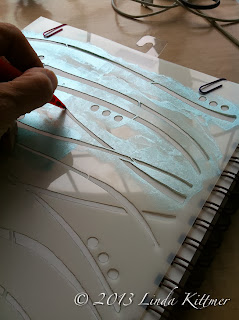 Working in my 9" X 12" Strathmore Mixed Media Visual Journal, I started by tracing the Waves stencil using pencil. I often jump right in with pen, but this time I thought I'd lay everything out in pencil first, and then when I find time I'll do the pen work while listening to TV.
I added the quote by writing it between those wonderful lines created by the stencil.
With the text in place, I reached for the Layered Salad stencil and filled in the empty spaces around the edges with whimsical flowers made using the various design elements in this stencil.

The rest of the pencil lines were also traced with the black pen.
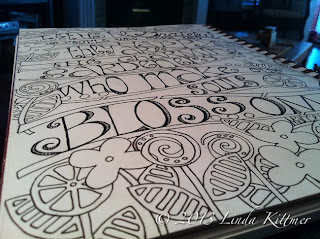
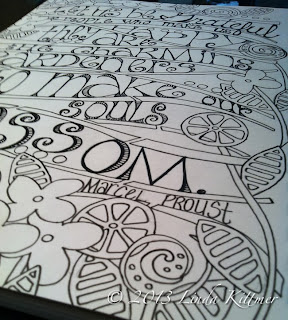
And I'm ready for some paint. I decided to use acrylic for this page. I use a very fine brush and water down the paint so that it flows almost like watercolour paint.
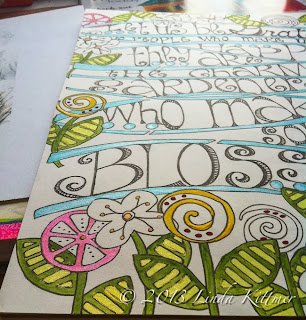
After adding colour to all of the elements, mostly using some shimmery metallic paints, I pulled out a silver Pitt pen and added some shadows.
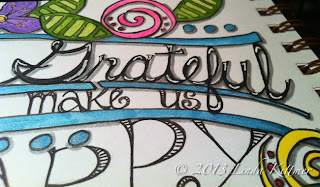
Don't you just love that wonderful quote by Marcel Proust?!
These days I'm grateful to have the honour of raising a future dog guide foster puppy. He's been keeping me busy these days, so I wanted to create a journal page that I could doodle on, a little at a time, when I got the chance.
I used two of Terri's stencil designs: Waves and Layered Salad.


 Working in my 9" X 12" Strathmore Mixed Media Visual Journal, I started by tracing the Waves stencil using pencil. I often jump right in with pen, but this time I thought I'd lay everything out in pencil first, and then when I find time I'll do the pen work while listening to TV.
I added the quote by writing it between those wonderful lines created by the stencil.
With the text in place, I reached for the Layered Salad stencil and filled in the empty spaces around the edges with whimsical flowers made using the various design elements in this stencil.

The next step was to use a permanent black pen (I like Microns and/or Pitt pens) to embellish the letters as I traced them in black, adding extra thickness and some tiny lines to fill in the fatter sections.
The rest of the pencil lines were also traced with the black pen.


And I'm ready for some paint. I decided to use acrylic for this page. I use a very fine brush and water down the paint so that it flows almost like watercolour paint.

After adding colour to all of the elements, mostly using some shimmery metallic paints, I pulled out a silver Pitt pen and added some shadows.

Don't you just love that wonderful quote by Marcel Proust?!
There's a giveaway on the StencilGirl Talk Blog and
all comments left on the ENTIRE hop
are eligible to be picked as the winning comment.
Giveaway will close on Sunday, November 24th at 11:59PM Central Time.
Blog Hop Order
Linda Kittmer-you're here...thanks for coming!
Wednesday, November 20, 2013
Shadows Revealed...
Monday, November 18, 2013
The Last of the Fall Colour...
On the weekend, while out in the garden, I shot these images of the last bit of colour left in the yard. Although most of the leaves have fallen, and those still clinging to the trees are mostly a sad brown, there is still a bit of pretty colour to be found in a couple of spots in the garden. I took these rather quickly, with my iPhone, and unfortunately the focus is not the best. I do love those wonderful berries on the euonymus . The colour and shape is so interesting. The wine/green leaves are from my fragrant snowball bush...it smells divine when it's in bloom in the spring! And the barberry bush is rapidly loosing it's leaves, but those still on the bush are a wonderful variegated pink/burgundy colour.
"Here are some of the commands I know...okay, I'm just kidding about that last one, but a puppy can dream can't he?"
Linking up with Texture Tuesday.
I thought you might enjoy an update on Dime too. He's doing great and he's never too far from Casey! He is such a clever little fellow, learning so much everyday. Happily, at 12 wks he's reliably housebroken (actually was a week ago already!) and we haven't had an accident in the house since his second week with us.
"Here are some of the commands I know...okay, I'm just kidding about that last one, but a puppy can dream can't he?"
Linking up with Texture Tuesday.
Thursday, November 14, 2013
An Extra Post This Week...
Hi Everyone, I'm popping in with an extra post today to let you know I'm posting over on StencilGirl Talk blog today to share a quick little tutorial on how this "Stepping Stone" art quilt began.
I was inspired by a beautiful skein of thread and that led me to audition a bunch of my hand dyed fabrics and some batiks I had in my stash. The tutorial shows how I used a bit of surface design using three incredible stencils designed by Terri Stegmiller. Please pop on over to the StencilGirl Talk blog to check it out!
This quilt is actually made up of five smaller quilts which were then aligned and stitched together with some areas overlapping. After finishing the hand stitching that I've shared in posts here and here, I took the five pieces to the my studio for some machine stitching.
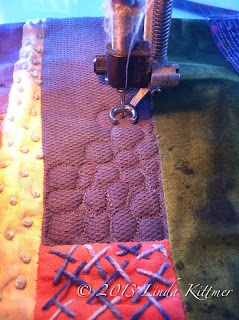
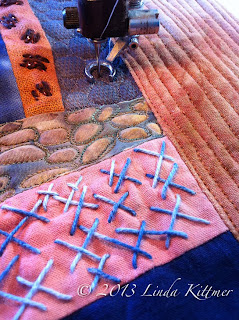
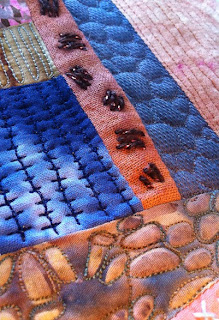
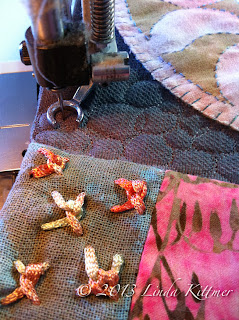
And here is the finished piece. Unfortunately, the stitched design in the circles does not show up well in the photo. It looks much better in person (In my humble opinion!).
I was inspired by a beautiful skein of thread and that led me to audition a bunch of my hand dyed fabrics and some batiks I had in my stash. The tutorial shows how I used a bit of surface design using three incredible stencils designed by Terri Stegmiller. Please pop on over to the StencilGirl Talk blog to check it out!
This quilt is actually made up of five smaller quilts which were then aligned and stitched together with some areas overlapping. After finishing the hand stitching that I've shared in posts here and here, I took the five pieces to the my studio for some machine stitching.


And here is the finished piece. Unfortunately, the stitched design in the circles does not show up well in the photo. It looks much better in person (In my humble opinion!).
Wednesday, November 13, 2013
A Simple Solution...
This piece is back on track. Last week I showed you the stitching I had started in the shadow areas, and I was saying that it wasn't working for me. Well, it turns out I just needed to lengthen the stitch and put it on a 45º angle to achieve the texture I want, with enough contrast to show up. This stitching should be done soon (I hope) so that I can get to the machine quilting of the background.
I'll be back with an extra post tomorrow, to reveal the finished piece that I've called 'Stepping Stones'. If you're a new follower, it began with a skein of thread as inspiration and then involved a lot of hand stitching that you can see here and here.
Have a great day!
Monday, November 11, 2013
A Blog Hop Featuring StencilGirl and Foam Board Express
Today I'm participating in a blog hop with StencilGirl and Foam Board Express.
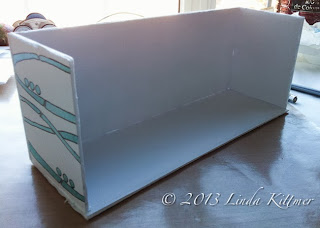
 I've been meaning to come up with an organizer for all of my pens, pencils, scissors, etc. that I want to keep easily accessible on my desk so I designed one using foam core board, decorated with Terri Stegmiller's Waves stencil.
Since I didn't have a sharp blade for my utility knife, I decided to try cutting the foam board with my paper cutter (guillotine). Although it did slightly crush the edge (not visible in the finished project), it gave me a good clean cut and made it fast and easy to get the pieces the size I wanted.
I cut 2 pieces for the sides (11" X 4.5"), 1 piece slightly narrower but the same length (11" X 3.5") for the bottom, and then 5 pieces (4.5" X 3.25") for the sides and inner dividers.
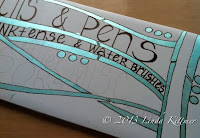 Using a metallic turquoise acrylic paint and a make-up sponge, I stencilled part of the waves stencil onto the front, back and side pieces. I used a 0.8 Micron pen to outline the stencilling and to add some text to the front.
I glued the bottom edge of the front piece and then attached it to the edge of the bottom piece so that the side sat flush with the edge of the base. The pins are stuck in through the the base and into the foam of the front piece (be careful to push them in straight so they don't poke through the paper layers). I pin about every inch along the entire edge.
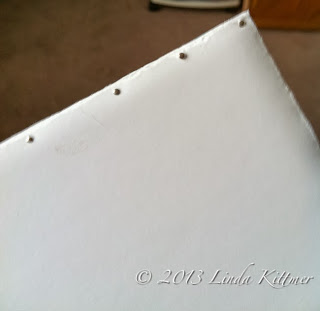
Apply glue to the bottom and front edge of one of the sides. Place flush with the bottom and front pieces, and again pin to secure. If any glue shows, wipe excess away before it dries, to avoid clear lumps of glue (especially on the outside).
You now need to do some measuring and draw a few pencil lines so you'll know where to put the pins for the inner dividers. I made a mark along the edge at 5.5" to mark the centre, and then 2.75" from that centre line, to mark the quarter line. You need to mark these lines on the inside of all three 11" pieces, and on the outside of the base and back pieces.
Draw in the pencil lines along the base, both inside and out, and the inside of the front piece. These lines will allow you to position the dividers accurately, as well as figure out where to put in the pins. Note, I didn't want pins all along the edges in front, so I only pinned the top and bottom and relied on the glue to hold the rest. I did pin from the back all along the edge though since it didn't have the text decorating it.
Once all of the dividers are in and pinned from the bottom as well as anchored at the top and bottom edge of the front, it's time to add the final piece.
Put a bead of glue all along the top and side edges of the dividers and side pieces, as well as along the bottom edge of the back piece. Place it so that it sits on top of the edge of the base and tight against all of the dividers and sides. Making sure that the sides and dividers are covering the lines you drew so that you know they're in the correct position, and then go ahead and pin to secure it all. Once the glue dries it will be good and solid!
And here's what it looks like filled up and in place at the corner of my desk.
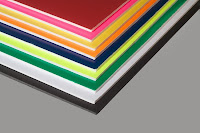 Foam Board Express would like to offer a package of five (5) of its 20-inch by 30-inch flat display foam boards, including one black foam board, one white foam board and three additional foam board sheets in colours chosen by the winner. Colour choices include: green, red, yellow, dark blue, neon yellow, neon orange and neon pink.
Don't forget to hop on over to the next stop on the blog hop and leave a comment!
 I've been meaning to come up with an organizer for all of my pens, pencils, scissors, etc. that I want to keep easily accessible on my desk so I designed one using foam core board, decorated with Terri Stegmiller's Waves stencil.
Since I didn't have a sharp blade for my utility knife, I decided to try cutting the foam board with my paper cutter (guillotine). Although it did slightly crush the edge (not visible in the finished project), it gave me a good clean cut and made it fast and easy to get the pieces the size I wanted.
I cut 2 pieces for the sides (11" X 4.5"), 1 piece slightly narrower but the same length (11" X 3.5") for the bottom, and then 5 pieces (4.5" X 3.25") for the sides and inner dividers.
 Using a metallic turquoise acrylic paint and a make-up sponge, I stencilled part of the waves stencil onto the front, back and side pieces. I used a 0.8 Micron pen to outline the stencilling and to add some text to the front.
One the decorating was done, it was time to assemble the pieces. I used PVA glue and regular straight pins to put it together. The glue holds it long term, while the pins hold it until the glue dries and then give it a bit more stability (think mini rebar)
I glued the bottom edge of the front piece and then attached it to the edge of the bottom piece so that the side sat flush with the edge of the base. The pins are stuck in through the the base and into the foam of the front piece (be careful to push them in straight so they don't poke through the paper layers). I pin about every inch along the entire edge.


Apply glue to the bottom and front edge of one of the sides. Place flush with the bottom and front pieces, and again pin to secure. If any glue shows, wipe excess away before it dries, to avoid clear lumps of glue (especially on the outside).
You now need to do some measuring and draw a few pencil lines so you'll know where to put the pins for the inner dividers. I made a mark along the edge at 5.5" to mark the centre, and then 2.75" from that centre line, to mark the quarter line. You need to mark these lines on the inside of all three 11" pieces, and on the outside of the base and back pieces.
Draw in the pencil lines along the base, both inside and out, and the inside of the front piece. These lines will allow you to position the dividers accurately, as well as figure out where to put in the pins. Note, I didn't want pins all along the edges in front, so I only pinned the top and bottom and relied on the glue to hold the rest. I did pin from the back all along the edge though since it didn't have the text decorating it.
Once all of the dividers are in and pinned from the bottom as well as anchored at the top and bottom edge of the front, it's time to add the final piece.
Put a bead of glue all along the top and side edges of the dividers and side pieces, as well as along the bottom edge of the back piece. Place it so that it sits on top of the edge of the base and tight against all of the dividers and sides. Making sure that the sides and dividers are covering the lines you drew so that you know they're in the correct position, and then go ahead and pin to secure it all. Once the glue dries it will be good and solid!
And here's what it looks like filled up and in place at the corner of my desk.
After organizing that area of my desk, I decided to make a little divider for one of the cubbies in this shelf. Now instead of a 13" cube, I've got some shelves within it to organize some of the smaller bins and things. Notice I left enough space at the side so the ATC display case can still stand at the side of that space. It was constructed in the same way, using glue and straight pins. By adding a back, although not really necessary, you get that much more stability.
 |
| Before |
 |
| After |
And now, check out these great prizes...
INCREDIBLE PRIZE PACKAGE:
Foam Board Express is giving away:
 Foam Board Express would like to offer a package of five (5) of its 20-inch by 30-inch flat display foam boards, including one black foam board, one white foam board and three additional foam board sheets in colours chosen by the winner. Colour choices include: green, red, yellow, dark blue, neon yellow, neon orange and neon pink.
and
StencilGirl is giving away:
All comments on all blogs eligible. Combined prize going to one winner.
You can check out Foam Board Express on their website and their FaceBook page and they've also launched a Pinterest site.
Don't forget to hop on over to the next stop on the blog hop and leave a comment!
Linda Kittmer-You Are Here
Leslie Tucker Jenison-Your next stop on the HOP
GIVEAWAY (ends Thursday November 14th @ 11:59PM Central Time
Subscribe to:
Comments (Atom)
