Showing posts with label water soluble stabilizer. Show all posts

Thursday, June 18, 2015

Amanda McCavour Workshop: Culminating Project...

After creating several samples while working on exercises in Amanda McCavour's workshop (see them here and here), it was time to start work on our 'big' project.


I decided that I wanted to use a range of neutral colours. I've included a couple of in process shots of the piece at the sewing machine. Because you work with the fibres trapped between layers of water soluble stabilizer, it's very easy to stitch...no threads and bits to get caught on as you sew!


I put the piece up on the design wall (stabilizer still in place) for a while to decide where I wanted to go next. Then, after adding a little more machine stitch using the ivory coloured thread, I rinsed out the stabilizer and hung it to dry.


In this final shot, I'm auditioning it on a loosely woven piece of fabric that I may use as the backing fabric for the piece. I plan to add some hand stitch and possibly some beading or other embellishments and then mount it on a stretched canvas frame.


Wednesday, June 17, 2015

More Thread Lace Exploration...

After making many of my sample pieces during the Amanda McCavour workshop, I decided to play around with a realistic thread lace version of Wafer, my future dog guide puppy.
I had this picture of Wafer on my iPhone, so I put a piece of Fabri Solvy over the screen on my phone and traced it with a black pen.

Working from light to dark, I started stitching the foundation of the piece. At this point, the black lines you see are only drawn onto the water soluble stabilizer.
Shading was added using the darker thread, and then the black thread was added to outline the piece and add the facial features, etc.

I didn't get pictures, but when I washed out the solvy I lost an eye, and part of the shoulder area had a hole...not enough connecting threads (which you can see if you look carefully).

After some additional stitching to repair as needed, I again rinsed
out the Solvy and this time I had a cute little puppy to hang from my rear view mirror in the car. A fun little exercise that taught me a few things and now makes me smile whenever I'm in my car.

Monday, June 15, 2015

A Week With Amanda McCavour!

I spent the first week of June in a fabulous week long workshop with the incredibly talented Amanda McCavour.  If you ever get a chance to take a workshop with Amanda I highly recommend it.  In addition to being a talented artist, Amanda is a lovely person and a great teacher!

The workshop was all about using water soluble stabilizer to create thread lace. What fun!

This sample piece was a bit of an experiment gone wrong...I was not intending to make a creepy, very dense spider web. But, when cut up and reworked I created a fun flower that I quite like.


I really like where these random, free form doodled leaves are going, and I have plans to continue with them to create a larger piece with that in the future. My thoughts right now are for some sort of a vessel, but we'll see...


This is another piece that was reworked a couple of times. The first shot shows me stitching in the thread grid to support the pieces I had cut up from the original piece (sorry, I forgot to get a picture of it).

You can see the rinsing process and I wash out the water soluble stabilizer once the thread work was finished.
 

I then added some scrim bits and the text...perhaps to be used as an embellishment on a journal cover.

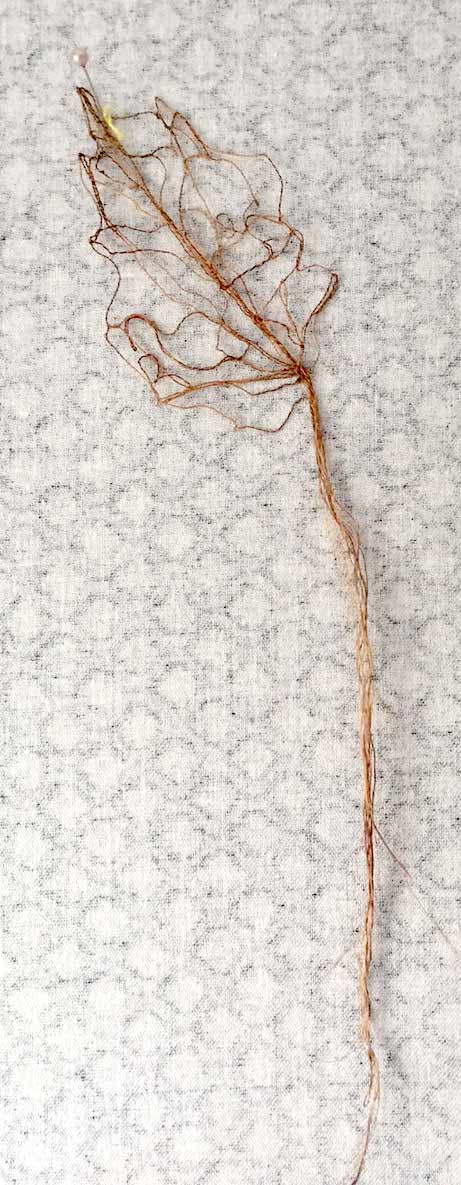
This leaf was another sample, this time to experiment with just how minimal I could go with the thread and still have the piece work.

I just love the incredible shadow that was cast in the late afternoon sun!
 For this sample I was playing around with laying down interesting bits of yarn before machine doodling connecting circles to create the structure that would hold it together. Again, the second shot shows the wonderful shadow cast later in the day.
This final sample was done using Japanese rice paper. I love the pattern in the paper, and because of the long fibres in this type of paper, it sews well. The exercise was to cut holes into the piece and then sew connecting threads within the spaces. I can see some interesting potential for using this technique in future work!

Sunday, April 14, 2013

A Treasure Map

"Searching for Serenity" is the treasure map art quilt that resulted from a funny bit of dupioni silk that my friend Heather gave me a few years back after she had done some dyeing.  It was actually her wipe up cloth, and the colours and shapes in it called to me to do some hand stitching.  If you'd like to know more about it's progress, you can read about it here (original post showing the dye stained silk), here (showing the extensive hand stitching), and here (where I posted about adding the machine stitching).  

As I completed the the machine stitching, the hand stitched areas seemed to rise from the surface and I watched as a treasure map emerged.  Jean noticed this too, and even commented on it in a previous post!  Free motion pebbling was used to add additional depth and texture, allowing the islands to rise from the sea, and the sea to flow out into the border of the quilt before changing to a linear echo of the flowing water.  I did free motion machine embroidery on water soluble stabilizer to create the pirate ship and the compass rose.  The island names are small metallic pieces with words engraved into them, including the word Serentity...the ultimate destination.


Friday, February 10, 2012

From Paper Sketch to Fibre Art...

I've been so absorbed in my Letter Love 101 online class that when I went in to my studio my sewing machine kept giving me dirty looks. Okay, maybe I was imagining that, but it  did look sad and neglected.  Well, I figured out a great way to make everyone happy - keep practising my lettering and give my sewing machine some loving (come on, it is February!) via thread sketching.  
I started by sketching out the alphabet using pen and paper (one of the exercises in the Letter Love course).  As soon as I saw this exercise I knew I wanted to do it in thread!

 The next step was to trace the letters onto a water soluble stabilizer.  I like to use "Wet N Gone" by Floriani because rather than being like a shiny plastic type of material that many such wash away stabilizers are, this one looks and feels like a soft interfacing.  Don't let the product photo fool you - it's enclosed in plastic to keep it dry for obvious reasons.


I'm now ready to give that sad sewing machine some quality time :0)  I chose a neutral coloured fabric that has a subtle mottled appearance and an slightly coarser texture because I wanted the background to be an interesting base for the stitching.  That fabric was layered with batting and backing as you would for any quilt.  The stabilizer is then put on top and I took the whole 'sandwich' to the machine,  Now for the thread sketching fun!
Using an open toe foot and setting the machine for free motion stitching, I started by tracing around the letters and filling in the negative space between them.  I use any thread in the top and Bottom Line thread in the bobbin.

As you can see, I decided to add some swirly vines which were drawn directly onto the stabilizer and then thread sketched as I did with the letters.


Here's what it looked like once the thread sketching was done.

Fun Fact:  According to Anita from Cotton Mills Threadworks you can wind about 102 yds (93 m) of bottom line onto a bobbin.  Based on that, for this project I used about 600 yds (558 m) of thread!  Needless to say, since I like using black thread, I buy it in cones not little spools ;0)
Now for a little magic.  I run the piece under cool water in the sink and I keep swishing it around until all of the stabilizer is washed away.  This literally takes seconds.  I rinse it a little longer, but because this is an art quilt I don't stress - the remains of the stabilizer actually gives it a bit of a stiffening effect.  If you're using this for a traditional quilt (I thinking a cute addition to a crib quilt maybe) you want to rinse it longer to get all of the stabilizer out and get back the original softness.


I hung the piece in my studio to dry before pressing it, trimming it to square up the edges and then I used a free motion ziz-zag stitch to finish the edges.  I free motion stitched on my signature and...
 ta da!