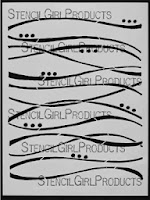
 I've been meaning to come up with an organizer for all of my pens, pencils, scissors, etc. that I want to keep easily accessible on my desk so I designed one using foam core board, decorated with Terri Stegmiller's Waves stencil.
Since I didn't have a sharp blade for my utility knife, I decided to try cutting the foam board with my paper cutter (guillotine). Although it did slightly crush the edge (not visible in the finished project), it gave me a good clean cut and made it fast and easy to get the pieces the size I wanted.
I cut 2 pieces for the sides (11" X 4.5"), 1 piece slightly narrower but the same length (11" X 3.5") for the bottom, and then 5 pieces (4.5" X 3.25") for the sides and inner dividers.
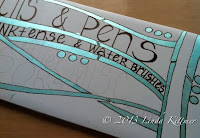 Using a metallic turquoise acrylic paint and a make-up sponge, I stencilled part of the waves stencil onto the front, back and side pieces. I used a 0.8 Micron pen to outline the stencilling and to add some text to the front.
One the decorating was done, it was time to assemble the pieces. I used PVA glue and regular straight pins to put it together. The glue holds it long term, while the pins hold it until the glue dries and then give it a bit more stability (think mini rebar)
I glued the bottom edge of the front piece and then attached it to the edge of the bottom piece so that the side sat flush with the edge of the base. The pins are stuck in through the the base and into the foam of the front piece (be careful to push them in straight so they don't poke through the paper layers). I pin about every inch along the entire edge.
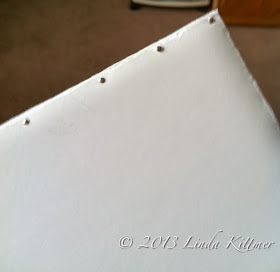
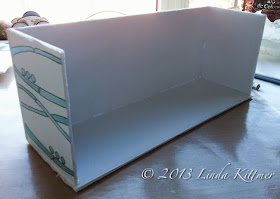
Apply glue to the bottom and front edge of one of the sides. Place flush with the bottom and front pieces, and again pin to secure. If any glue shows, wipe excess away before it dries, to avoid clear lumps of glue (especially on the outside).
You now need to do some measuring and draw a few pencil lines so you'll know where to put the pins for the inner dividers. I made a mark along the edge at 5.5" to mark the centre, and then 2.75" from that centre line, to mark the quarter line. You need to mark these lines on the inside of all three 11" pieces, and on the outside of the base and back pieces.
Draw in the pencil lines along the base, both inside and out, and the inside of the front piece. These lines will allow you to position the dividers accurately, as well as figure out where to put in the pins. Note, I didn't want pins all along the edges in front, so I only pinned the top and bottom and relied on the glue to hold the rest. I did pin from the back all along the edge though since it didn't have the text decorating it.
Once all of the dividers are in and pinned from the bottom as well as anchored at the top and bottom edge of the front, it's time to add the final piece.
Put a bead of glue all along the top and side edges of the dividers and side pieces, as well as along the bottom edge of the back piece. Place it so that it sits on top of the edge of the base and tight against all of the dividers and sides. Making sure that the sides and dividers are covering the lines you drew so that you know they're in the correct position, and then go ahead and pin to secure it all. Once the glue dries it will be good and solid!
And here's what it looks like filled up and in place at the corner of my desk.
After organizing that area of my desk, I decided to make a little divider for one of the cubbies in this shelf. Now instead of a 13" cube, I've got some shelves within it to organize some of the smaller bins and things. Notice I left enough space at the side so the ATC display case can still stand at the side of that space. It was constructed in the same way, using glue and straight pins. By adding a back, although not really necessary, you get that much more stability.
 |
| Before |
 |
| After |
And now, check out these great prizes...
INCREDIBLE PRIZE PACKAGE:
Foam Board Express is giving away:
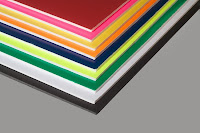 Foam Board Express would like to offer a package of five (5) of its 20-inch by 30-inch flat display foam boards, including one black foam board, one white foam board and three additional foam board sheets in colours chosen by the winner. Colour choices include: green, red, yellow, dark blue, neon yellow, neon orange and neon pink.
and
StencilGirl is giving away:
All comments on all blogs eligible. Combined prize going to one winner.
You can check out Foam Board Express on their website and their FaceBook page and they've also launched a Pinterest site.
Don't forget to hop on over to the next stop on the blog hop and leave a comment!
Linda Kittmer-You Are Here
Leslie Tucker Jenison-Your next stop on the HOP
GIVEAWAY (ends Thursday November 14th @ 11:59PM Central Time


Cool creations! I'd love to win some of this foam board stuff :).
ReplyDeleteStay inspired!
Thanks Michelle. Good luck in the draw.
DeleteLoved your penholder, thanks for sharing!
ReplyDeleteThanks Ruth. I'll certainly keep my desk organized!
DeleteAh, foam board is so versatile. I love the way you put your text on it.
ReplyDeleteYes it is Muriel. Thanks.
DeleteI love the idea of sculpting with the foam board. I usually think of it as a 2d media. Thanks for the great idea!
ReplyDeleteThank you. I find it great for this sort of use. And I'm thinking custom gift boxes for special gifts at Christmas too.
DeleteI love your pen and pencil pot - I could do with one too!
ReplyDeleteThanks!
Thanks Gill. You sure could!
DeleteJust found your blog. Great ideas...always looking for inspiration for storage, using stencils/journalling, new techniques etc. Would love to win. Thanks
ReplyDeleteSo glad you found my blog. Enjoy the hop and good luck in the draw!
DeleteThis is a great custom box!
ReplyDeleteThanks. It's simple but very useful.
DeleteThat's some serious boxage there, Linda. What a great project. Love it.
ReplyDeleteThanks Judy. This should help keep my desk organized!
DeleteWonderful project Linda!
ReplyDeleteYou are right- great minds do think alike! Love how it turned out- and the stenciling on the front is fabulous!
ReplyDeleteThanks Carolyn. I may have to add some washi tape to the corners or something to 'fancy it up' after seeing your beautiful creation!
DeleteI luv boxes.This is a great idea!
ReplyDeleteThank you Elle.
DeleteGreat lettering, cute idea Linda. xox
ReplyDeleteThanks Corinne. I learned a lot of great lettering tips from Joanne Sharpe!
DeleteThis is way too cute. I love what you created.
ReplyDeleteThanks Monica.
Deletea great creative way to organize-love it!
ReplyDeleteThanks Linda. I love to stay organized!
DeleteLove your organizer - and the pins as "mini rebar". Thanks
ReplyDeleteDianne West
Thanks Dianne!
DeleteWhat a great use for foamboard!
ReplyDeleteThanks Tina.
DeletePerfect organising. Love that foamboard.
ReplyDeleteThanks Jo. Foamboard is really great for this sort of thing...inexpensive and easy to work with!
DeleteI hadn't thought about using pins as rebar for foam core. That's a great idea. Lovely project. And why doesn't someone invent the perfect foam board knife - never needs the blade changed. Or did I just miss that tool?
ReplyDeleteThanks Linda. I love your idea for a perfect foam board knife!
DeleteFirst things first! I have been meaning to tell you how much I love your blog header!!! So pretty!!!
ReplyDeleteSecondly, I LOVELOVELOVELOVELOVE your pencil holder. The way you wrote your words inside the waves is cool! I love making organizers and MUST HAVE this foam board!!!! TFS!
Thank you so much Barbara, for all the love! Good luck with the draw!
DeleteI love your pencil/pen/marker/everything holder - great idea! Really like your decoration too! Thank you!
ReplyDeleteThanks Heidi. It's really working to keep me better organized!
DeleteThis is exactly what I need for my many sets of Markers! Thanks.
ReplyDeleteThanks. Although, this is just for a few things I keep on hand. All the Tombows, Paint Pens, etc., etc. have other organization. There's just too much 'stuff' to keep it all right there on the desk. LOL
Deletethank you so much for your awesome creation, i loved it. and sure would love to try to make it. i have stuff all over the place that sure do need organizing. thanks for the idea and the chance to win. xoxo
ReplyDeleteThanks. I'm glad I could inspire you. Good luck in the draw.
DeleteThis is a great project! I just might have to give this a try!
ReplyDelete...Raine
Thanks Raine. Good luck in the draw...you just might win the supplies you need to get started.
DeleteMore and more good ideas coming from
ReplyDeletethis hop! Nice colors,too!
Thanks Nancy. I always love hopping to all the stops to see what everyone else has done too!
DeleteNever would have thought to use foam core in this way... And I live the stencil too!
ReplyDeleteGlad to have given you another idea for using the foam core.
DeleteFelicidades por tu creatividad. Me encanta ese uso de los dos productos. Un éxito!
ReplyDeleteGreat organizing ideas. and the pins as "rebar" is very cool. This is great hop. So many different ideas and talents.
ReplyDeleteThanks. Yup...gotta love 'mini rebar'!
DeleteVery fun! I love it!
ReplyDeleteThanks Leslie.
Deleteawesome- love your finished product!
ReplyDeleteThank you Ruthie.
DeleteAnother great use for the Foam board.
ReplyDeleteThanks Denise.
DeleteI especially love the metallic acrylic paint!
ReplyDeleteThanks. It's one of the Martha Stewart craft paints.
DeleteOh love these ideas! And that stencil, so awesome!
ReplyDeleteThank you Suzanne.
DeleteI love the organizer! Great idea.
ReplyDeleteThanks Holly. One step closer to better organization in my studio!
DeleteWow! Just like that, you have an awesome new organizer!! Love it!
ReplyDeleteThanks Deborah. And yes, it was a pretty quick and easy project.
DeleteWhat a sweet organizer for your art tools, Linda!
ReplyDeleteFabulous!
And of course I LOVE that metallic turquoise! :)
Thanks Mary. The paint is one of Martha Stewart's craft paints. I picked it up on sale at WalMart.
DeleteAwesome organizer, Linda! That stencil is perfect!
ReplyDeleteThanks Cat.
DeleteGreat project! Thank you for the detailed step outs. Love the turquoise and your lettering is awesome too.
ReplyDeleteThanks Jessica.
DeleteGreat storage container and shelf idea. I love the doodle work on the storage container. Great work and thanks for the chance to win the giveaway.
ReplyDeleteThanks Billie. Good luck in the draw.
Deletegreat idea -and I like that it has a bottom!
ReplyDeleteThanks Sharon. Yes, with the bottom I can pick it up and move it easily.
DeleteStraight pins! LOVE it!!! and the shelves!
ReplyDeleteThanks Maria. This has inspired me to make even more organizational dividers for a couple of the other sections in that shelving unit.
DeleteGreat organizational idea...and that paint...so yummy. Thanks for the idea.
ReplyDeleteThanks Rita. I'm glad you like it. Good luck in the draw.
DeleteSmart! and looks good too!
ReplyDeleteThank you Sandy.
DeleteWhat a marvelous idea!!!! I bought a silverware caddy to hold some of my pens and love it, however haven't found another one like it. Now, it doesn't matter because I am going to make one of foam board!!! Thanks for sharing!!!
ReplyDeleteThanks Randell. I'm glad you like the idea. Have fun making yours.
DeleteLove suggestions for ways to organize my stuff!
ReplyDeleteThank you Cindy.
DeleteWOW, great project! I could use a holder like that! Great instructions, thanks. Now I just need to win that fabulous prize so I can make a few of those holders for my pens and paintbrushes:)
ReplyDeleteThank you. Have fun making some of your own...and good luck in the draw.
DeleteLove it! Need to get some foam board to attempt one of these!
ReplyDeleteThanks Nydia. Maybe you'll be the lucky winner in the draw.
DeleteThis is too cute! Love the design! Could use an organizer like this!
ReplyDeleteThanks Jean.
DeleteCute doesn't even begin to cover this! It's SUPER brilliant and well designed and executed. Thank you SO much for sharing.
ReplyDeleteMade a unit to hold my stamp pads and stamps......used hot glue. It has held together well and is very strong structurally. Like your pen holder (this may replace the water pipes that currently hold my pencils and brushes.). Love the artwork❤️
ReplyDeleteThanks Robin. I'm thinking I need to make a few more too!
DeleteI am grateful for learning so many techniques using these stencils. This is so much fun.
ReplyDeleteThanks Diana. I'm so glad you're enjoying the hop!
DeleteI really like your blog, and the project was very cute! I'd LOVE to win the package of foam boards!!!
ReplyDeleteThank you Peggy. I'm glad you found me. Good luck in the draw.
DeleteGreat project! Just thinking about using the cutter was inspiring. I love when we get hints that help us. I think the cutter is faster and the crushed sides didn't matter in the end.
ReplyDeleteThanks Sandy. And yes, depending on what you're planning to do with the foam board, the cutter is perfect. If you try this, just remember to cut with the same side up each time so the slightly crushed edge is always on the same side. It actually springs back up for the most part anyway.
DeleteThanks Sandy. Terri's Waves stencil is great for writing on wavy lines!
ReplyDeleteLinda, such a cool idea for a container! I love it! love that turquoise pen too!
ReplyDeleteThank you Jackie. It's actually Martha Stewart acrylic craft paint, not a turquoise pen at all. However, I'd love to have a paint pen in that colour!
DeleteWhat a cool project! Great use for the foam board and the stenciling looks awesome!
ReplyDeleteThank you. I'm pleased with how it turned out and it does keep my desk tidier!
DeleteThis is a GREAT organizer. I can see making/using one next to my sewing machine to keep my tools together. Thanks for the idea.
ReplyDeleteThanks Lynne. Have fun making yours!
DeleteLove Love Love your work! Thanks for sharing
Deletewhat a fantastic idea, thanks for showing how to do!
ReplyDeleteThank you. I'm glad you liked the post and the hop.
DeleteWonderful storage bin and so easy to customize. Thanks for sharing!
ReplyDeleteThank you Tina. I'm glad you like it.
Delete